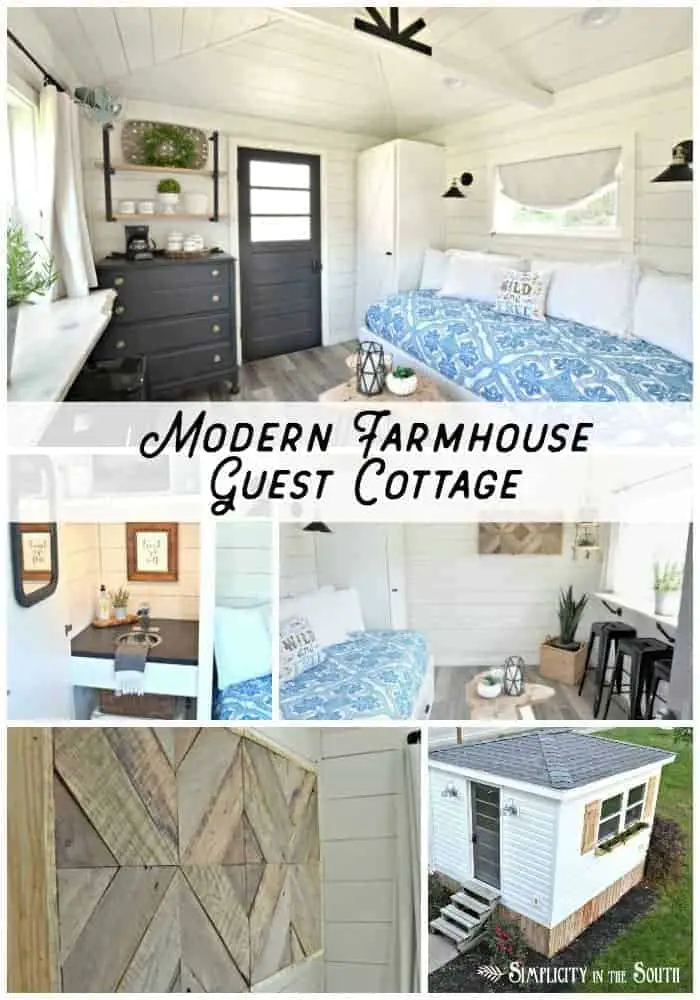
One Room Challenge: The Modern Farmhouse Cottage Guest Shed Reveal
It feels SO good to shout it and officially announce it. It would have been kinda awkward shouting, “Sorry guys!!! We gave up the middle of last week!”. I wouldn’t dream of giving up this late in the game. Especially since this past week has been all about adding the final details that make our cottage guest shed feel like a home. I can’t wait to show you all the work we put into our tiny 10′ x 12′ shed.
If this is your first time here, welcome! Here’s where you can catch up on the past week’s happenings:
And now, I’d like to share the time-lapse video we did during the whole shed remodeling process. We’ll be following up with a video tour of the cottage to answer some of the most frequently asked questions and to show all the details. You can follow us on YouTube here.
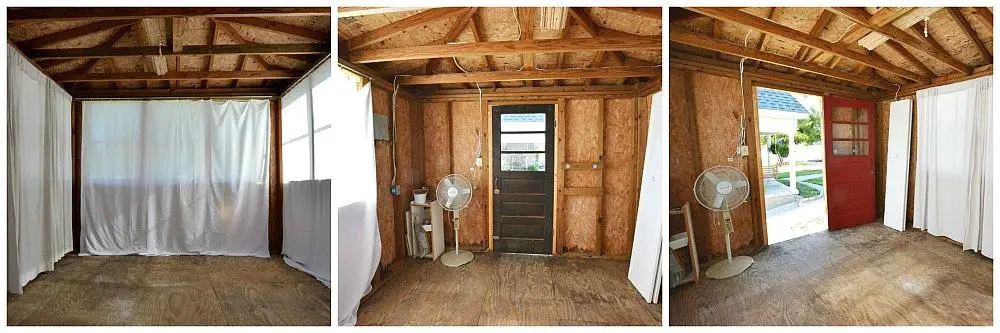
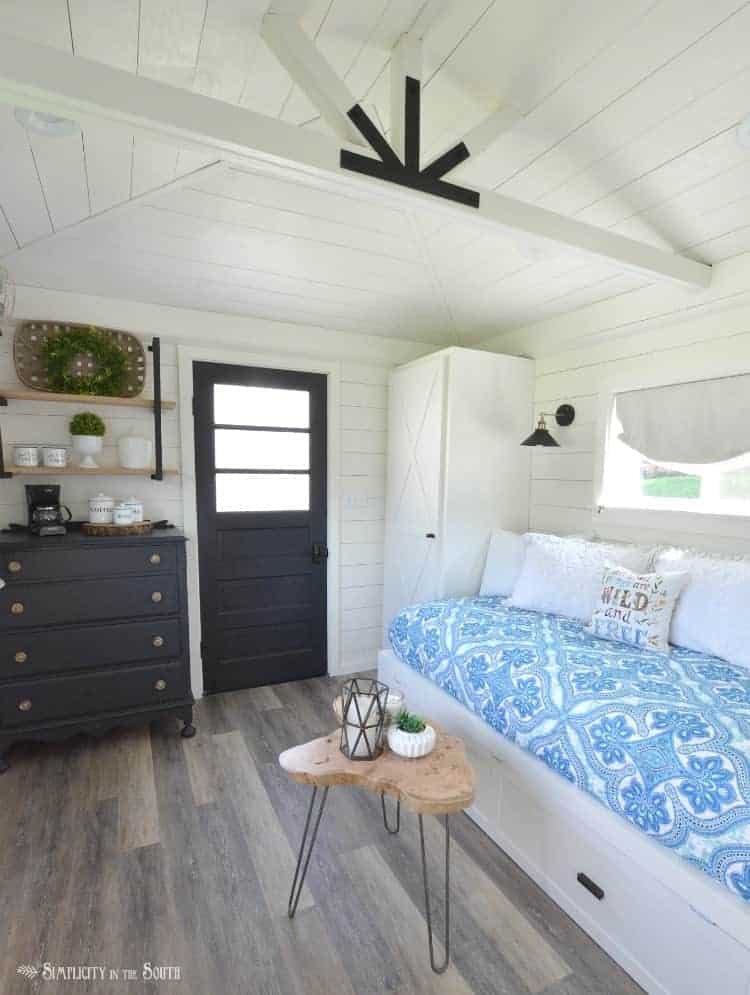

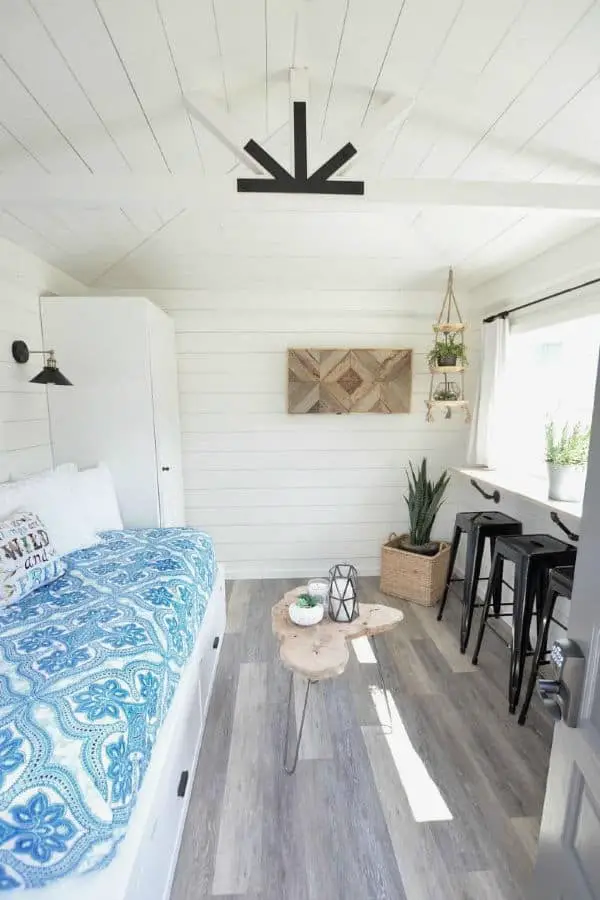
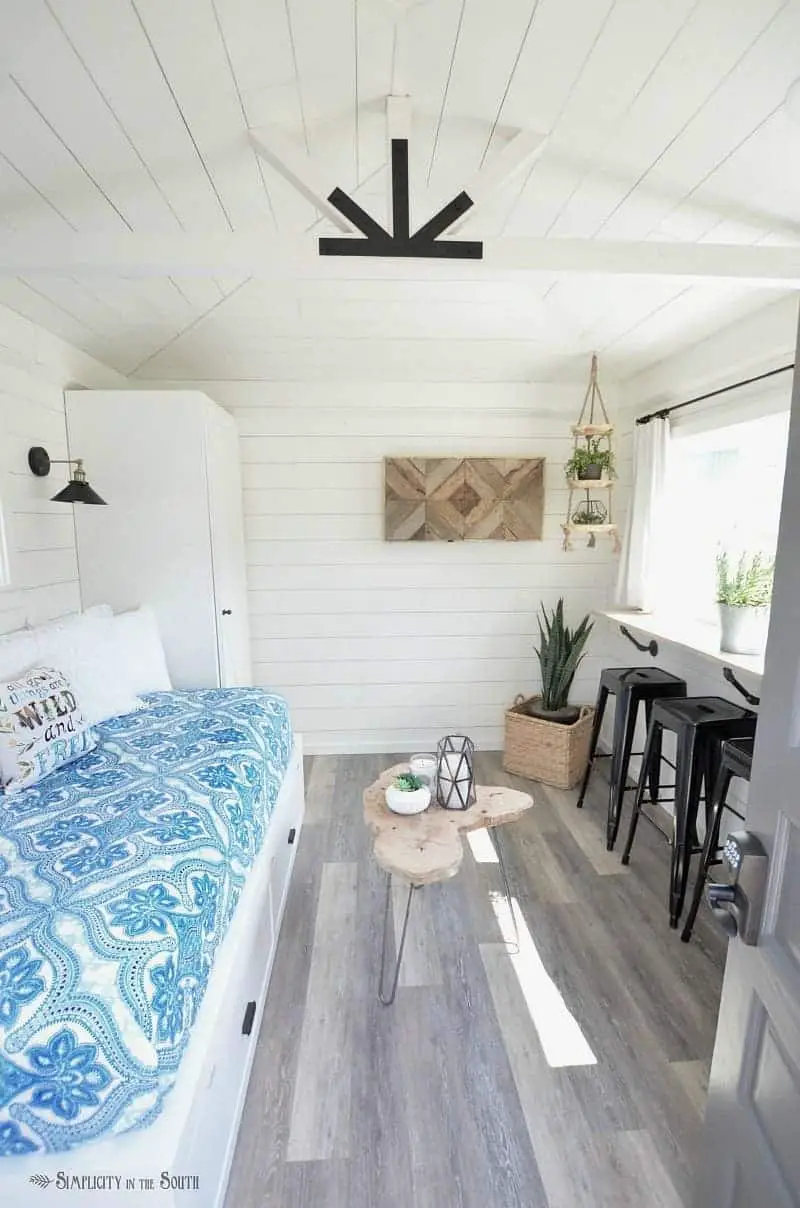
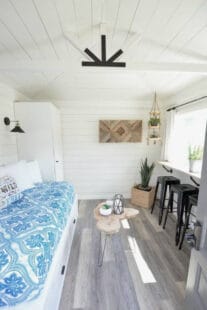
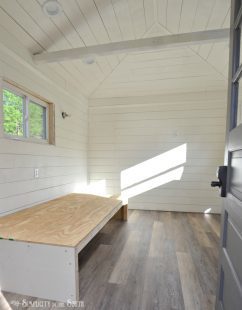
The most time-consuming part of this job was done the first 2-1/2 weeks as we installed new windows, reconfigured the wiring, insulated and then put up faux shiplap on the walls and ceiling. The trick to putting faux shiplap over the studs with no drywall behind it is in ORC week 3’s post. It really gives the room the cottage vibe I was going for.
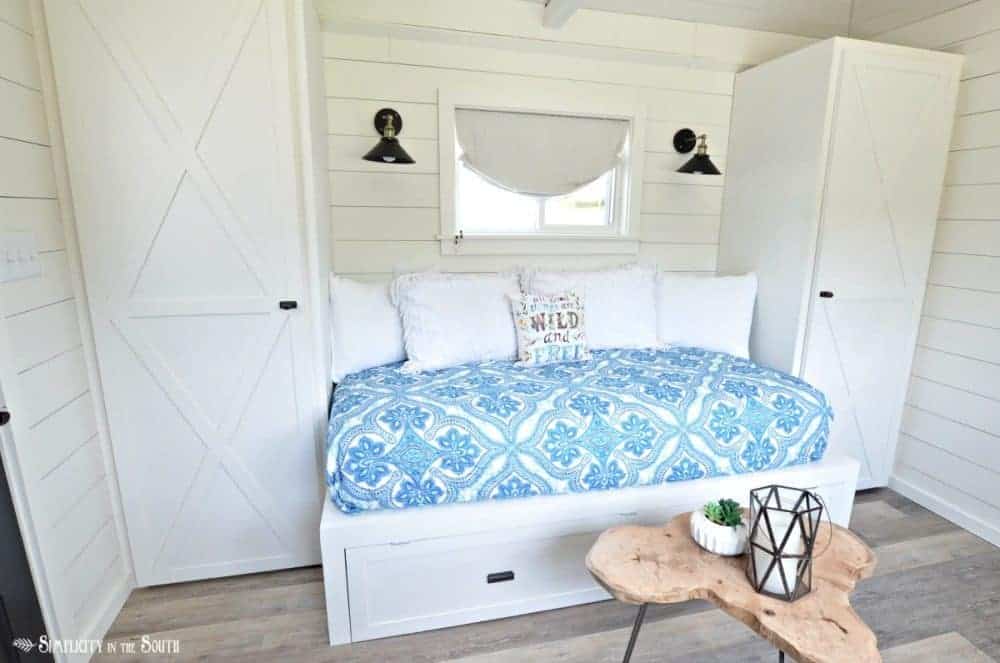
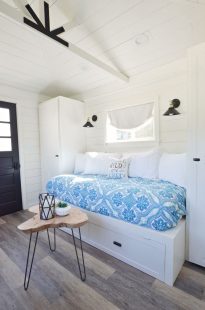
A bar area below the window gives you a place to eat or hook up your computer without taking up much space.
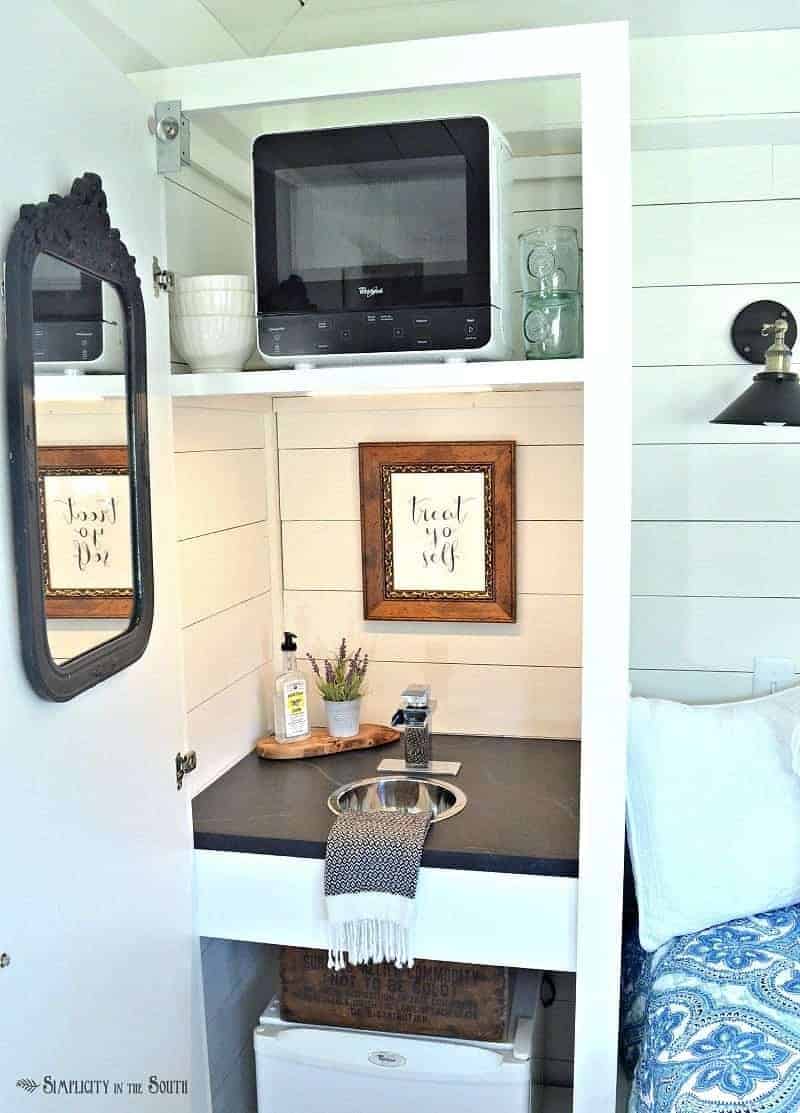
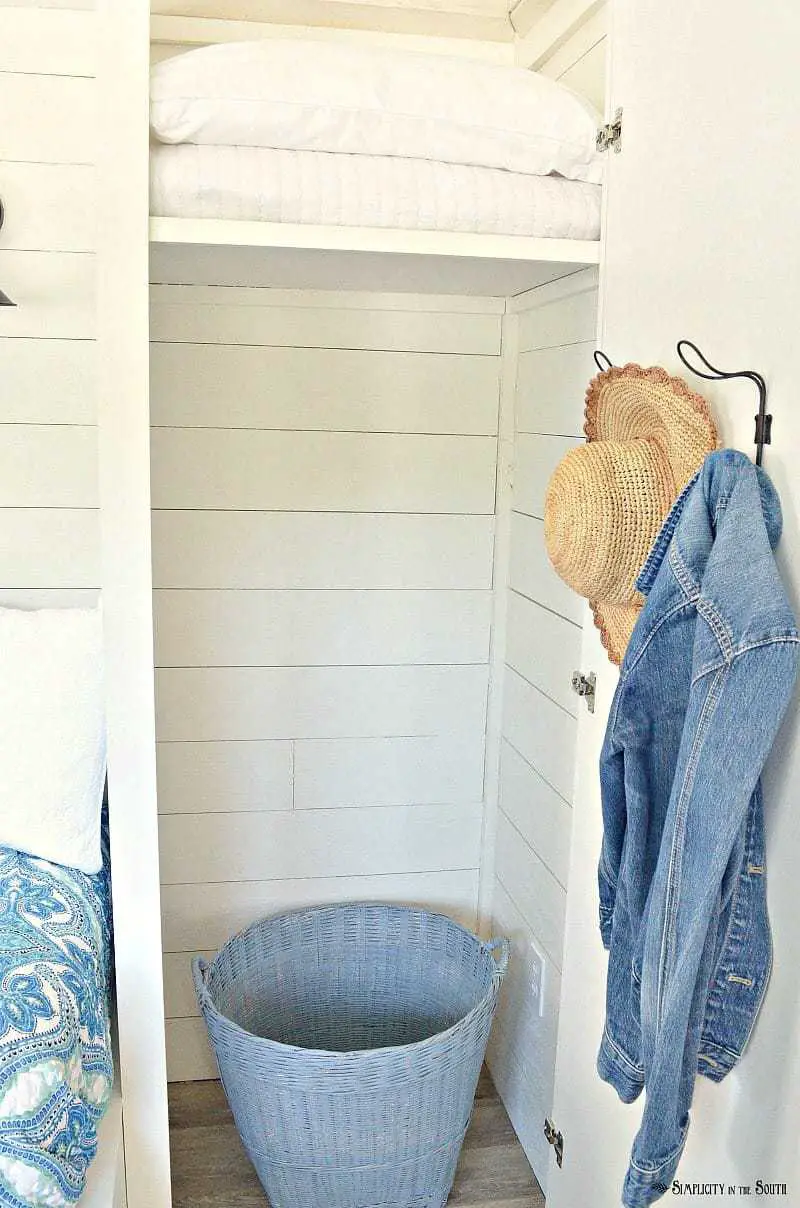
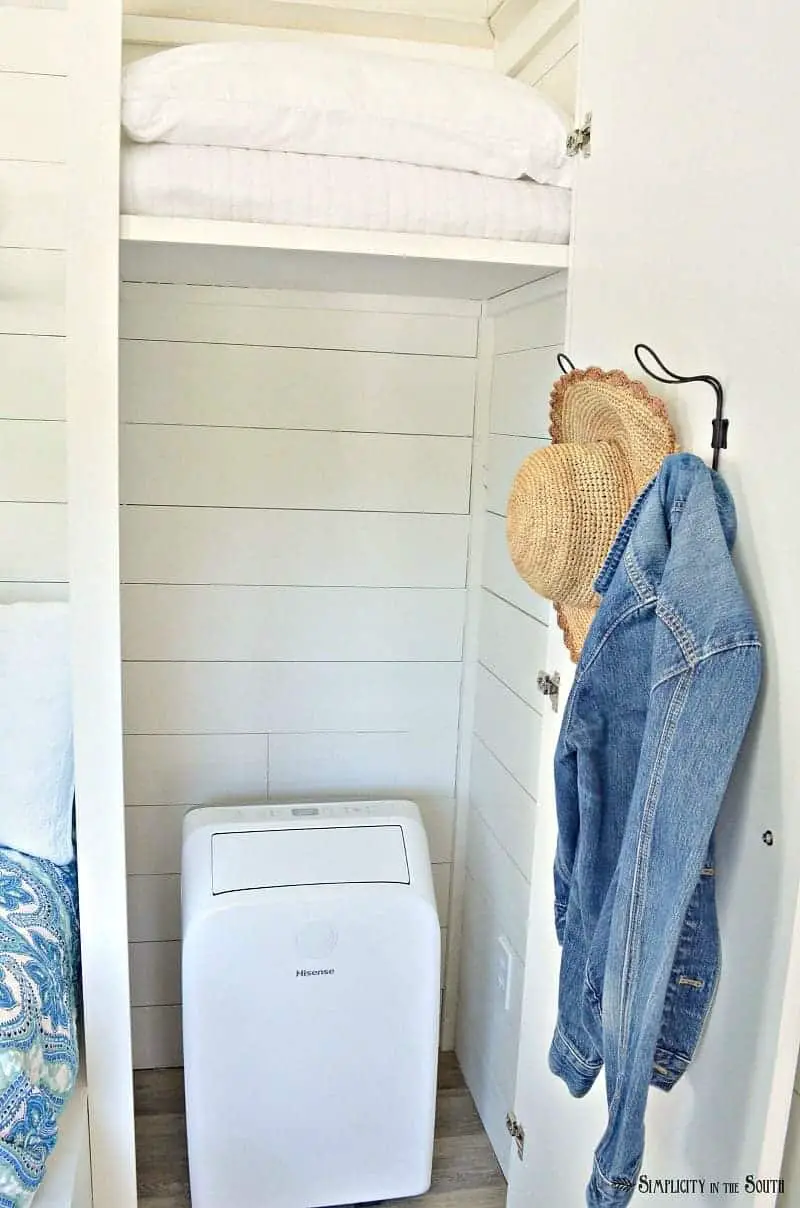
In the wintertime, this is where we’ll store the portable air conditioner. The exhaust for the AC unit is hidden behind a cover on the wall near the bar. I’ll add those pictures later.
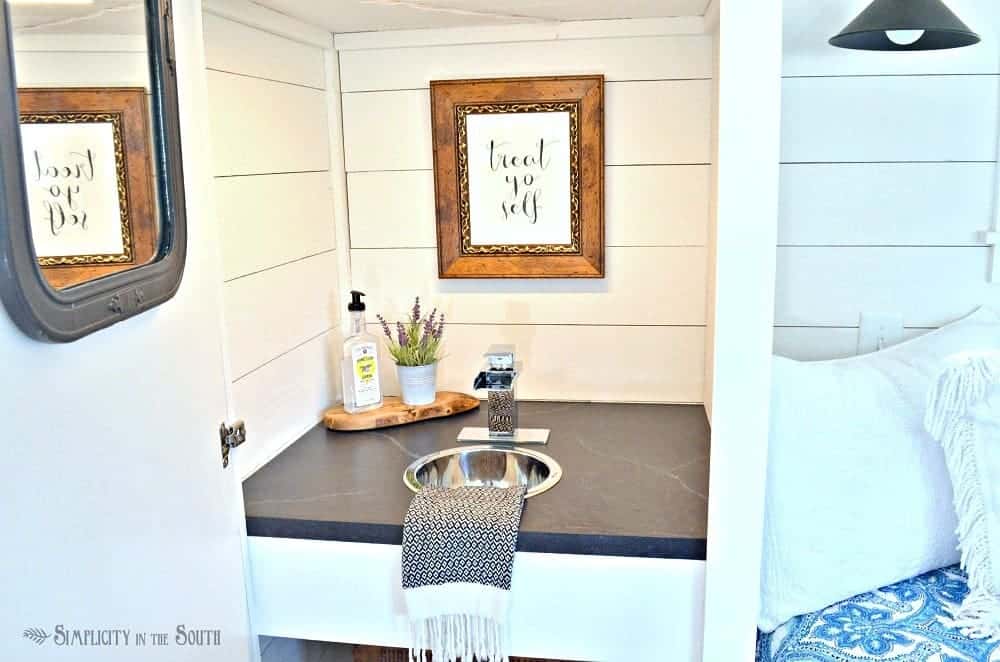
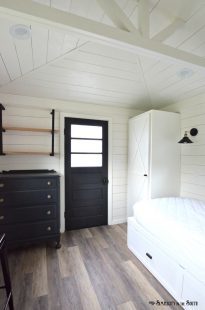
If we decide that we need a composting toilet in the closet, we already have an electrical socket.
The guest house is right off the front porch so it’s not a necessity right now. But, I’ve already got it all planned out. If I need to convince Jason it’s time to get a toilet, we’ll just spend a night in the cottage mid-winter so he can get the full experience of running to the bathroom in 30-degree temperatures. 😉
(Update: Juli insisted after her 1st night in the cottage that she has a toilet so we went ahead and picked a composting toilet out. She’s 6-feet tall, so we’ll have to remove the upper shelf. I’ll add a curtain on a swing-out rod for privacy. We’ll follow up with a video tour of the cottage later.)
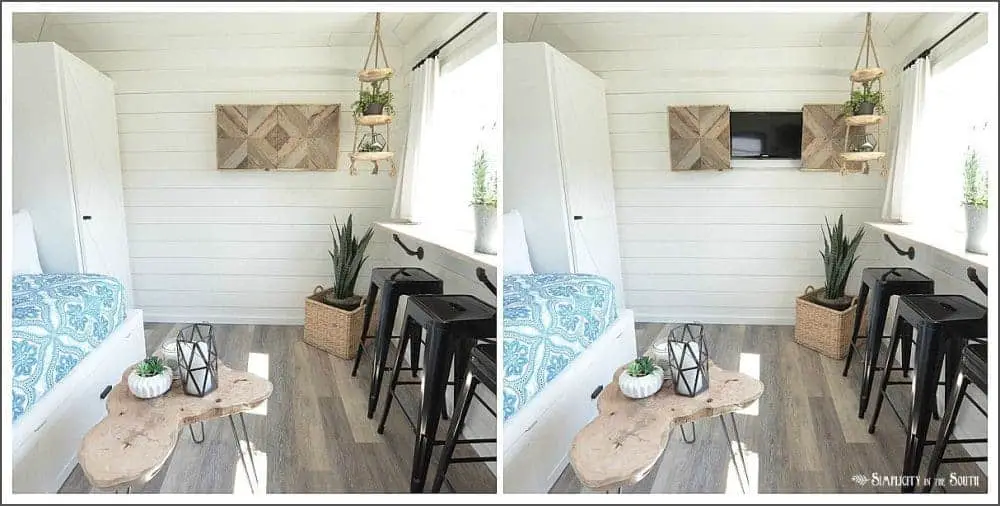
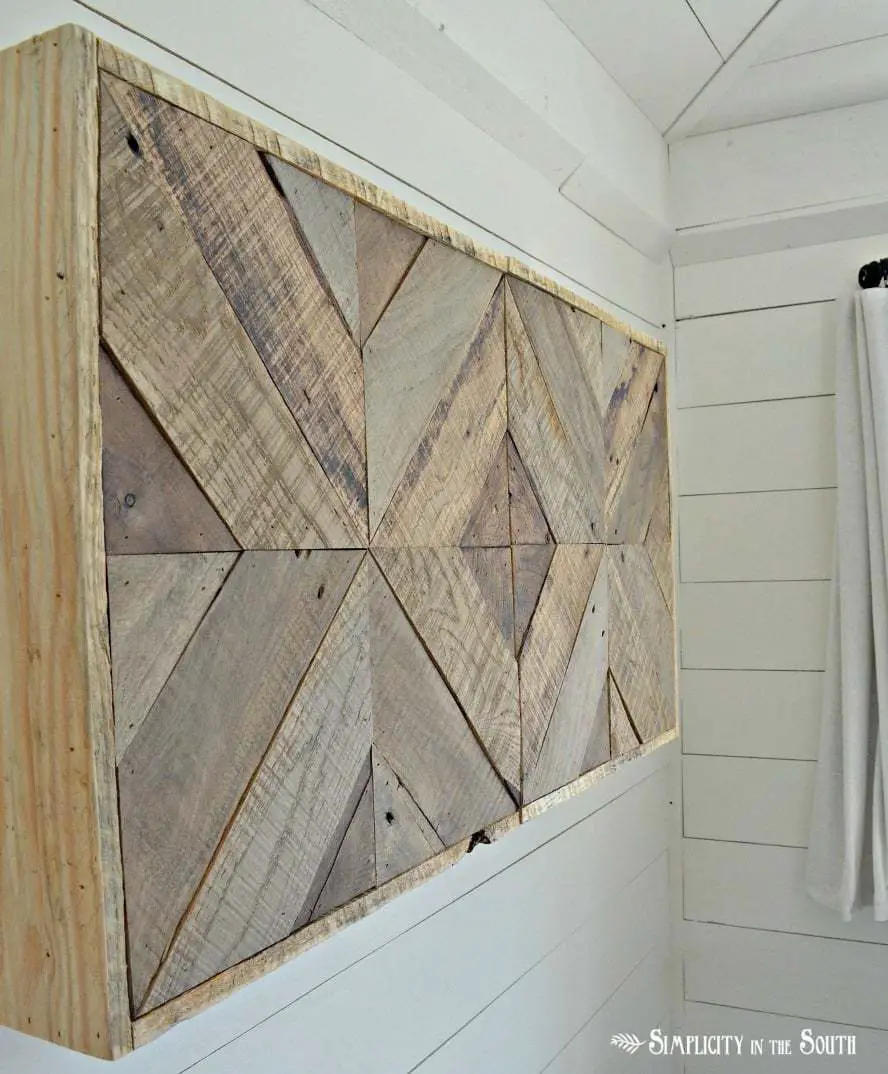
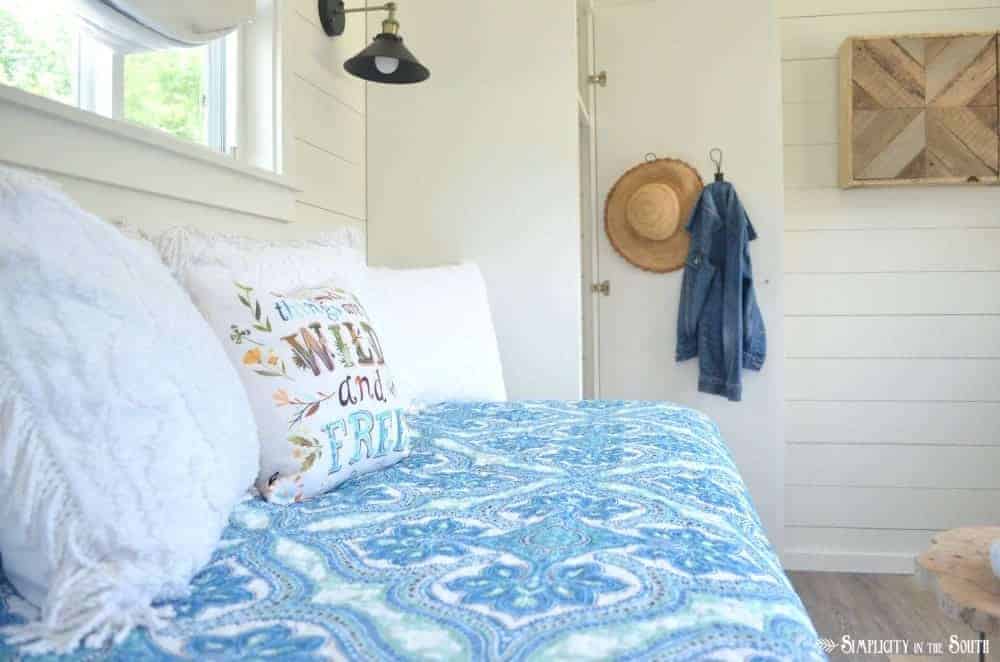
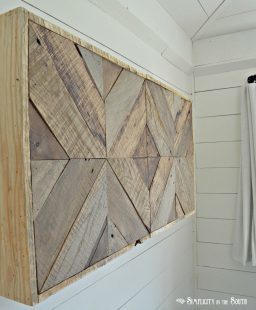
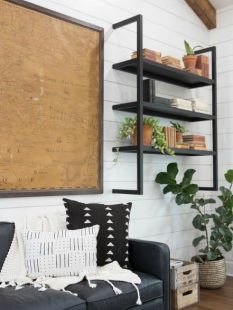
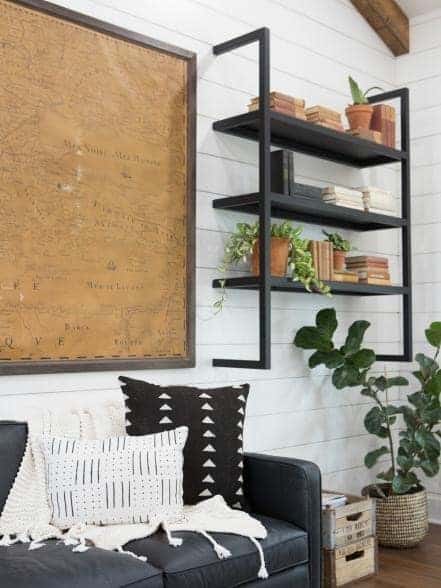
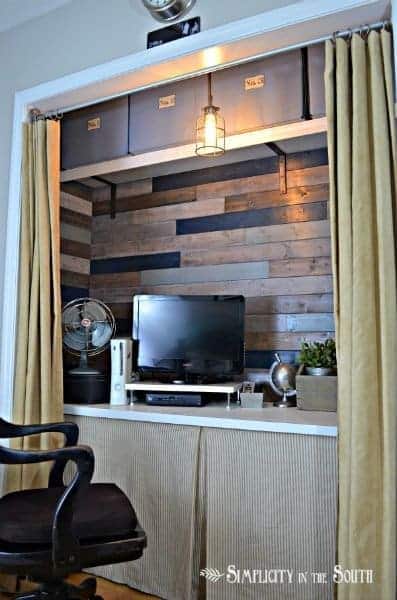
One of my favorite details of the guest shed is the reclaimed wood artwork that hides the TV.
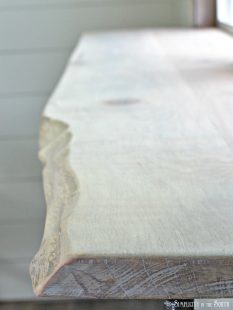
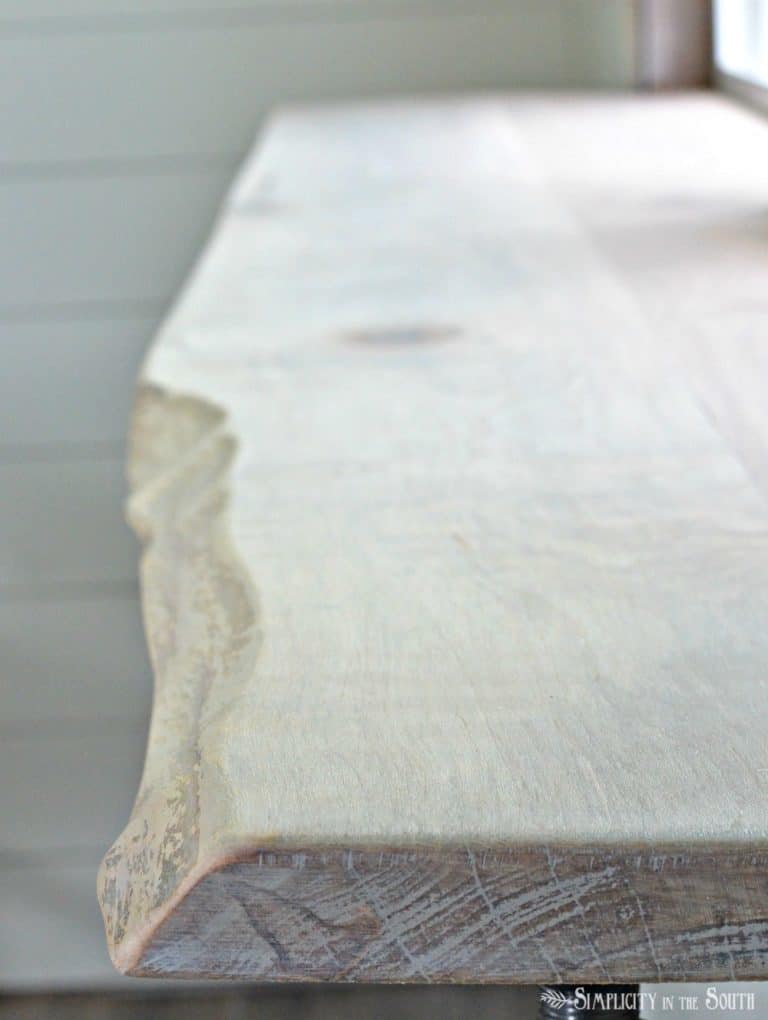
The easiest DIY project was making the wood slice coffee table. Jason brought this slice of pecan home about a year ago and I knew right away we’d save it for this room.
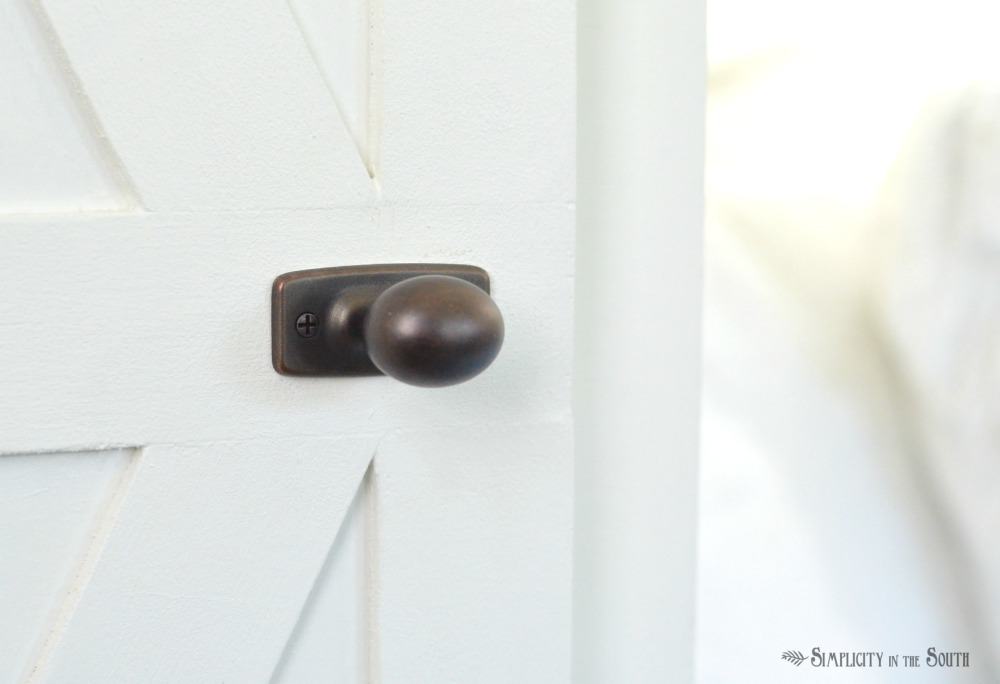
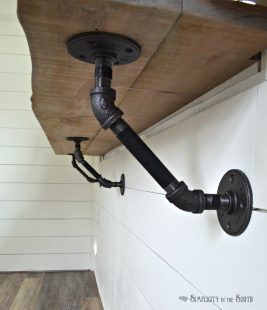
There’s also a mix of metals such as the antique gold on dresser drawer knobs, the oil rubbed bronze knobs on the built-in cabinetry and the raw steel on the industrial pipe bar brackets.

To make use of the top of the dresser, I added a coffee bar.
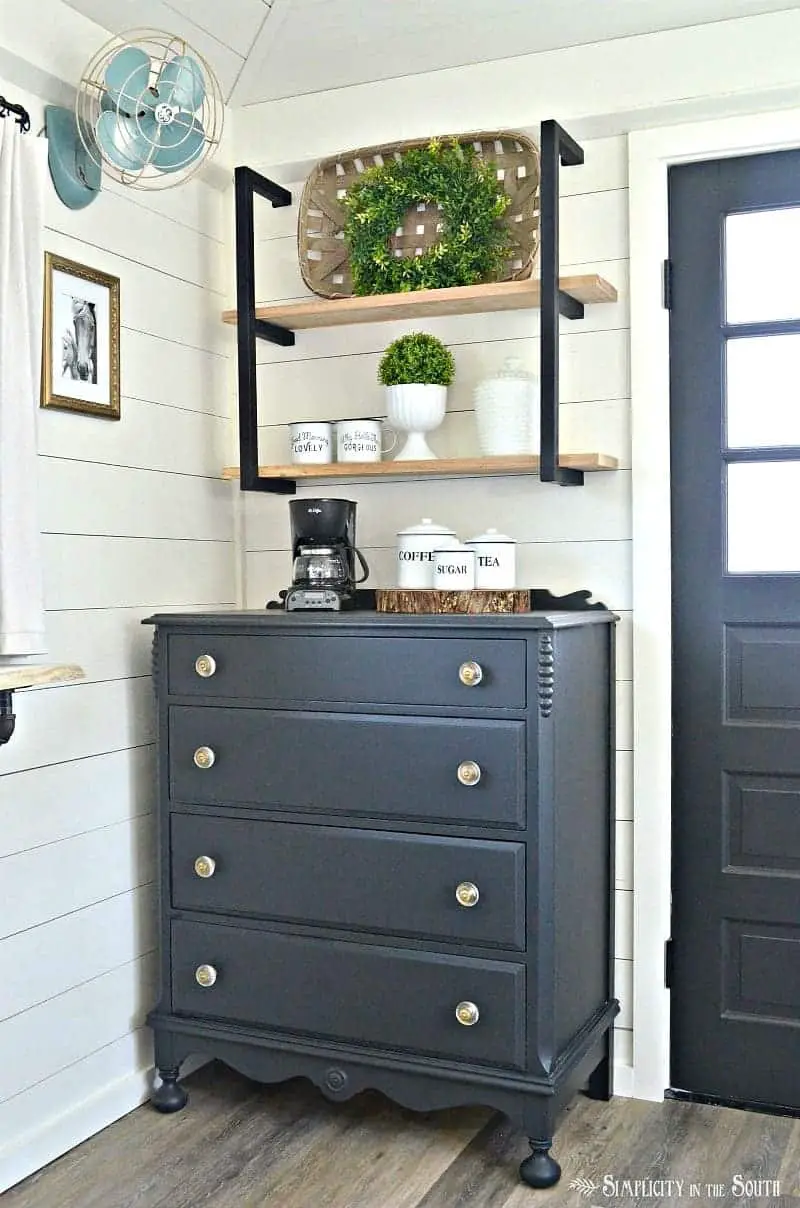
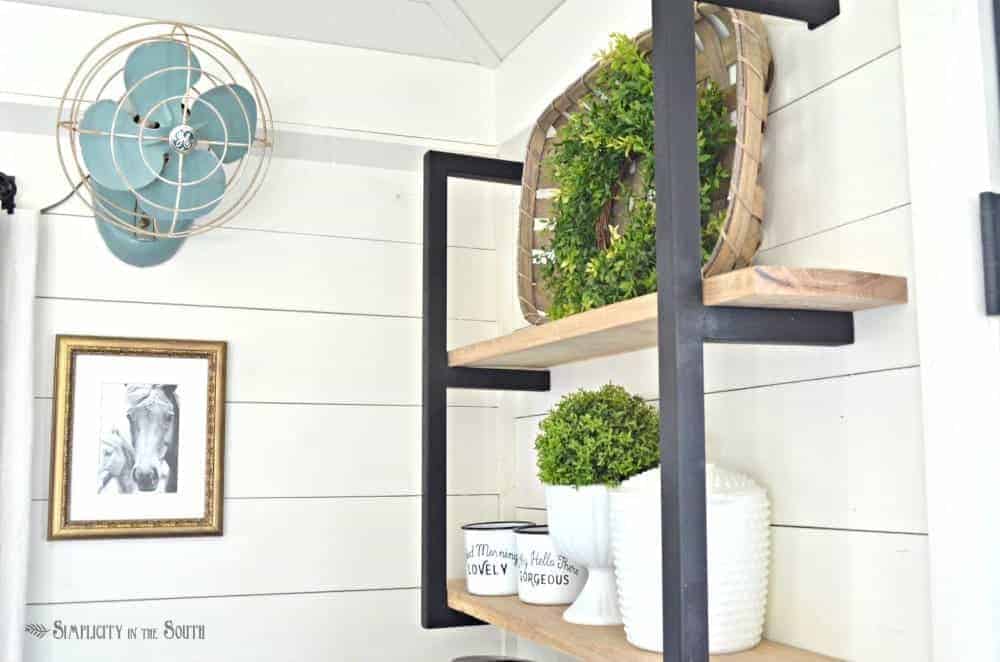
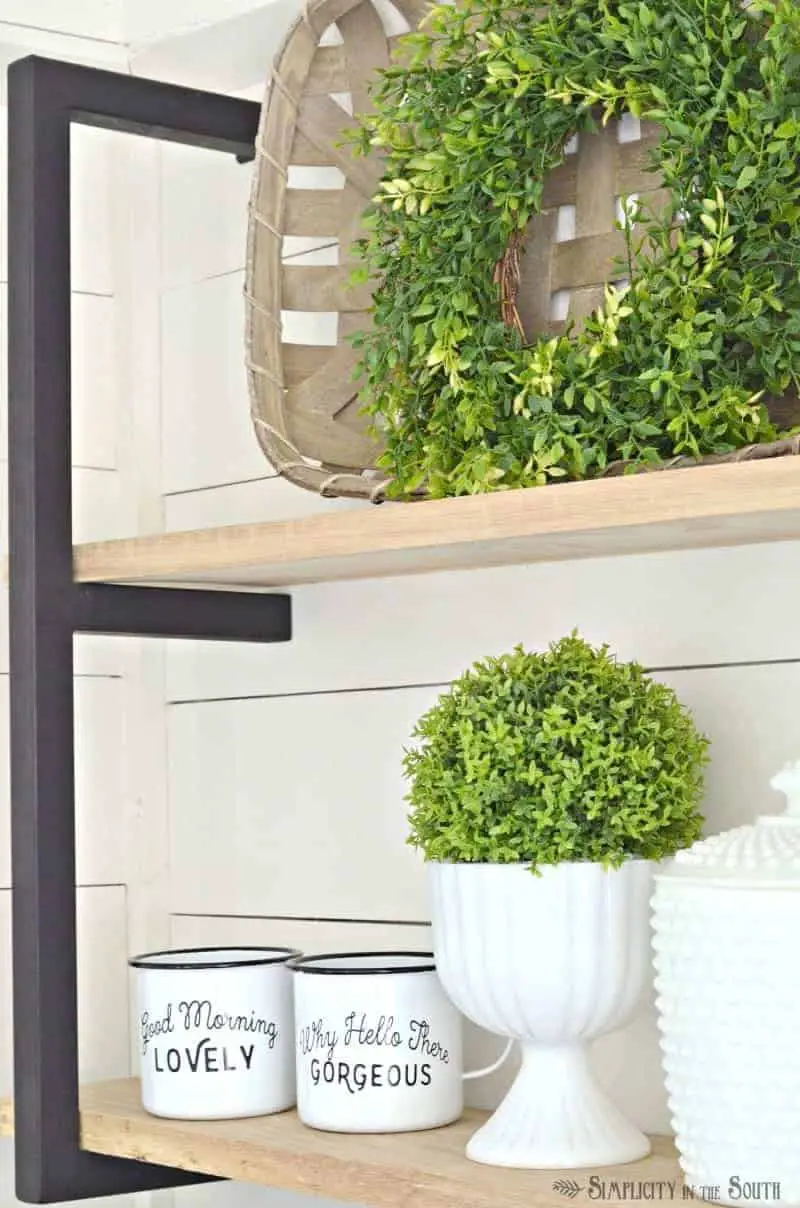
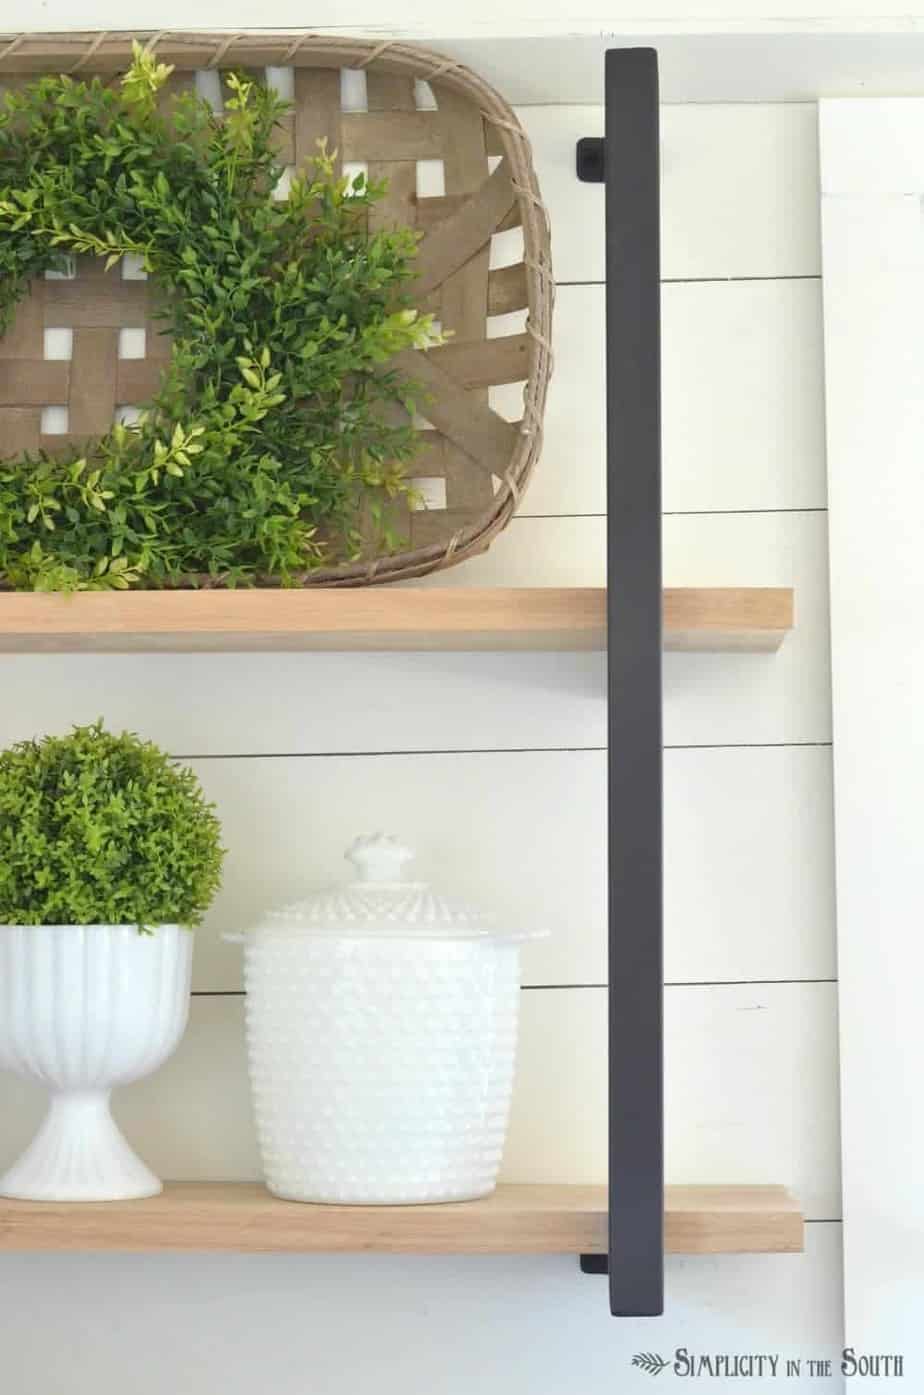
Jason welded the frame for this shelf and we added some oak planks we had in our stash of salvaged wood. We have the modern farmhouse shelf brackets welded from steel for sale in our Etsy shop.
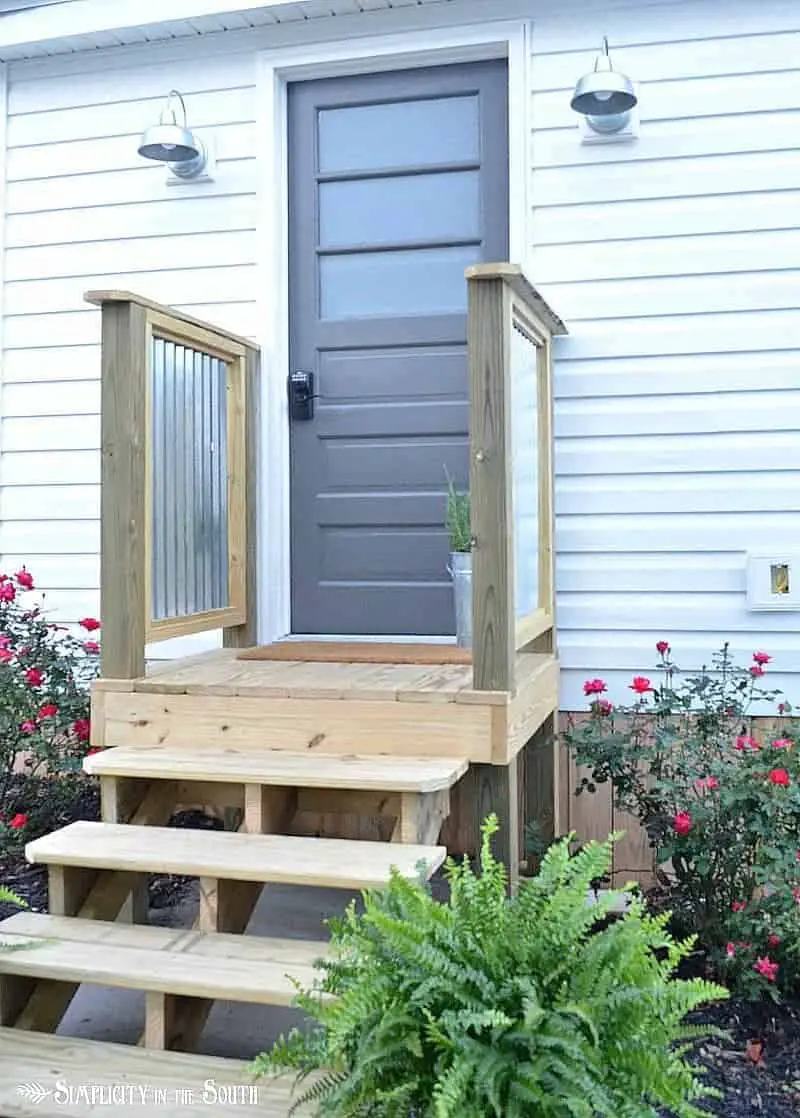
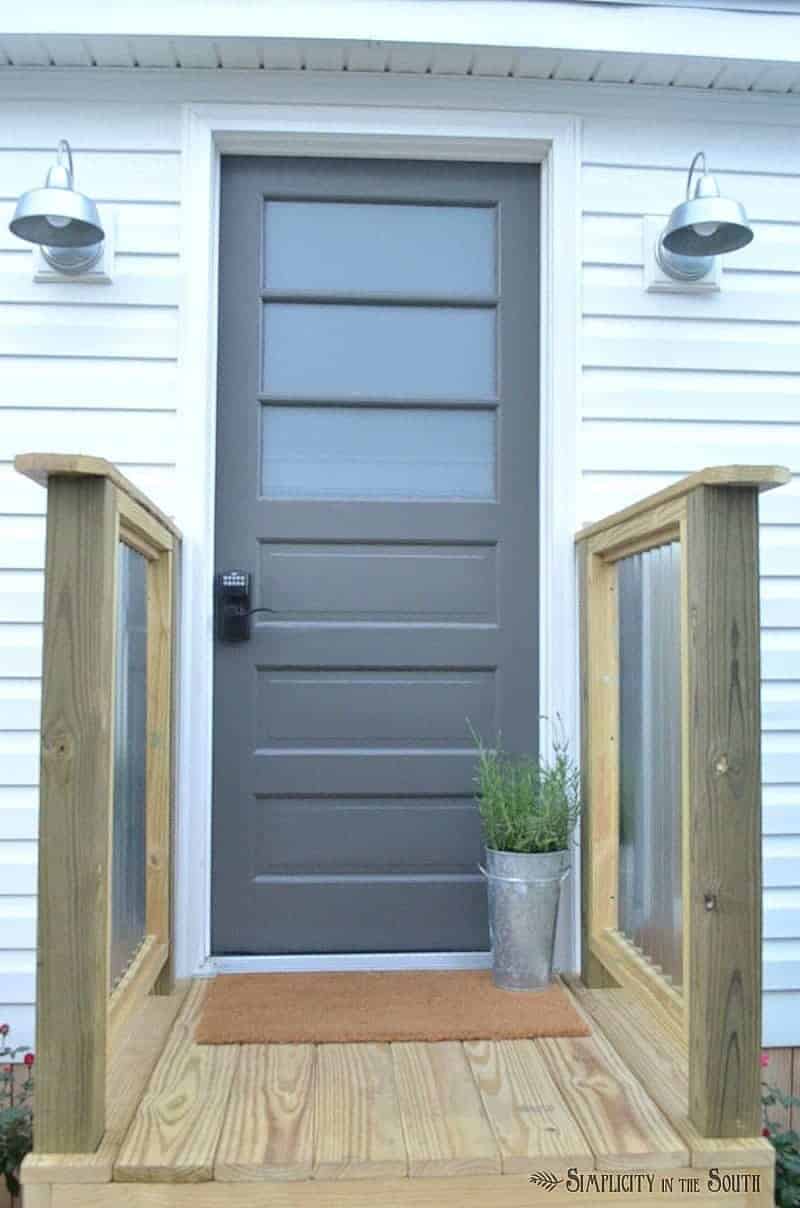
Our last project was adding a small porch with corrugated galvanized metal sides to complement the light fixtures.
We decided to join as guest participant a week before the One Room Challenge began and I had no idea how tiring the next 36 days would be. We’ve lost precious hours of sleep and have gained a few pounds from eating take-out more times than I can count on my fingers (and toes). Would we take on the challenge of completing a room from scratch in 6 weeks again? Absolutely!
Let’s talk budget:
We originally budgeted $2500 but with the addition of exterior improvements we didn’t plan on and some incidentals, we spent $3100. Luckily, the new roof was sponsored, so that was not included in those numbers. I already had many of the decorative items, the TV, microwave, fridge, and the air conditioner that we used in our garage.
Lastly, I’d like to share a few tips I’d give homeowners who want to tackle a project like this:
1. Before you get started, I recommend using an app like this one to space plan. I used this same app to make the 3D digital after pictures in week one’s post. It allowed me to see that built-ins were the way to go with this small space. I could also visualize how deep the cabinets needed to go in order to give us the maximum amount of depth without blocking the sightlines of the room.
2. Even though it might seem daunting to do everything yourself, there are advantages to this if you’re an experienced DIY’er. You’re not at the mercy of your contractor’s timeline. This may mean doing the work at night after the kids have gone to bed and working weekends, but you set your own schedule for when things get done. You also save yourself a ton of money. On our tight budget, we couldn’t afford to hire out the work.
3. Make yourself a punch list a couple of weeks before your expected completion time. It’s easy to underestimate the time you have left to get everything done. If your list is in plain view, it’s easier to stay on track and your partner can see what they can work on when you’re not there. Plus, there’s something so satisfying about scratching another project off the list.
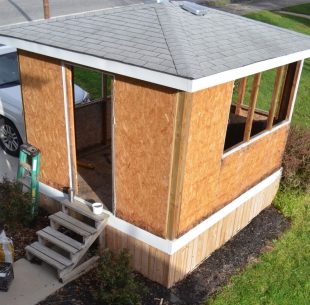
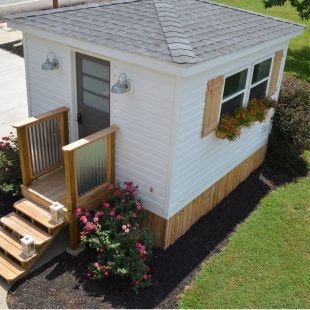
Update: Here’s a before picture of the exterior and a picture a couple of months later when the flowers were in full bloom!
Sources:
**affiliate links are included for your convenience**
- Wall, ceiling, and trim color- Alabaster by Sherwin Williams in Satin SW 7008
- Interior Door Color- Lincoln Cottage Black by Valspar in semi-gloss 4009-2
- Exterior door color- Kendall Charcoal by Benjamin Moore in semi-gloss HC-166
- Flooring
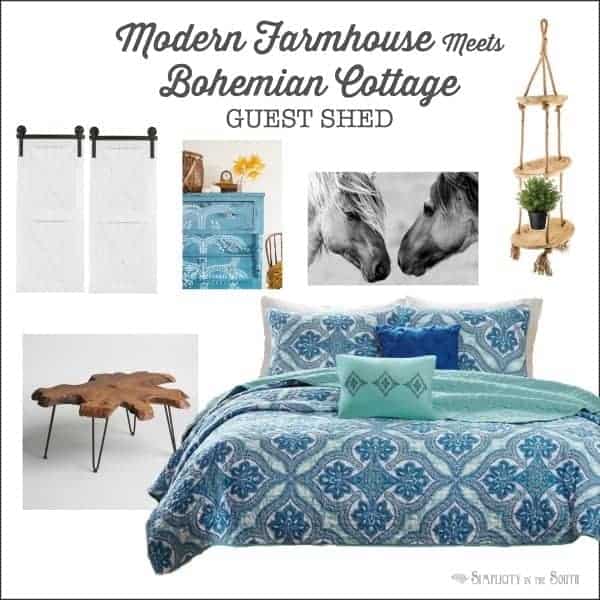
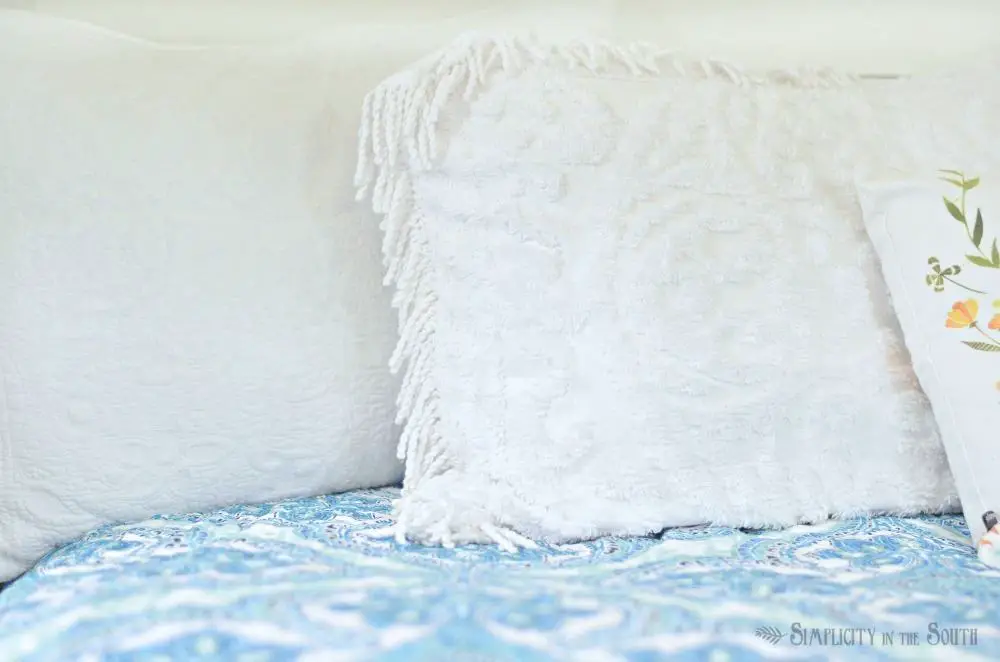
- Blue and White Quilt
- White Chenille Fringed Shams
- Wild and Free pillow cover by Katie Daisy (no longer sold on Society6)
- Industrial Wall Sconces
- DIY Reclaimed Wood Sliding TV Cover
- DIY Live Edge Bar
- DIY Steel pipe bar brackets
- Barstools Set of 2 and Single
- Curtains- a DIY project using dropcloth. I made the roman shade using this tutorial
- Wrap Curtain Rod- Walmart sold out but here’s a similar one and the ring clips
- DIY Wood slice coffee table with Hairpin legs (wood slice was given to us by a friend) Similar coffee table
- Artificial Sansevieria / Snake Plant (it was put into a larger pot)
- Waterfall faucet
- Sink
- Mini cube microwave
- “Treat Yo Self” print
- Black Dresser (Habitat for Humanity find)
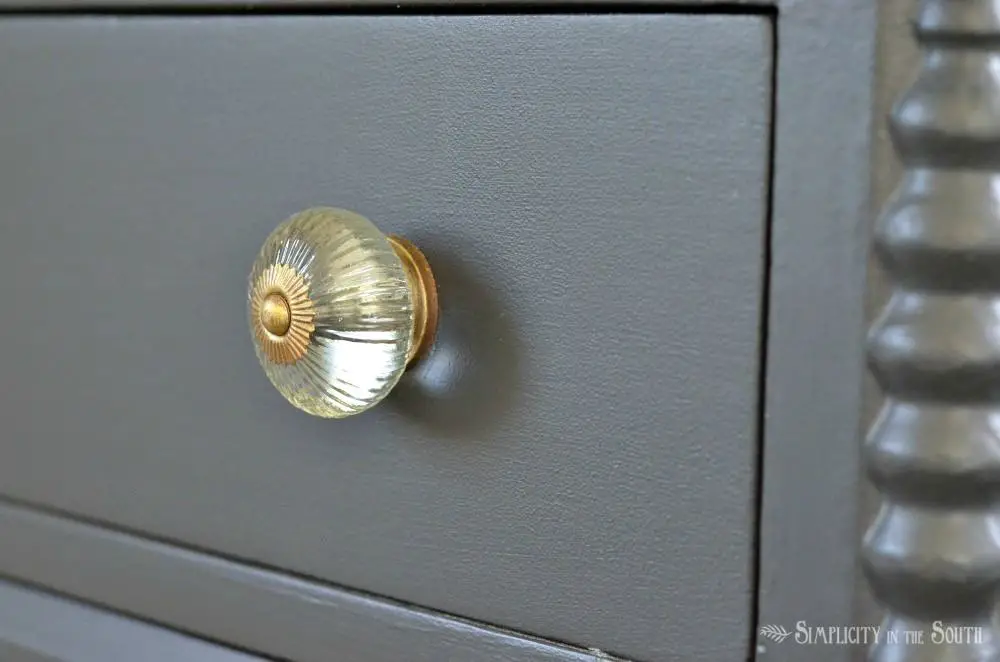
- Glass Knobs on Dresser- Marshalls
- Door Pulls on Cabinets
- Bin pulls on the trundle bed cover
- Black & White Enamel Mug Set
- Coffee, Tea, & Sugar Enamelware Container Set
- Tobacco Basket
- Wreath
- Black & White Horse Print
- White Fluted Pot on the coffee table
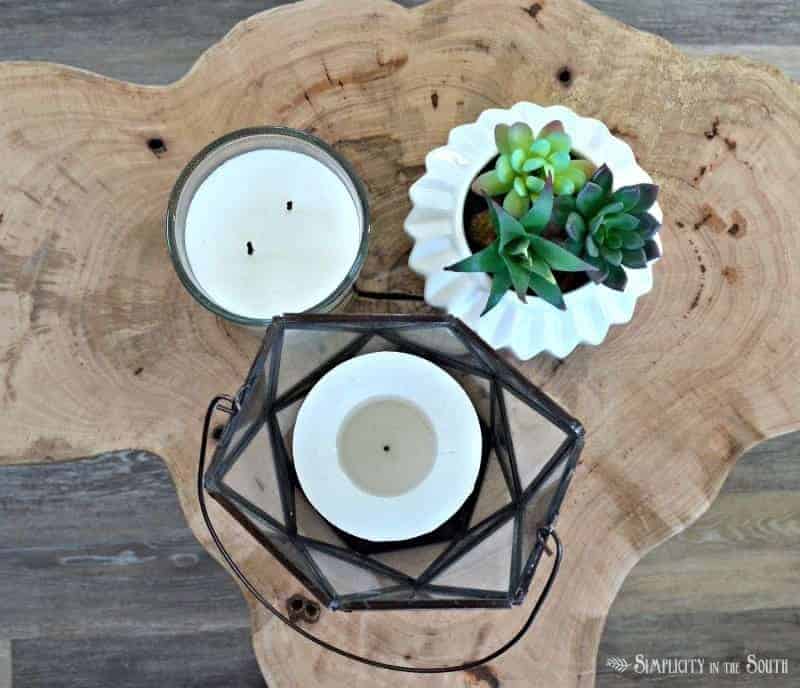
- Geometric Candle Holder (similar) on the coffee table
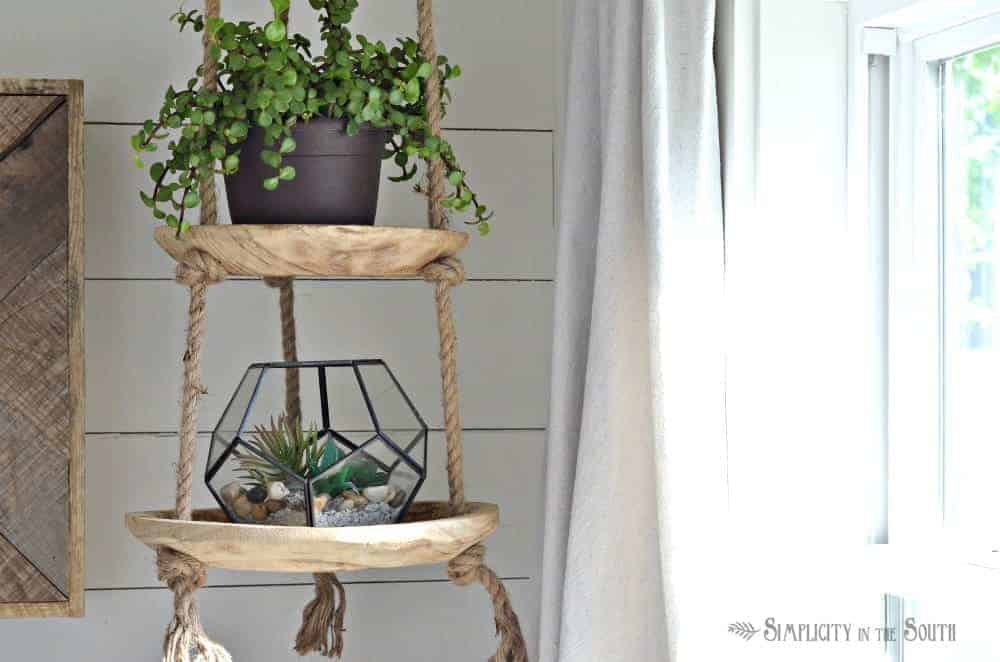
- Hanging plant holder
- Geometric metal and glass terrarium
- Vintage General Electric oscillating fan
Thank you, Linda, of Calling It Home, for allowing all of us guest participants to be a part of the One Room Challenge! Be sure to check out all the other room reveals. I’m sure you’ll find something that inspires you!
Have you tackled a room remodel recently? Please share your tips on what made it easier on you.


This modern farmhouse guest shed transformation is absolutely stunning! The dedication and hard work that went into every detail truly paid off. I can only imagine the sense of accomplishment and satisfaction you must feel seeing the before and after pictures. The cozy and bohemian cottage vibe is so inviting, and I love how you incorporated the color blue, creating a perfect space for your stepdaughter and future guests. Your DIY skills and attention to detail are inspiring, and I can’t wait to see the video tour to learn more about the process.
You said you would add a video to show the changes made with the composting toilet and a privacy curtain. Where can I view that video? Thanks!
Hi Anna! We’ve been slack about doing the follow-up video so I apologize. We ordered the Nature’s head composting toilet but Juli (my step-daughter) was totally against having it in her room so we returned it. Since she’s going to college in the fall, we’re planning on putting one in anyway and it’ll be more affordable and semi-DIY. We plan to do another video when we put that in. Thanks for your patience!
Hi!
I am really interested to see if you ended up putting the toilet in? This is amazing! We have turned our shed into a workspace with a pull out couch and have more visitors! Now looking to add the bathroom without making it an ASD.
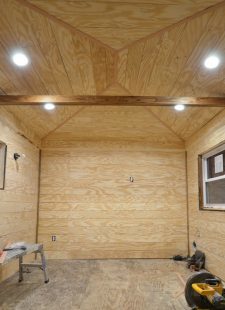
I know this is an old post but I absolutely love what you did here! I have an old shed in my yard as well and am looking to do something similar. My questions is about your ceiling joists. It looks like you removed some to have a raised ceiling look. How did you know how many could be removed without risking the roof sagging?
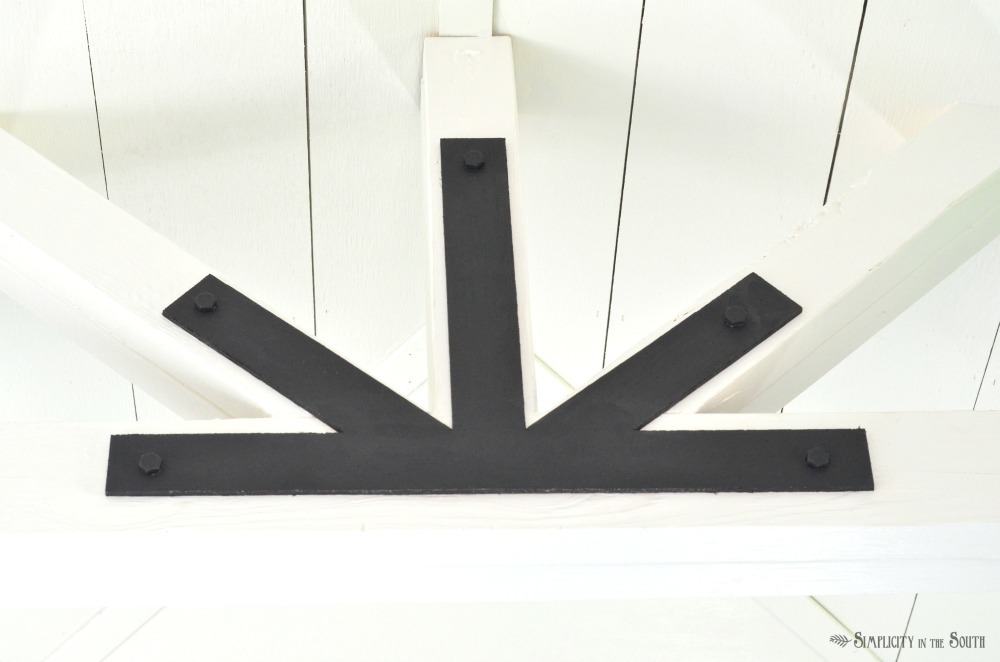
Thank you, Bethanie! I had Jason explain to me the technical side of how he knew he could remove the other ceiling rafters. The roof on our shed is a hip roof (for a slightly rectangular shed), so the roof is essentially 4 equal triangles that meet at a peak and is shaped like a pyramid. A hip roof is self-bracing, requiring less diagonal bracing. The weight of the hip roof requires bracing at the peak. Before he removed the other 2 ceiling rafters which weren’t needed, he strengthened the center rafter by sandwiching 2 boards together and then added 2 center supports going diagonally and one up to the center of the roof. So, to make a long story short, if your shed has a hip roof, then you should be able to remove the extra rafters as long as the center one is reinforced. Good luck and have fun with making over your shed!
Your guest cottage is adorable. I also love small spaces and downsized from a 2800′ home to a tiny 570′ vintage farmhouse a few years ago. I also own a tiny house on wheels that is 8′ wide and 18′ long. I love decorating and up-cycling used items. My style is farmhouse, shabby chic and french country. I really like your amazing use of space and that you painted it white inside. Every detail is just perfect. Your daughter is one lucky girl. Many blessings.
Thank you so much, Tonita! I checked out your tiny house and cottage and they are adorable as well. Too bad we’re not neighbors cause I can tell we’d do a heck of a lot of shopping at flea markets together! Thanks for stopping by 🙂
wowza that is amazing..you thought of all the necessities and worked it into a small space..anyone would be blessed to stay there!
Hey there, I realized I was permitted to post this reply applying a perfect proxy from https://publicproxy.net/
Where did you get those lovely glasses that are next to the moicrowave?
I would love to write my next novel in this lovely cottage. ~Smile!
Insanely good! You two are amazing. Well done.
Thank you so much, Linda!
Sorry if I missed it, but where is the bathroom?
That’s the most common question. ? We’re adding a toilet like you’d find in a tiny house in the closet on the right within the next month. The closet on the left has a kitchenette with a sink. For now, we have keyless locks on all the doors and the guest house is less than 10 feet from the front porch.
Curious how you mounted the fan on the wall? I have a wonderful vintage fan and no real space for it. This could be a wonderful solution. Fantastic job, by the way.
Thank you, Penny! I was happy when I could finally find a permanent home for one of my vintage fans so I’m hoping this will help you with yours. With this model, there’s a keyhole hook at the base. See the picture below.
 Then I had to loosen the bolt at the base to adjust the direction it faced.
Oh my goodness, thank you! I just looked and I have that keyhole as well! I’m so excited about this. My fan works, but it gets crazy hot, plus it’s totally unsafe for fingers. But I love the way it looks so much and putting it on the wall like that is so genius. Thanks again! I can’t wait to copy you. lol.
Yay! You got lucky! So glad I was able to help out.
Gorgeous! Do you have any instructions/plans for the day bed your husband made? We need a bed like that at our lake house and my husband is also a carpenter. Did I miss a link somewhere? Thanks!
Thank you! I’m working on the post for the trundle day bed and cabinets we put in the guest house now. The post should go out either tomorrow or Wednesday. The link for the built-in daybed we put in my oldest son’s room is here: Built-in bed with trundle drawers I hope that helps! 🙂
It’s me again! 🙂 Just wanted to let you know I chose this as one of the features tomorrow at the Farmhouse Friday link party!
Thank you so much for sharing this at the Farmhouse Friday link party! Pinned and shared! 🙂
I’m new on your blog and I’m glad I found it! What a gorgeous makeover!!
What an amazing transformation! We have an old shed that we converted into a farmhouse guest house also, so I know the challenges you were up against, and you pulled it off beautifully!
Thanks for sharing it at Talk of the Town – your guest house is my feature pick for next week’s party’
Angie @ http://www.knickoftime.net
Thank you so much! I’ve been dreaming of having my own guest house since I found yours a couple years ago.
Such a brilliant transformation! You should feel so proud of yourselves. And you did it all on such a tiny budget which is really inspirational for us non-millionaires out here. I loved the time-lapse video too! xx
I love how many amazing details you fit into such a cozy space, you packed in more charm than most rooms twice it’s size…just gorgeous!
Great job, I really need this hahaha.
This is absolutely amazing! Beautifully done. 🙂
Wow! This space is amazing. I love all of the natural elements. I’m sure it will make a great little hideaway 🙂
I love it! I wish my husband would let me use our shed to do something like that! You did a great job!
What an adorable little space!
What a cool space! I’d love to be a guest and get to stay here! The shiplap looks so good here.
One of my favs from the ORC. Congratulations!
You DID IT again! Another amazing transformation that’s magazine worthy. So many beautiful details! Love it.
It turned out so beautiful! I love the tiny kitchenette in the closet–what a great idea!!
You accomplished so much in 6 weeks!!!! The guest shed looks amazing. I love the accent you put on the beams.
What a lucky stepdaughter! So much functionality in one small space, well hidden away and yet so very lovely! Kudos!
Uhm, is your shed on Airbnb, because I want to move right in! So many thoughtful details – the welded shelves, the vintage fan, the hidden mini kitchen. Love it all! And as one DIYer to another, I appreciate you putting the time and effort to do it all yourselves. Great job!
Absolutely gorgeous! You nailed every little detail–I want to live here!!
It turned out absolutely stunning! I knew it would:) Congrats on your new beautiful space!
http://www.raisingafarmhouse.com
When can I move in? What a great job!!
You really thought of every little detail. I love that you hid a kitchenette in one of the built-ins, and all the live edge features are just so gorgeous. And that faux metal beam accent is perfect!
I love how this turned out! The metal accent on the beam is amazing. Adds the perfect amount of detail .I bet your step daughter is super happy that her room is all done and ready to live in!
What?? This cottage rocks! I love everything about it! I felt like I was watching an episode on HGTV. Nicely done!
This is so crazy cool! I can’t believe how this all came together, it’s just gorgeous. I know this was a huge project to tackle especially after working all day but seriously you guys should be so proud. It’s completely amazing – I love it all! Hugs, CoCo
Love, love every part of your bunkie!
This is an amazing transformation, I could not love it any more!! Beautiful job!
WOW, THIS IS THE EPITOME OF THE ONE ROOM CHALLENGE!!! Great job looks amazing!
It turned out beautifully! I love all of your attention to details. It is going to be just right for all of your guests. Great work!
Thank you, Stacy! My parents are coming to stay soon and I’m so excited about them being our 1st official guests. I hope they love it as much as we do.
What an amazing transformation!! Such an awesome space now – love that artwork that hides the tv!
Thanks, Bre! The TV cover was a last minute idea and I’m so glad we went with it!
this is just so pretty! love the blue bedding for a great color pop! love the dresser, the little table… everything! i am packing my bags to come stay!
I’m reserving a spot for you! We all need a break after the past 6 weeks. 😉 Thank you so much for sweet comment.
Look how cute it all turned out! I love all the little details – the welded shelf, the hidden kitchen, the detail on the beam, the reclaimed wood panels to hide the TV. It’s a gorgeous space!
Thank you, Lizzie!
Beautiful! I want to stay in your cottage, it’s so me! Too many great details to pinpoint just one in this space. Great job!
Thank you, Kim! I hope my stepdaughter and guests enjoy it as much as I have the past week. 🙂
what a fantastic guest suite from practically a blank raw space in 6 short weeks! I love how to max out the functions in this small room and packed the “vanity” area within one unit while more adoptable storage on the other + a casual dining zone with a bar!! you have thought of it all!
congrats on week 6 of One Room Challenge!
Thanks, Tim! It was quite a challenge fitting everything we wanted in this tiny room but space planning is one of my favorite things about designing a room. Thanks for stopping by!