How to Make a Decorative Air Return Vent Cover
The phrase, “it’s all in the details”, comes to mind when I think of what sets a basic-builder’s home apart from homes built back in the early to mid 1900’s.
Details are like jewelry for a home.
Over the past five years, I’ve been slowly getting rid of anything that screams 1980’s and adding little touches to give our home vintage-classic charm.
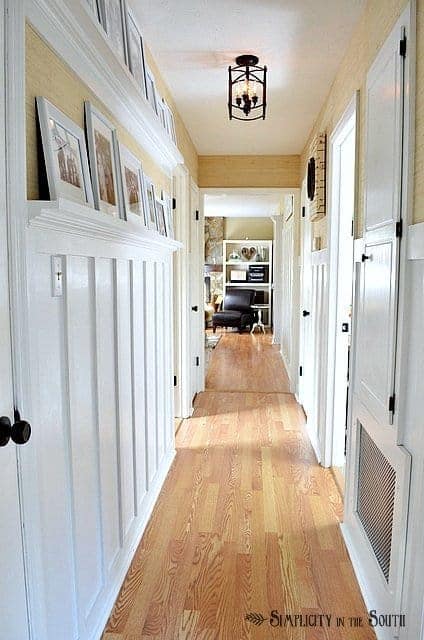
Click here to see the rest of the board and batten hallway
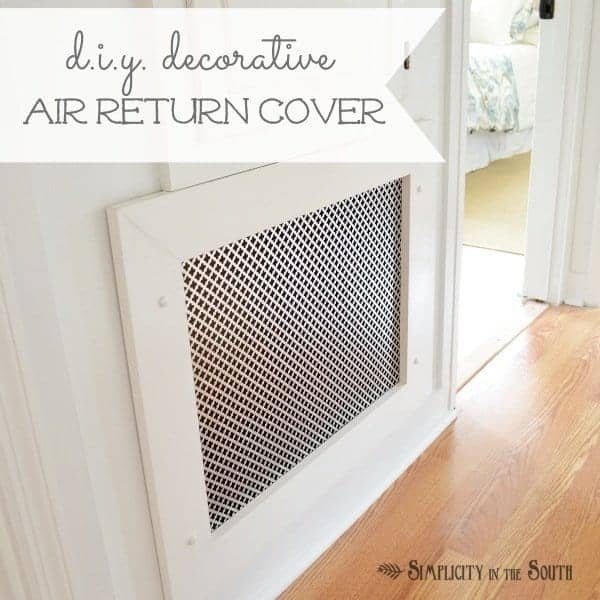
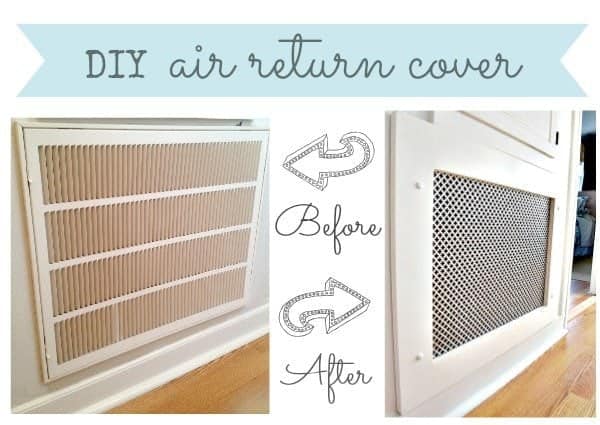
I checked out the price on vent covers and quickly realized I didn’t want to spend $500.00 for a custom cover like ones I’ve seen on the internet. With a few tools and some supplies from the local home improvement store, you can make a decorative air vent cover for about $40.00.
To see where I was inspired for this project, head on over to my original hallway design board.
Supplies to make a decorative air return vent cover:
(affiliate links are included for your convenience)
1. 4″ wide boards. I used the same primed finger joint boards that I used for our gallery shelves.
2. Wood glue
3. Decorative metal radiator screen found at Lowes. Here’s the item number to help you find what you need. There were three different types of screens, but I the quatrefoil pattern was my favorite. You can also order it on Amazon.com by clicking this link if you can’t find it in the stores.

4. A Kreg Jig and a face clamp. I bought mine through Amazon.com. The kit comes with an instructional DVD to help you get started. It also includes a screw starter kit.
5. Staple gun
6. Power Drill
7. Miter Saw
If you’re unfamiliar with the Kreg Jig, here’s the link to a video from the super cute and talented, Ana White. If you put “Kreg Jig” in the search box on her website, you’ll come up with all sorts of projects that you can make with it.
Directions on How to Make a Decorative Air Return Vent Cover:
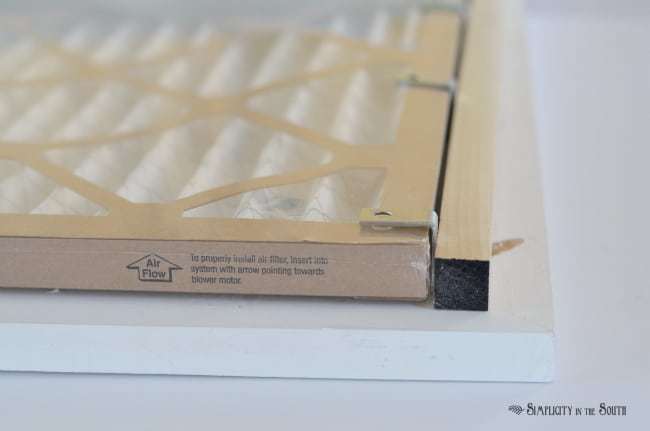
Since our heating and cooling system has the filter built-in to the air handler, the frame I made only needed to encase the opening and hold the metal screen. I’ll show you in just a second how to make it hold a filter.
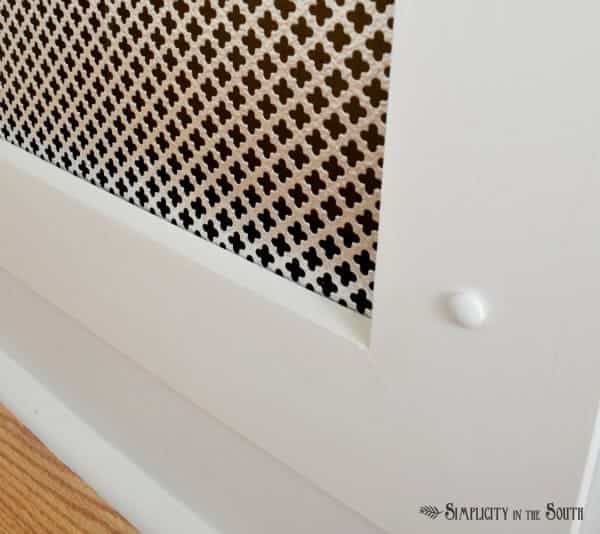
To make it easy to remove the frame, I countersunk the screw holes where it’s secured it to the studs and covered the holes with wooden buttons (also called screw hole plugs). If you need a frame that opens, you will need to secure it to the studs with hinges. Your best bet would be a piano hinge at the top of the frame so it lifts from the bottom.
This was my first time using the Kreg Jig. I accidentally put my first set of holes too close to the inside corners. So, just overlook those. You’ll want to keep your holes closer to the center.
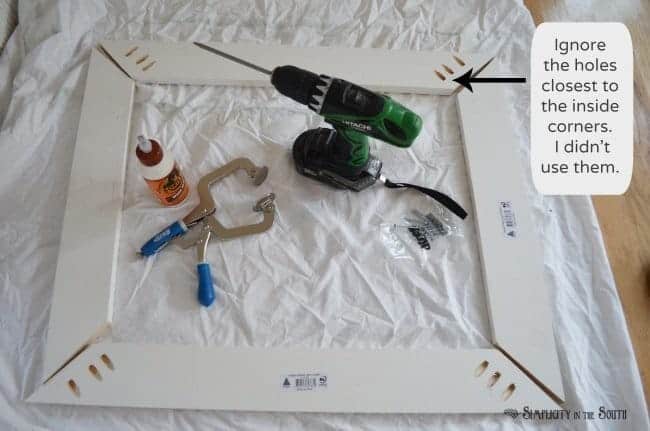
After you cut the boards to length, make pocket holes with the Kreg Jig. Secure the corners using wood glue and the screws that come with the kit. The face clamp is essential to keeping your corners squared and level when joining your boards.
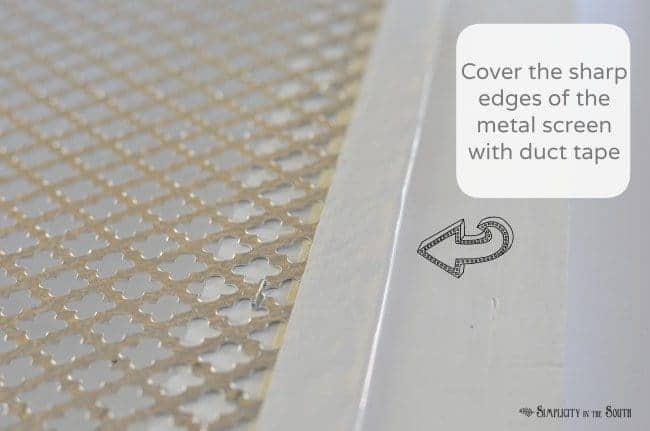
Cut the metal screen the size of the opening plus two inches. I used my kitchen shears to cut the metal. The raw edges are sharp, so cover them with duct tape. Secure the screen with staples.
I had a reader email me and ask me how I could make the frame hold a filter, so after searching the home improvement store for something that works, this is what I came up with.
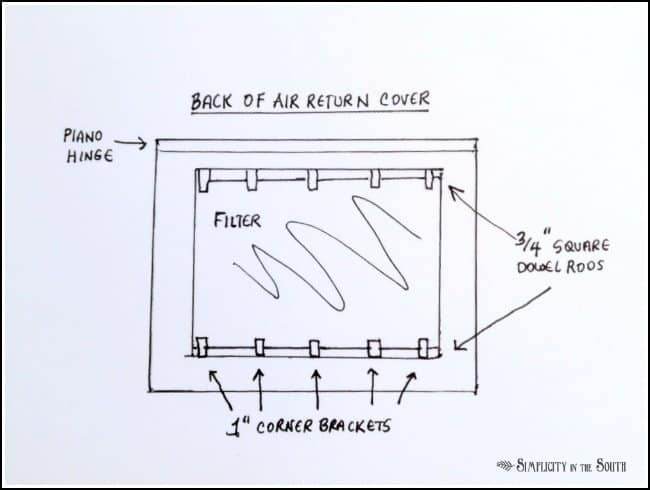
The filter holders are made from 1″ corner brackets spaced about 6″ apart and attached to a 3/4″ square dowel rod.
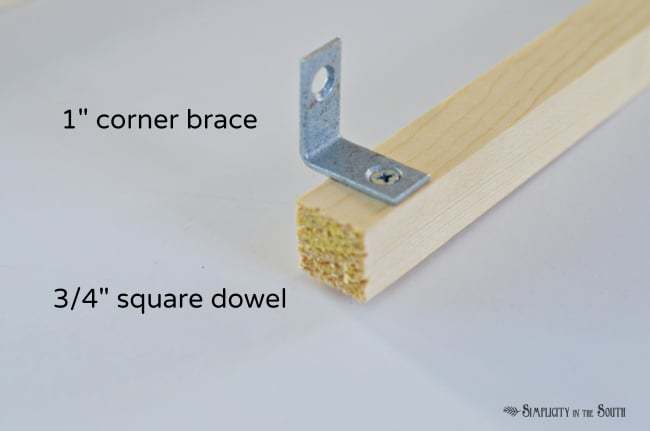
The square dowels are nailed down to the top and bottom of the frame so the filter can be slipped inside.
Thanks for all the sweet comments on the hallway! You guys keep me motivated to move on to the next project…plus the fact that my house looks like a construction zone. I’ve been working on the boy’s bathroom this week and can’t wait to show you how it’s all coming together! I’m also fitting in a few projects for our covered porch since it’s been so pretty outside.
If you want to check out all the projects that have gone into our hallway, just click on these links:
Monogrammed & Decoupaged Art That Hides the Doorbell


I love this idea! We did a big fall cleaning project with a dumpster rental for my memaw last week and now that it’s clean, I’m wanting to give her a few things to make her little apartment look nicer, and I think some homemade vent covers would do just the trick! It’s also a good little project for her, so I’m excited to show her how to do it! Thank you!
I love this idea but we have a very large air return right in our entry hallway and I can’t find large enough decorative sheet metal to fit. It’s 22.5” x 43”, any ideas where to look?
This post is great! Thank you so much for sharing! I have been trying to figure out a way to replace the heat register covers and cold air return covers in the 80 year old house I’ve been rehabbing. I have a total of
40 covers so this is a great as alternative to spending a fortune on custom made ones since they are not a stock size. Finding something that looks nice and will function how I’d like has been challenging. This
is fantastic, especially your ideas for adding the filter.
It’s comments like this that make me love what I do even more. I’m so glad this post helped you find a solution to your problem. Enjoy giving that 80 year home some TLC and thanks for stopping by!
This is so adorable!
I wish that our return was wall mounted but unfortunately it’s on the hallway floor of our 1938 bungalow. Any tips for a DIY return cover that you can walk on? They are SO outrageously expensive and not attractive.
Let me know if you have any other cute DIY ideas for floor ones please! 🙂
Hi Tiffany! I’m having the same problem. Our air return in our new/old home is the first thing you see when you walk through the front door. What size is the one you’re wanting to replace and we can brainstorm and see if we can come up with a solution that can be DIY’d.
Hello from Texas!
Did you remove the existing cover from the wall or just install this over? My return is caulked in and has a metal frame already, so just installing a new wood frame over it will not sit flush with the wall. I’m hesitant to get a razor blade and cut out the existing caulking and frame because I don’t know what’s behind it, aka how large is the existing hole!
Same question here! And how cen the new one be attached to be easily assessable for filter changes?
Hi Christin! You attach the frame with hinges, much like a cabinet door. To make it look nice and seamless, you could make the frame flush with the outside frame and have it open with a push magnetic closure like this: Sugatsune Touch Latch Magnetic For Medium Doors White https://www.amazon.com/dp/B000REOQFE/ref=cm_sw_r_cp_api_Q29tzb9GFQYDF
They also make baby proof magnetic locks like this: YutaoZ 12 Locks + 3 Keys Magnetic Baby Proof Safety Locks Set – Self Sticking Super Strong Adhesive for Cabinets Drawers – No Screws, No Drilling https://www.amazon.com/dp/B01N44KC0J/ref=cm_sw_r_cp_api_R49tzbXEQG8VN
Hope this answers your question 🙂
heyy!!!
indeed a very nice share…
In our homes, ventilation helps to exhaust unwanted smells, water vapour and pollution, and replace them with fresh air, but we also need to control ventilation so that we can turn it on and off as we need it, and direct it where it is necessary.
very simple and briefly explained ideas..and the images are also very beautiful..
thank you so much for this share..
I love the cute cover that you made to cover your grates. Adding little details like this to your home can make all the difference, I have found. I would definitely do this tutorial in a heartbeat!
This is such a terrific idea! I love it! Thanks for sharing! 🙂
Quick question???? Did you paint the grill? I just made this today and you can see inside the duct work a little too much to my liking!!
I love the idea and was inspired by your lovely work. Hope you don’t mind me linking it on my blog.
Thank you!
Fantastic! I actually bought those exact same quatrefoil panels months ago with the intention of doing a project like this, but have been agonizing over just how to make the frame. Searched the net and here you are! With the removal of a wall during my recent kitchen reno I now have 2 of those ugly returns staring at me in my new lovely kitchen. Thank you so much for this DIY post!
wow, very cool!
Oh, Thank you! I’ve been looking online and all the door inserts etc. are over $400 which is not in my price range! I’m going to Lowe’s!
This turned out so great Tricia. So much prettier!
Nancy
Thank you, Nancy! I never realized how much I disliked the old one until I look at the before and after pictures. 🙂
This is genius! I am totally going to do this! Thanks for the idea – I am pinning 🙂
Such an upgrade from the yucky vent covers! Thanks for linking this up to Frugal Crafty Home!
I love this! Such a cute and clever idea to make something not so pretty looks beautiful! I would love if you would share this over at our blog hop! http://www.ablossominglife.com/2013/04/frugal-crafty-home-blog-hop-20.html
Such a fabulous solution to such an ugly fixture. I love this. I would love for you to link to my Inspire Me Tuesday party still ongoing. This would definitely inspire others to change up their vents. Hugs, Marty
Great idea! I haven’t seen anyone think of this before, but it’s actually a cute vent now! Thanks for sharing it at Monday Funday!
Thank you, Katie!
I want to feature this on Monday Funday, but I can’t seem to copy the picture. It will only let me save it as a link. Any thoughts on how to save it? Thanks!
I figured it out! 🙂 I’ll be featuring you Sunday night! Thanks for linking it up!
Hi Katie! I’m so excited about the feature tomorrow night!!!! I’m glad you were able to grab the picture. That “pin it” button can be hard to get along with sometimes. 🙂
This is perfect – we have a similar situation in our 1989 home. We have a huge, odd-sized air return at the top of our stairs that wasn’t really even finished properly.
I’ve been wanting to create a return cover that looks nicer, fits the ductwork properly and something we could add a filter to because it would be easier to change the one here, than the one on our air handler in the garage.
Thanks!
Looks amazing! It really is all in the details, such a difference! Great project.
Krista
I love this project so much! Simple, yet such a difference to the feel of the space – amen to blurring those 80’s lines, sister! 🙂