My Craft Closet: Organization Tips and Ideas Part 2 (small home/ BIG IDEAS)
 I’m so excited to reveal the rest of my craft closet organization tips with you today!
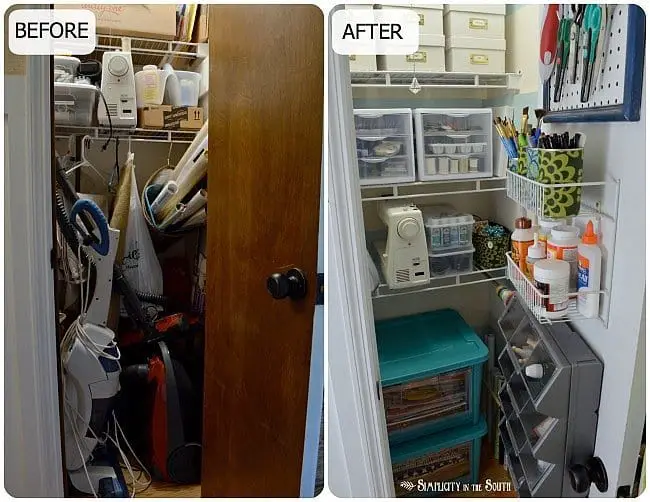
If you read part one of my craft closet reveal , then you got a glimpse of how much I needed to declutter and organize my hall closet. If you’re like me, frustration leads to motivation. Needless to say, I was beyond frustrated with the state of my craft closet.
I can totally blame my lack of organization over the past year on being creative.
See…there’s even this free printable from UCreate that justifies it.
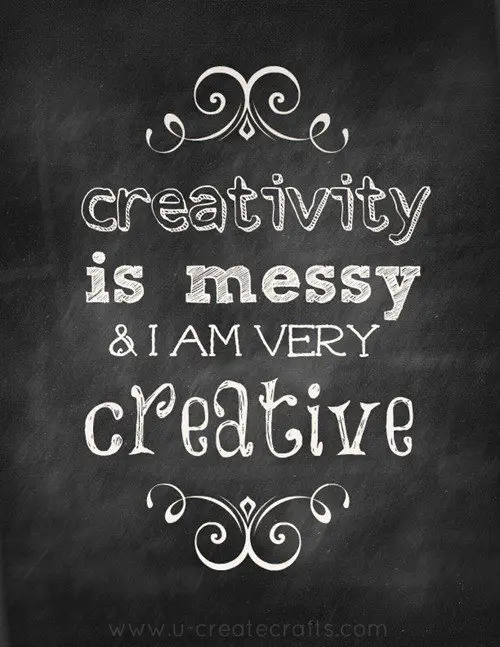
Sounds legit.
So, in case you missed it yesterday, I present to you the before.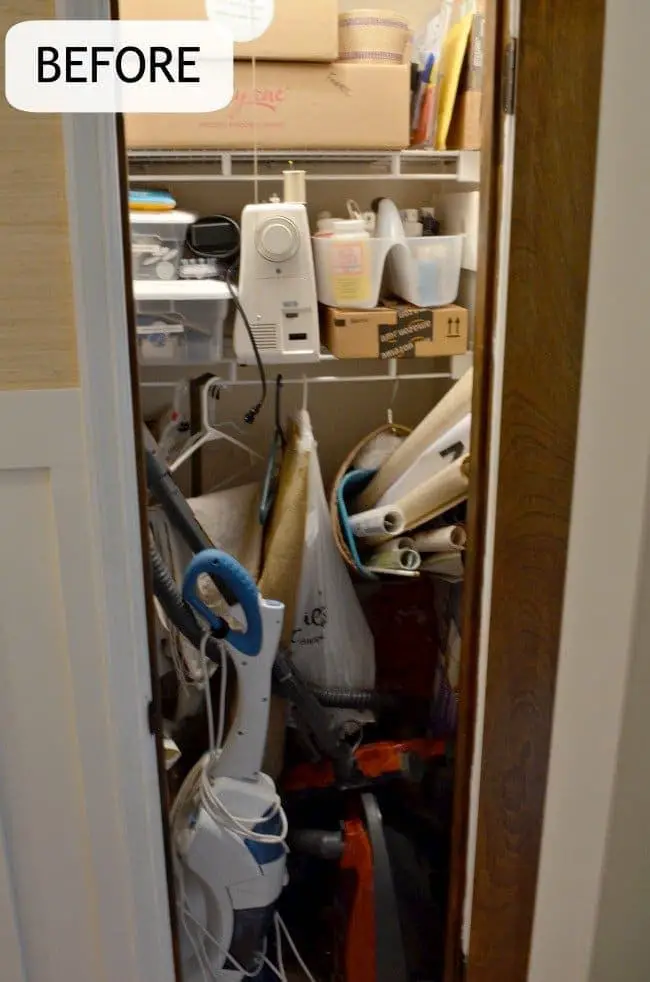 If the before picture makes you feel like Jean The Organizing Queen, you’re welcome.
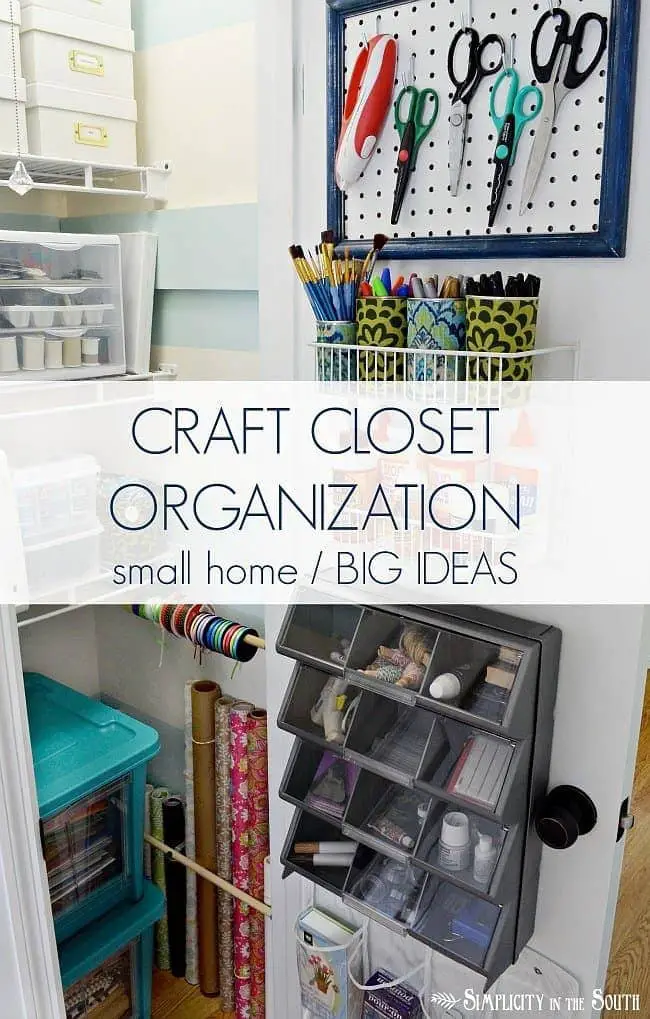
Here are some craft closet organization tips and ideas that I hope will help you get your craft closet from the before to the happily ever after:
1. Make it your own.
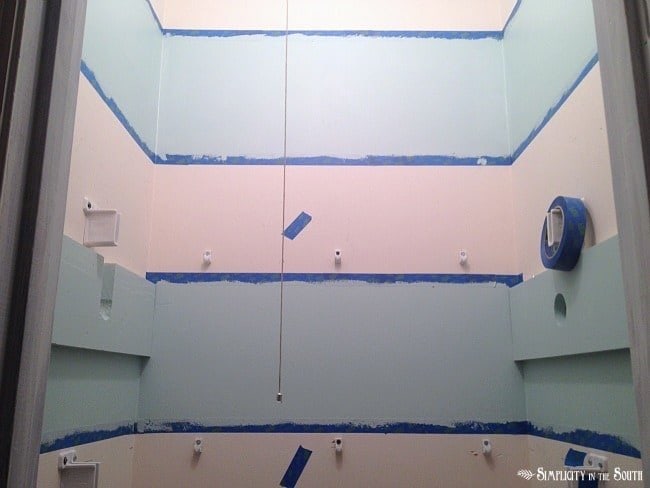
Remember this is your space to inspire creativity, so make it your own. Add color to the walls, add a stencil – whatever it takes to make it extra special. I decided to paint stripes on the wall so I could add color without having to paint around the existing shelving brackets. Plus, I was determined to have painted stripes somewhere in my home. I alternated the existing flat off-white paint with the light turquoise paint in an eggshell finish from our hall bathroom. To figure out how to do the stripes, I followed the tutorial for painting wall stripes from Beth of Unskinny Boppy. Her tutorial made it super simple to figure out how to space out the stripes for this math-challenged girl. High fives to Beth! Knowing me, if I add that special touch to make a closet functional and beautiful at the same time, I’m more likely to keep it organized.
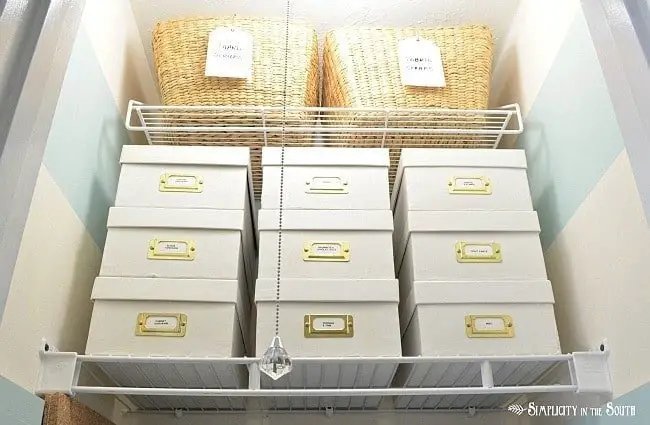
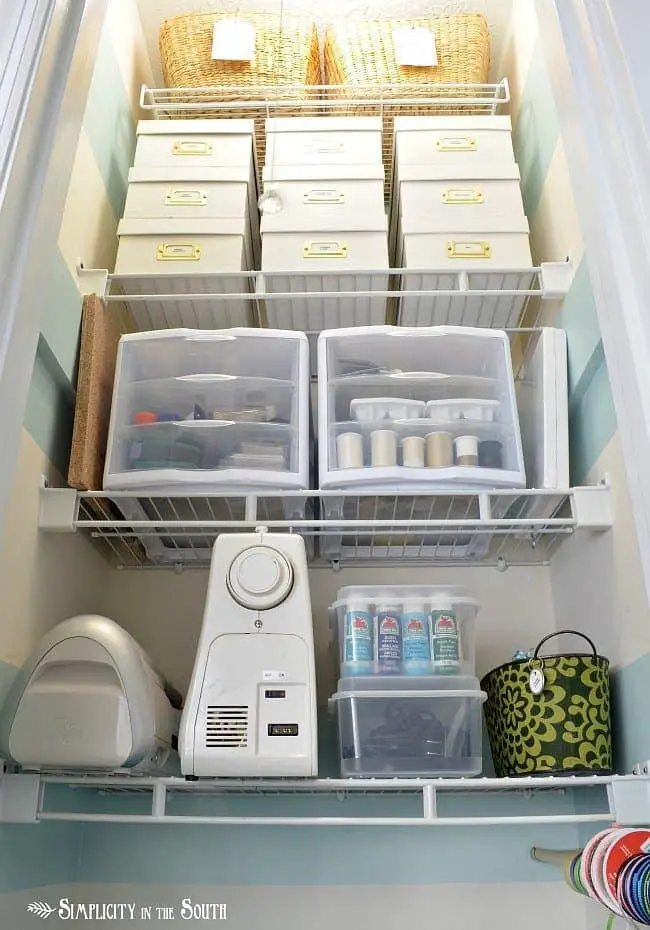
2. Keep the messy stuff concealed with boxes, baskets and/or bins.
I used this same tip in our laundry room for all the things that need to be stored away but not necessarily stored neatly. Since I’ve transferred our CD’s to a hard drive, I reused our old media boxes. They now hold upholstery supplies, large bottles of craft paint, stamping supplies, and larger sewing supplies such as cording. The baskets on the top shelf hold fabric scraps. I can just throw everything in the boxes and bins and it still looks organized.
3. Keep often-used items in clear drawer units.
I saved these clear organizers I found at Dollar General for items I use at least once a month. I may go back later on and label the drawers, but since they’re at eye level, I can easily see what’s inside.
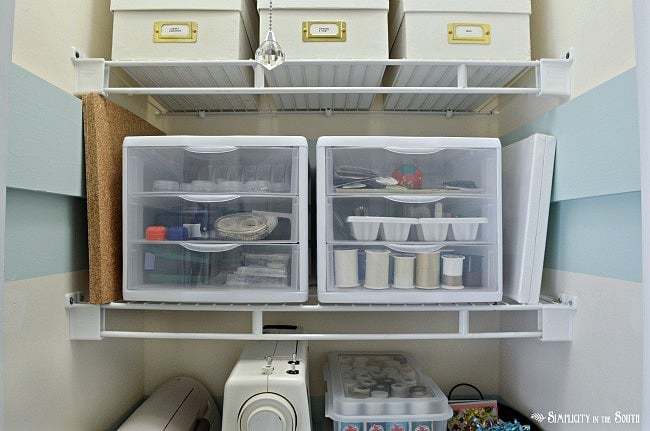
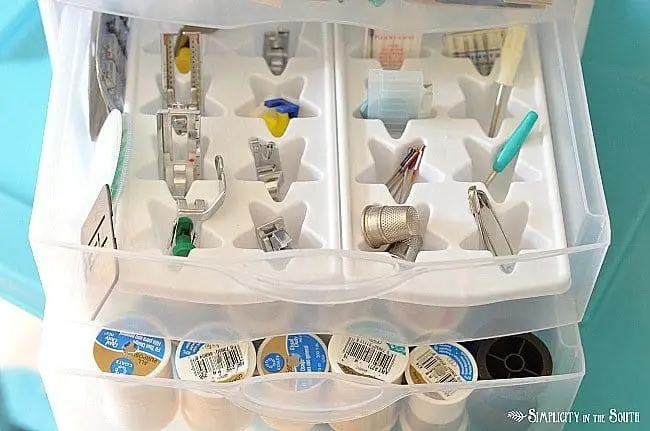
4. Store small items in ice cube trays.
Ice cube trays are one of my favorite storage solutions for small items since they’re so cheap. I couldn’t resist buying the star-shaped ones on clearance after the 4th of July.
5. Save your back and store heavier items at waist level.
This is a tip I learned from working in the health care industry. I’m not getting any younger (or taller, for that matter) so I added a lower shelf to hold the heavier items like the sewing machine. It’s easier on the back to lift from waist level rather than from above your head.
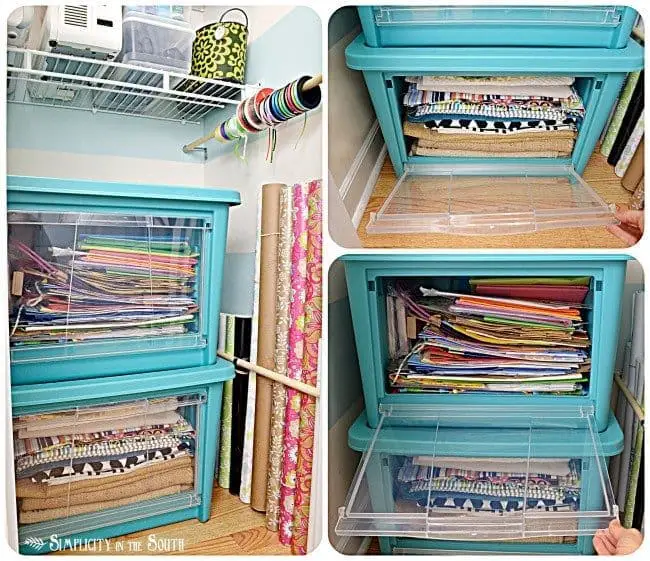
6. Keep it together.
It’s common sense, but I wasn’t following my own advice to keep like things together. Half of my fabric and wrapping supplies were stored in our family room. I simply did not have a place to store it all in the closet until I cleared it out and added these bins from Rubbermaid. You can read more about them in this post.
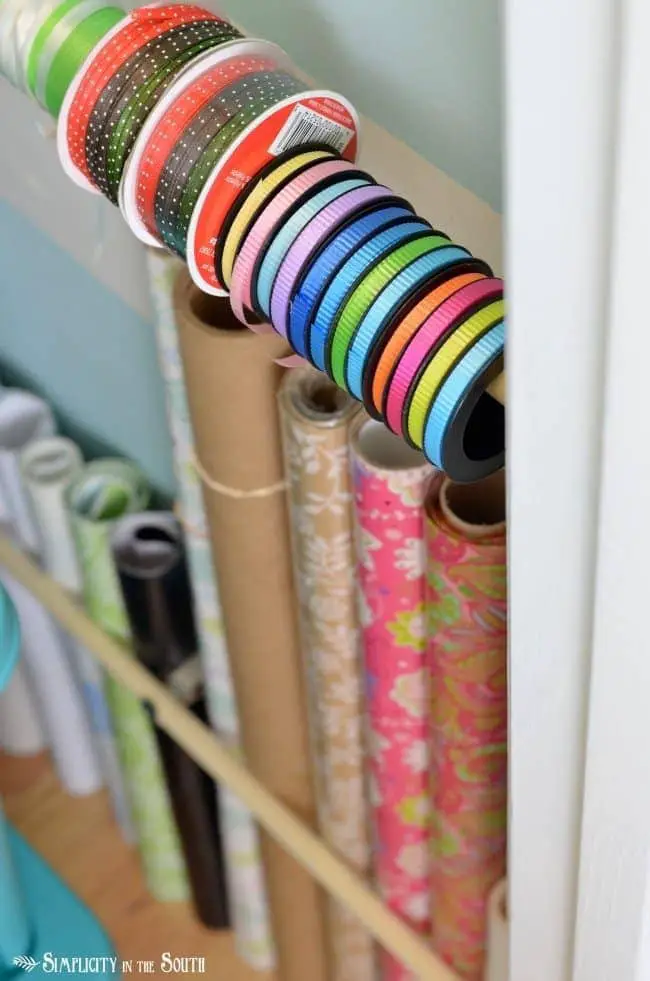
7. Make a wrapping paper and ribbon holder from dowel rods and curtain rod holders.
I must admit, this is my favorite part of the closet. I reused curtain rod holders to hold 5/8″ dowel rods to hold wrapping paper and ribbon. Now, it’s neatly stored next to the bins that hold gift bags and bows.

8. Use the valuable real estate on the back of the door.
By using the back of the door, I was able to add another 11 square feet of storage space. Maybe, this math-challenged girl knows a little something after all.

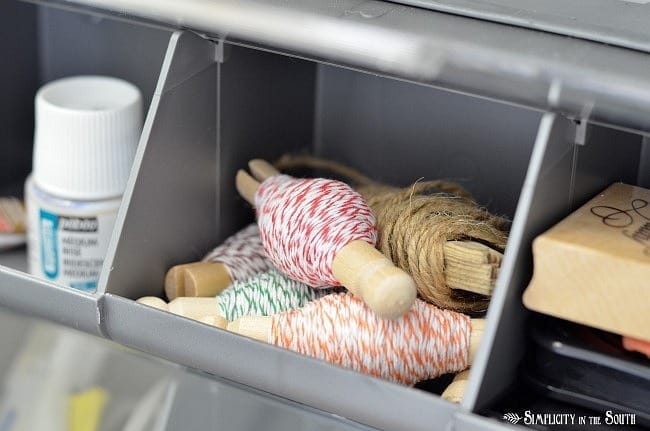
I hung a gray portable bin on the back of the door for often-used craft supplies. Below the bin, I hung 1/2 of a shoe organizer for larger items.
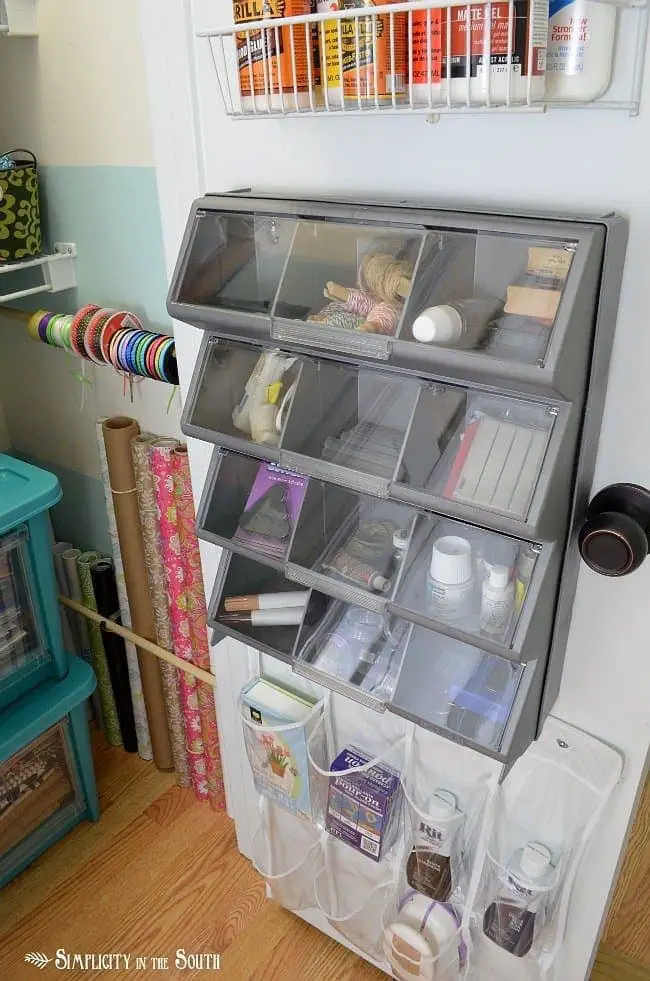
A piece of pegboard was put in a frame to hold scissors. Tin cans covered with fabric scraps are used to hold markers and brushes. You can see the tutorial here.

Much better, don’t you agree?
If you like the craft closet organization tips I shared today, then I’m betting you’ll love the other organized closets in our home:
{Organization On A Budget} For An Office-In-A-Closet
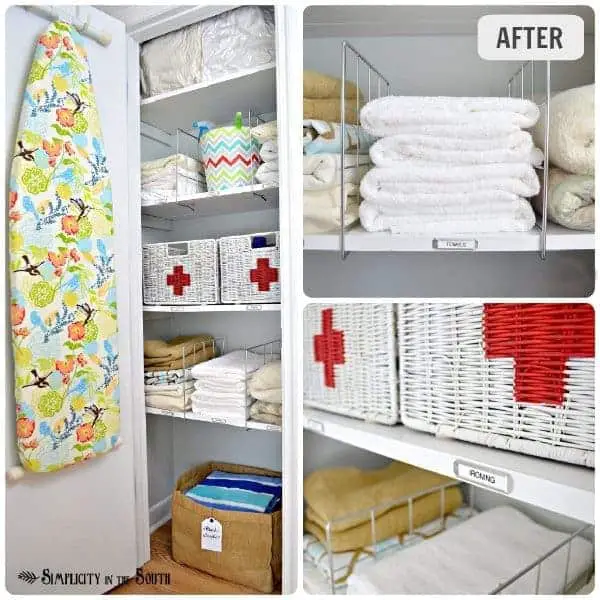
Hall Closet Organization (medicine and first aid storage)
It just occurred to me the other day that the one-year blogiversary for Simplicity in the South will be coming up on August 12th! Yay! I feel so blessed with all the friendships and support I’ve had from the blogging community along the way. I actually get to meet some of my fellow DIY bloggers in less than 24 hours at the Haven Conference in Atlanta, Georgia. So exciting! I’ll be taking lots of pictures and sharing them on Instagram so you can follow along on all the fun! You can follow all the attendees posting on Instagram with the hashtag #havenconf.
Do you have any craft closet organization tips you’d like to share? Please leave a comment to share with others.

Wow!! It is great transformation ideas , and so much pretty.
Absolutely “Genius” my dear!!
Where did the vacuum go? 🙂
What kind of shelves are those? They look like Elfa. Looking for something thinner than wood that I can screw right into the walls. Thanks!
Hi Kiai! The vacuum went into a closet in the family room. These shelves are the Kraftmaid wire shelves from Home Depot or Lowes that are cut down to size. They can cut them down to size for you. Hope that helps!
Yes. Thank you so much! Happy Thanksgiving! 🙂
I just looked it up. I think you meant ClosetMaid. 🙂
Darn it. I didn’t mean to link to my last blogpost.
Oh yeah. You’re right. Thanks 🙂
Loved everything so clean and organized one quick question what are those gray bins on the door and where can I find some
Hahah yeah I’ve noticed that a lot of their fall ofrgfines have been a bit on the wonky side! Definitely a little too crazy for me, but still fun to look at!
Where did you get the “craft organizer” that you hung on the back of the door? That would be perfect for my craft closet I have begun to create.
Looks amazing! Where did you purchase the gray portable bins? I’ve been looking for something like that instead of using the stackable bins.
I’m just reading this two years later and had the same question. I have the perfect spot for those gray bins, now if I could just find them!
The gray bins look like bolt/screw organizers you could find at your local hardware store.
What brand of wire shelves are those? That’s exactly what I’m looking for!
How did you attach items to the back of the door without seeing the screws and whatnot on the other side of the door?
Hi! We have hollow core doors and I used 7/8″ drywall plastic anchors and screws.
I absolutely love it!!
Hi Trisha. Your before pic looks like 2 of my ‘craft/office’ ROOMS! Working on a salvaged piece to make a desk to go in a 22″x60″ closet with bi-fold doors – in my rented apartment. Can’t do too much with that, but it’s a start. Get the laptop off the ironing table, so the ironing board doesn’t have to be set up. Then ORGANIZE! I love your ideas. Going to work on a few of them as soon as I get off this computer gaining ‘inspiration’. LOL Have a great day!
okay, so I didn’t use the desk in the closet. Instead, I found and cut down a bookshelf, and hung two shelves on the end wall. The chair is inside the closet and I’m happy! Thanks for the inspiration!
This is beautiful and amazing. It’s like Extreme Home Makeover.
I know in my head that I can do this for myself, but my experience in the past has been that somehow I never have enough space for everything. Do you throw away what doesn’t fit? Do you pare down as you go? (These are both practically impossible for me to do.) I also have this ADD-thing, I think, where I completely lose interest in a hobby after I get everything organized the way I want it. I also have this house full of people where I have zero–and I do mean ZERO–space of my own.
Maybe it’s the fact that it’s pouring rain today, and that makes me feel like I can manage the laundry OR the dishes, but not both, and certainly not organizing anything else.
This looks so great! I love that you utilized the back of the door, that has to be my favorite part. But the stripes, the tension rods are pretty amazing too. Fabulous job!
Where were you able to relocate the vacuum etc to? Thanks for the inspiration!
I think we were separated at birth! Great closet! Dropping by from Met Monday. Hope you’ll come see my grandson’s playroom.
Allison
Atticmag
Lovely! I’m sure you are enjoying the ease of finding everything you need – and quickly. Great job!
Blessings,
Kim
OMG! Stop the bus! That closet is gorgeous! You did a great job, and I am def,def,def-inately going to be using is for inspiration. (You may be entirely to young to get my Rainman reference, sorry!) Thanks for sharing that fabulous job! ps: I followed you from Home Stories A to Z.
Rainman was totally during my era, although I think I watched it 10 times just to see Tom Cruise. Thanks so much for the compliment on my craft closet, Diana!
I LOVE it!!! I especially love the way you used the curtain rods for the ribbon! That is so clever!
Great inspiration Tricia! I love each and every organized tip here! You really packed so much storage in this closet! Thanks for sharing at Project Inspired!! Pinned to our group pinboard for some extra luv! Heather
Love what you did, with a closet. Well I have about the same problem, only my craft space takes up half of my little apartment, I have 2 huge closets as you walk in( did I mention that my apartment is very small) So one closet holds all of my scrapbooking items, and the other closet holds all of my trims and stablizer Then half of my little bedroom has a medium size desk the kind you would have in a hotel there I have my regular sewing machine and my embroidery machine, and I turned a broken bookcase on its side to hold all of my sewing stuff, I went to Big lots, Hancocks and Joannes and purchased a bunch of those pretty decorated boxed that come in a lot of sizes and catch them on sale. I’m going for the french shabby chic look all through my apartment. I would like to know where you purchased those darling clear fronted organizers that house your gift bags??? and the gray organizer you have hung on the back of your door I love those. Keep organizing you have awesome ideas, Thank you!!
Hi Jamie. We purchased some of those nice clear-fronted organizers at Home Depot a month or so ago.
WOW you did a fabulous job!!
Thanks for linking up! I shared your post in my wrap up http://tidymom.net/2013/9-creative-ideas/ Have a great rest of the weekend!
Hi Tricia. WOW. You are my inspiration. I’m laying on the couch surfing mommy blogs and procrastinating getting upstairs and cleaning out my own closet which is much more akin to your BEFORE. It’s my project for the weekend and I’m making good progress with inspiration LOL! Thanks so much and I’ll be sure to include your post in my reveal. Hugs, Holly @ coconutheadsurvivalguide
So many super-great ideas my head may explode! I wish I could waive a magic wand and have my closet transform itself to look like that!! Definitely pinning this so I can use it to plan my office closet that is in dire need of help 🙂
You have come up with some very unique and useful storage and organizing ways… I love your closet and have been totally inspired to tackle mine… thanks for the inspiration… I found you through Home Stories Ato Z….Am now following on Pinterest and Google +
So inspiring!
What did you use to attach the storage items to the back of the door?
Thanks:)
Wow great organizing here! Love all the gadgets you used! It was so nice to meet you at Haven! Following you now!
WOW! What a transformation. I love how creative you were with items that you already had. The striped painted wall looks great too! That’s one of those makeovers that you just want to keep walking by and gazing at your awesome work!
Kim
Awesome awesome awesome!! It is such a fabulous pretty well organized craft closet, I am totally inspired:)
This is the dreamiest closet I’ve ever seen! I love the stripes. The organization is very drool-worthy. You did great!
those gray bins on the door are a great idea!
hope you have fun at haven!
I have a whole bedroom to use for my craft room and I still cannot keep it organized. Of course I have several “crafts” spread out in there too. My sewing, my crochet, my jewelry making, and storing all my display items for my craft booth at the festivals. I tried putting wood shelves up but it still looks messy, so I’m checking into the drawer type units available at wallyworld.
Wow!! Looks so much better. I love it how accessible and organized everything is! Great job!
It’s amazing, Tricia! Every last detail is perfect…. and the storage is fabulous! Great job! 🙂