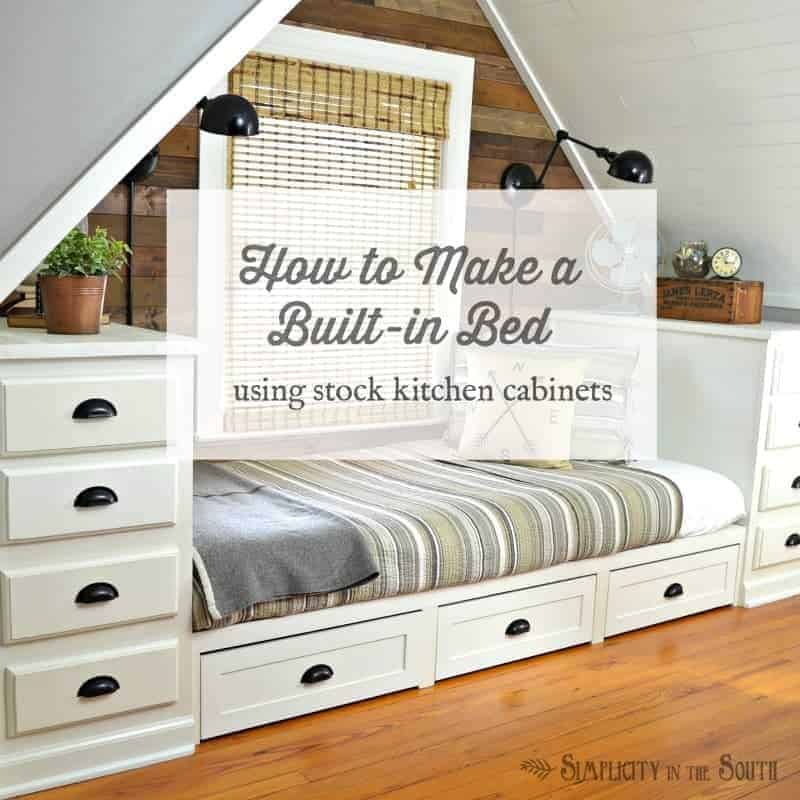
How to Make a Built-in Bed Using Kitchen Cabinets & a Rustic Planked Wall
We’re excited to say that our DIY built-in bed was published in the Fall 2017 edition of This Old House Magazine!!! It was also shared on their website here.
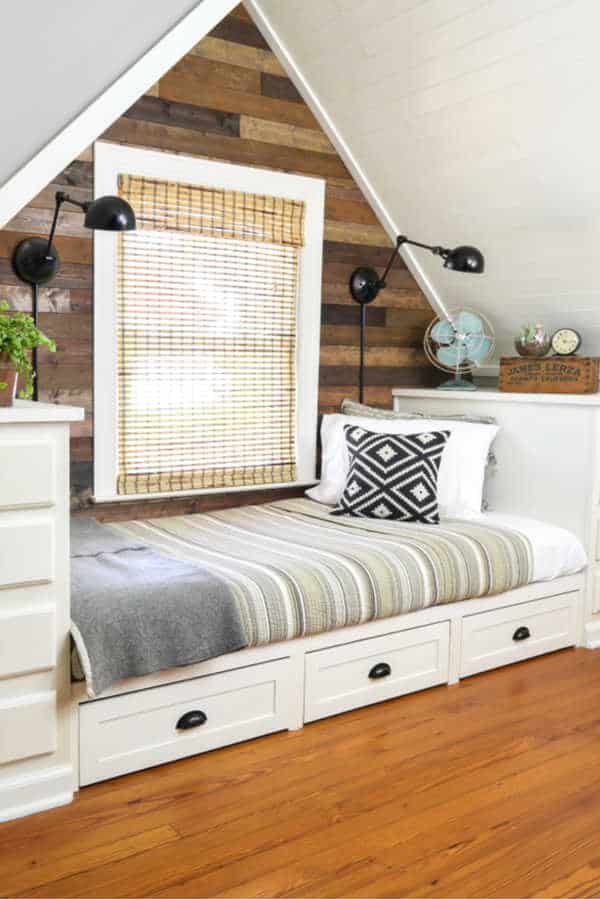
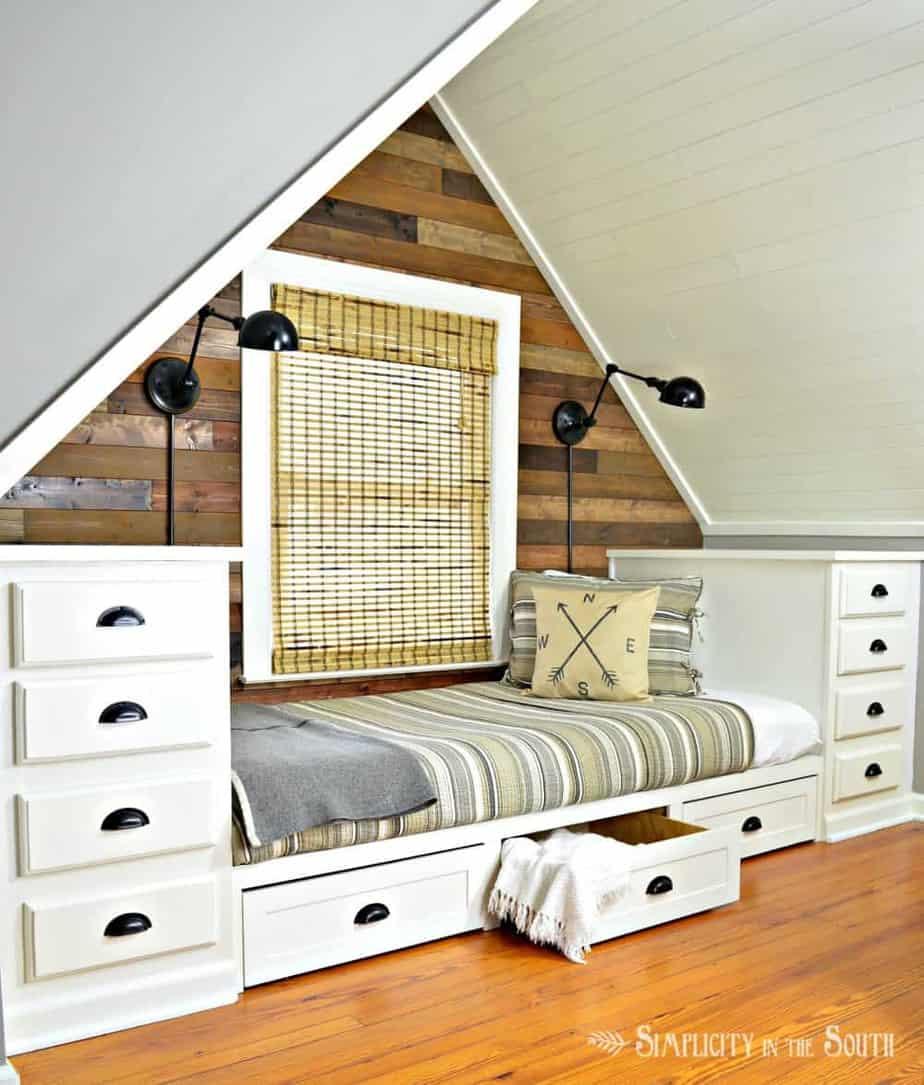
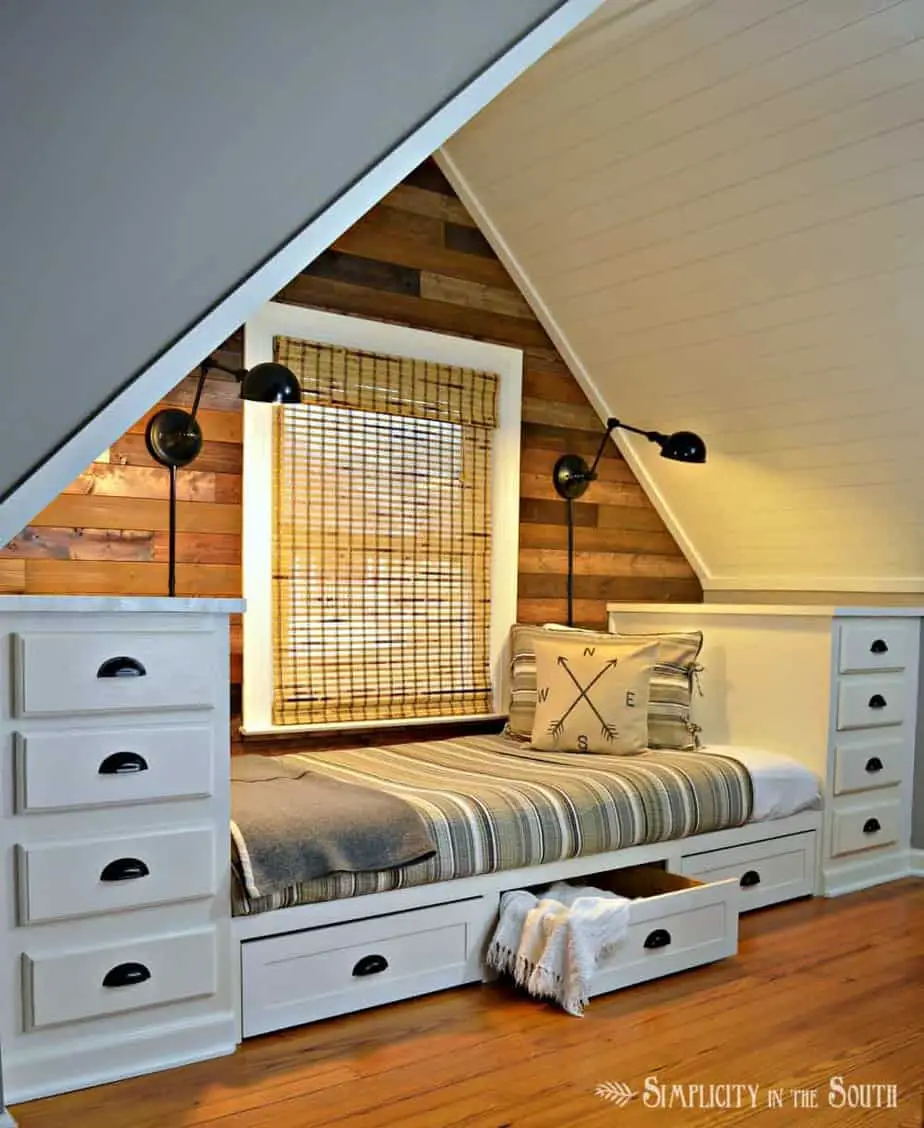
Hello, friends! Today, I’ll go over how we took a small dormer space in the upstairs bedroom and made it super functional by adding a built-in bed with tons of storage using kitchen cabinets and trundle drawers.
On top of that, we added texture, character, and coziness in this little nook with a rustic planked wall behind the bed and new lighting.
Next week, I get to show you the final reveal of Taylor’s Restoration Hardware inspired bedroom.
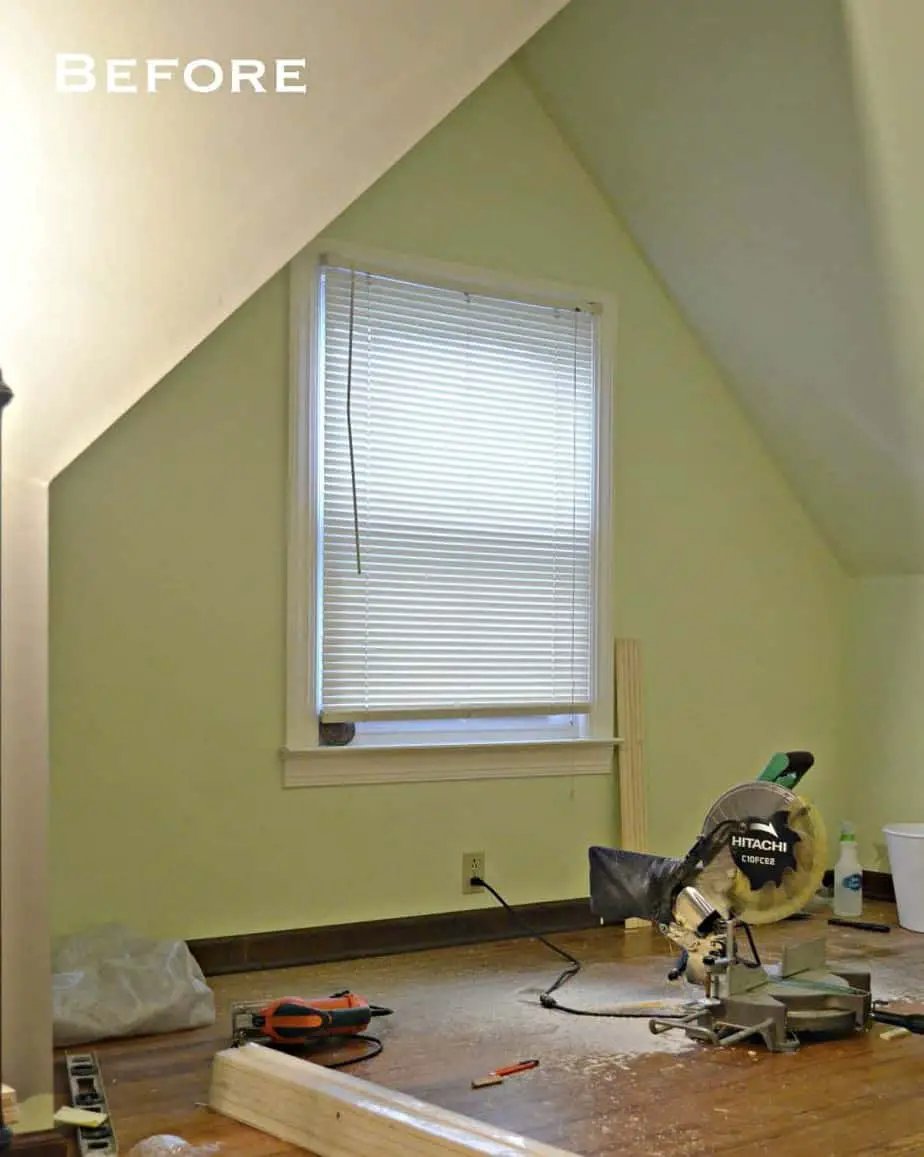
But first, let us rewind to see where we started before we added the built-in bed and rustic, planked wall.
And this is how the finished project turned out!
bamboo roman shade // striped quilt // farmhouse-style compass pillow cover // cup pulls // similar wall lights
Let me tell you what we used to put it all together.
**Please note: some of the links in this post are affiliate links. I’ve added links to products that I’ve purchased and trust enough to recommend. If you buy something through these links, we may make a small commission at no extra cost to you. We greatly appreciate you for helping support our blog! **
The supplies we used for the built-in bed:
(2) Sheets of 3/4″ thick plywood (we used a pre-primed sheet for a better paint surface)
(4) 2″ X 3″ X 8′ boards (for the frame behind the cabinets)
(1) 4 x 8′ sheet of 1/4″ luan with a smooth surface
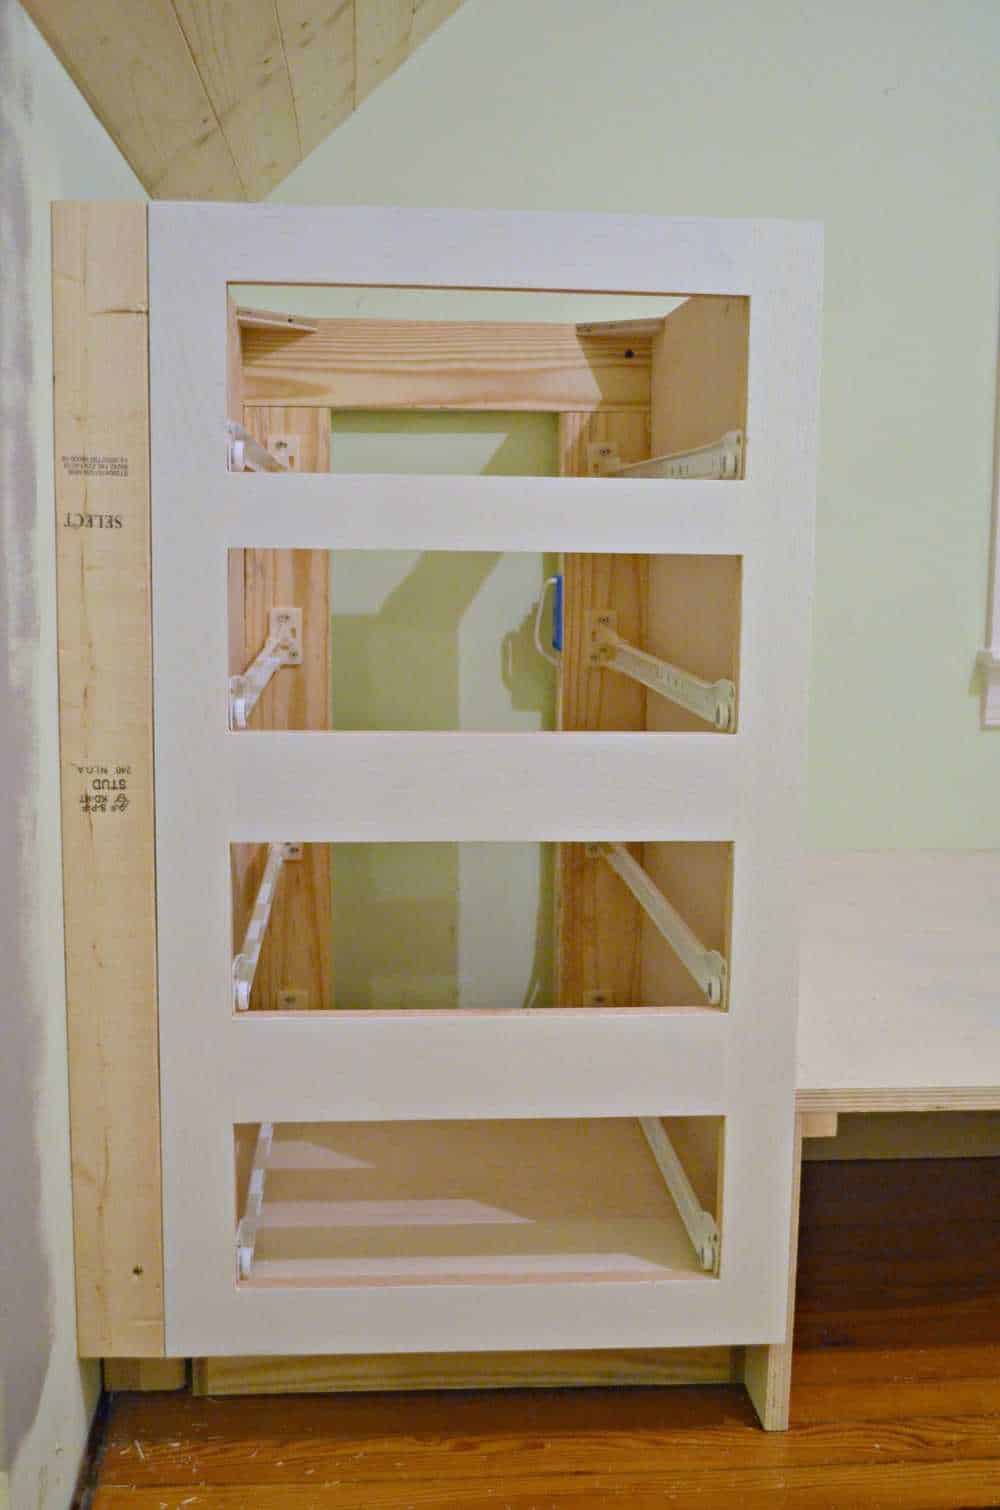
(2) 18″ wide drawer base cabinets. We bought these from a local discount home improvement store. This the link to their Asheville, NC location.
(2) Spruce/Pine-Fir Boards 1-in x 24-in x 4-ft (for the countertops on top of the drawers)
We ripped a few 1×4 boards down the middle to trim out the front edges of the plywood bed frame
(3) sets of Swivel caster wheels for the trundle drawers
Electrical wire and outlets including a USB charger wall socket
(Nails, screws, wood glue, caulk, and paint we already had on hand. We used the extra-long twin mattress that you see in the before pictures. This mattress from Amazon is similar but deeper.)
Cost of the materials for the built-in bed with drawers: $480
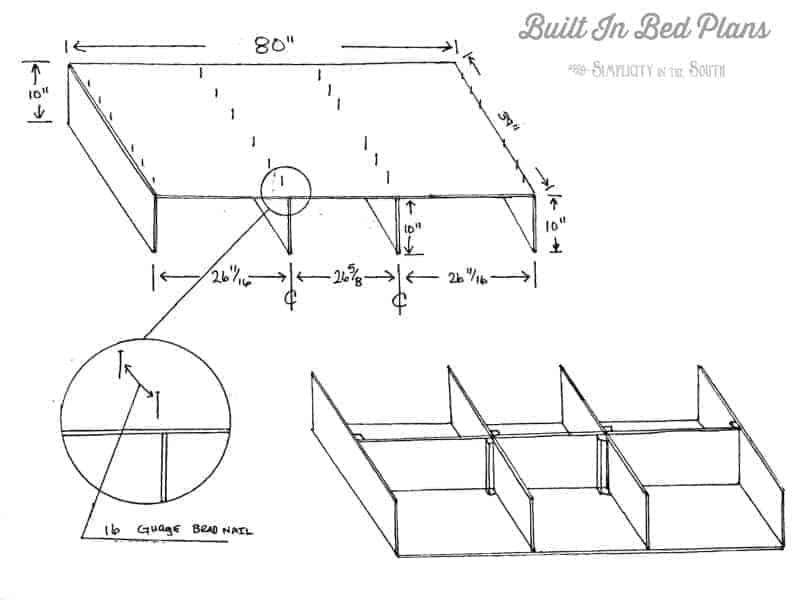
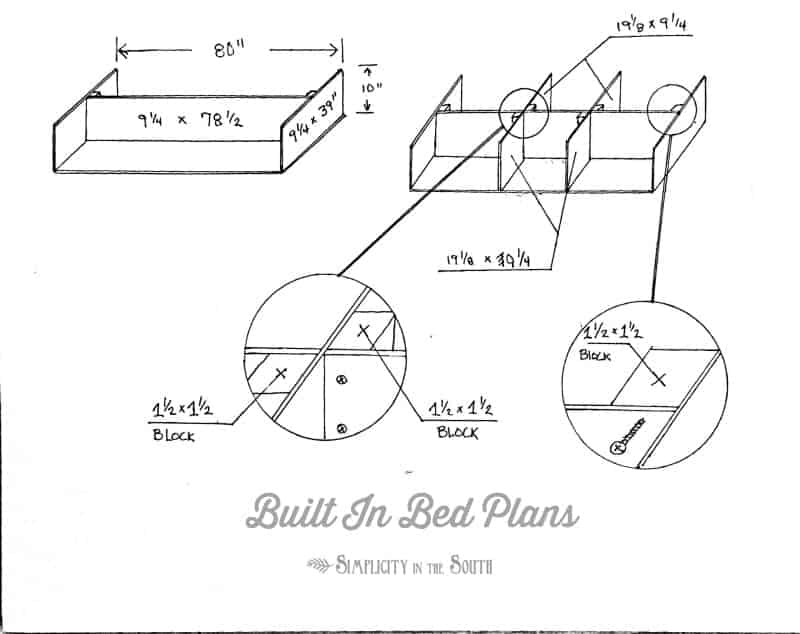
The first step was to measure the dormer nook where the bed would be placed. Our nook is approximately 10′ wide by 4′ deep.
Next, we took into consideration the mattress size. The extra-long twin mattress we already had was of 80″ long and 38″ wide.
Using those two measurements, we could estimate how much room we had left over for the two drawer units (kitchen cabinet bases) on either side.
We determined we had room for a pair of 18 ” wide stock kitchen cabinets on either side of the bed.
Keep in mind that older houses tend to be a little out of square. We discovered that the width of the window wall was around 2 inches smaller than the width where the front of the bed would be placed.
Always measure twice before ordering your cabinets.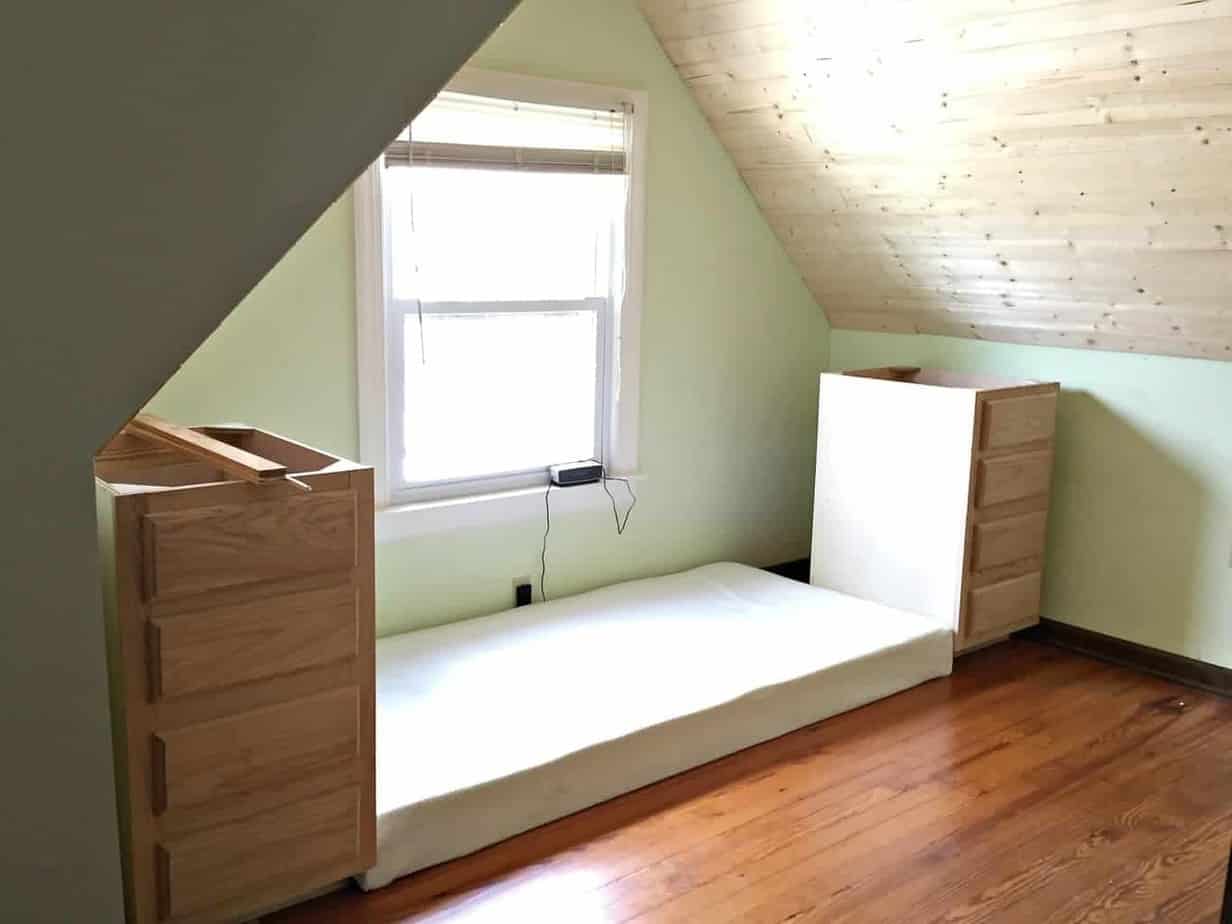
This left a gap of about 2-1/2 inches between the cabinet and the wall. To fill in that gap, we use 2 x 3 boards cut to length.
We wanted the front of the cabinets to be almost flush with the front of the bed. We pushed the cabinets away from the wall to match the bed frame. We then framed behind the cabinet rear section with 2 x 3s.
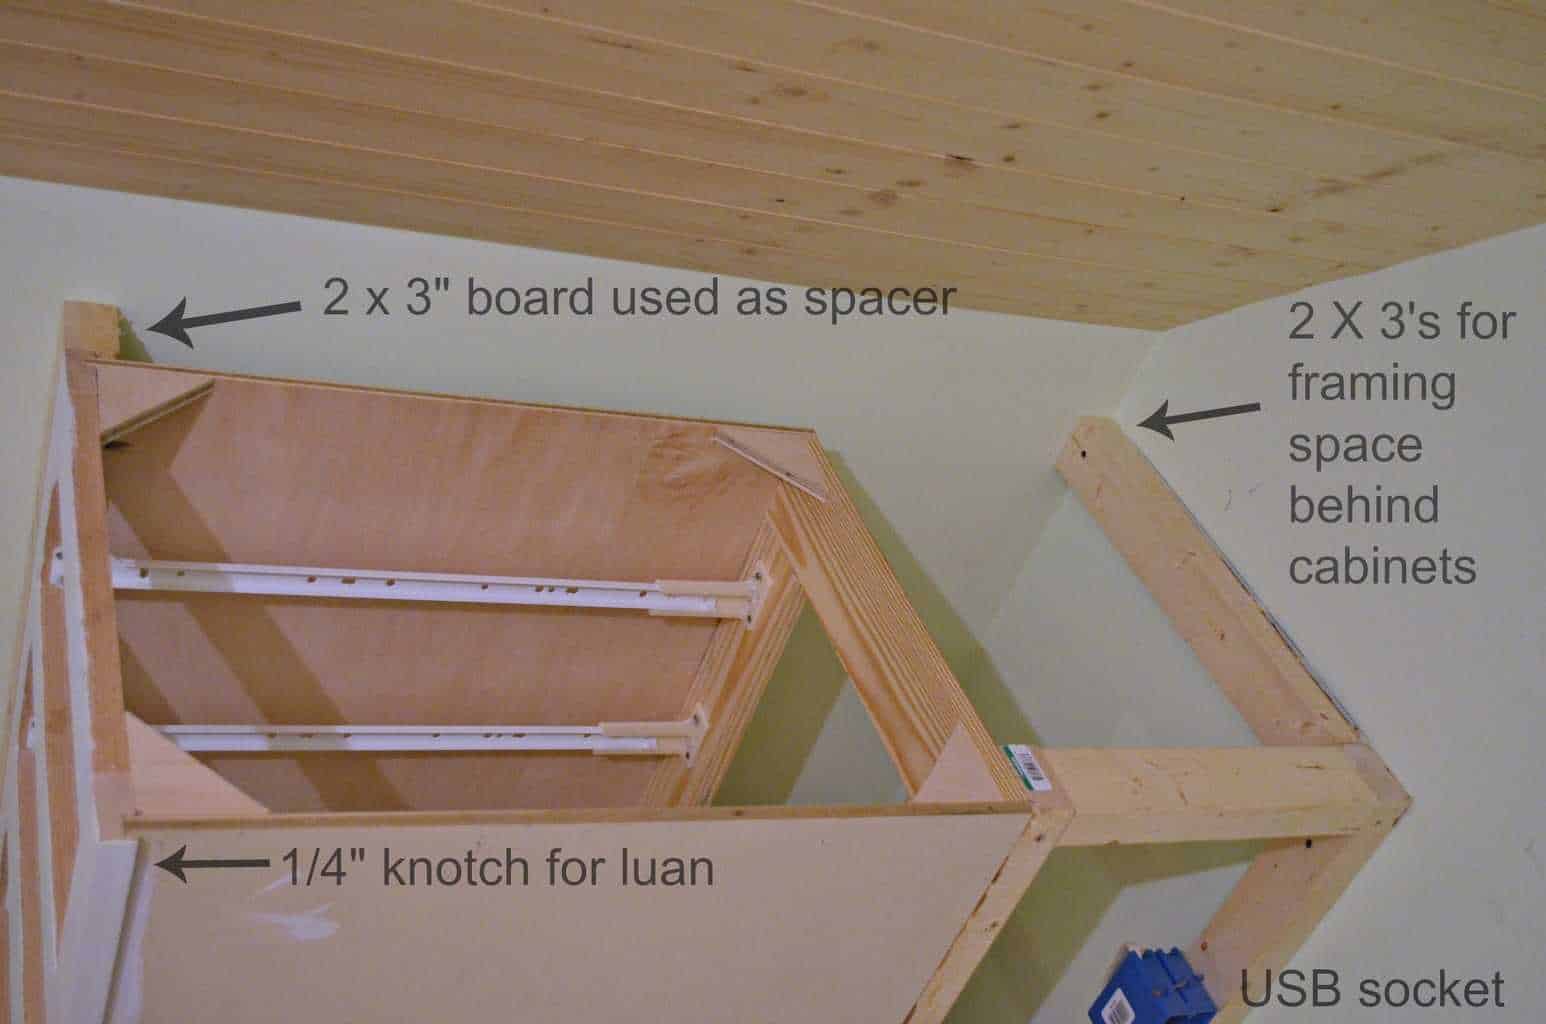
The next step was to use the existing plug-in behind the bed to add wall sockets to both sides of the bed.

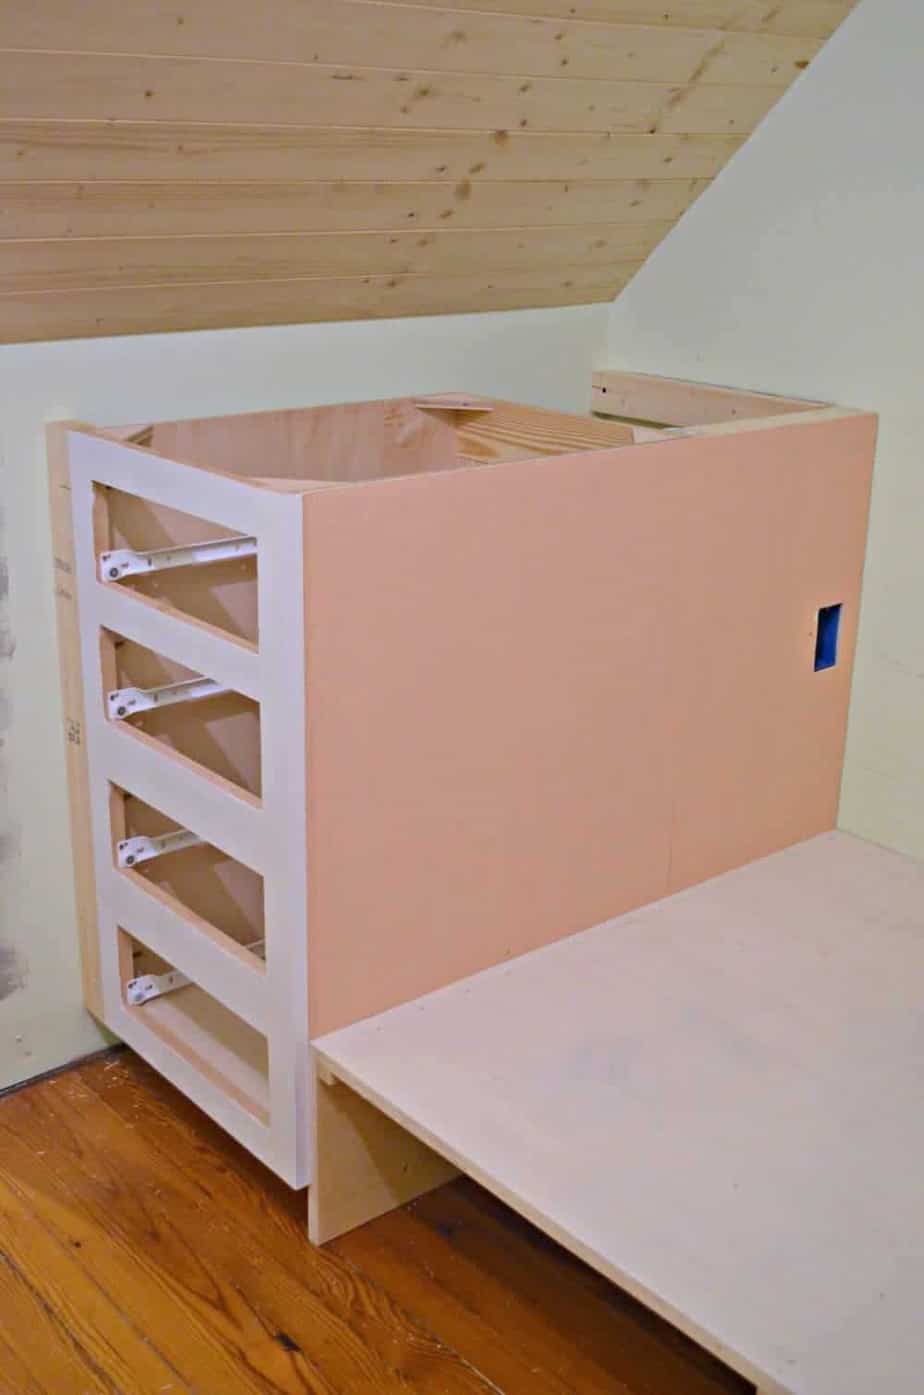
Then, the sides of the cabinets were covered with a 1/4″ piece of luan.

I don’t have pictures of how the bed platform was built because Jason surprised me with it one day after work.
Update: I’ve added the building plans and dimensions for the built-in bed below.
Jason used a 3/4″ thick 4 X 8′ sheet of pre-primed plywood to make the bed platform.
Eventually, we’ll add ventilation holes by drilling 1″ holes every 8″ apart where the mattress sits.
After the cabinets were installed, we trimmed out the bed frame with the ripped down 1×4’s matching the 3/4″ reveal on the cabinet facing.
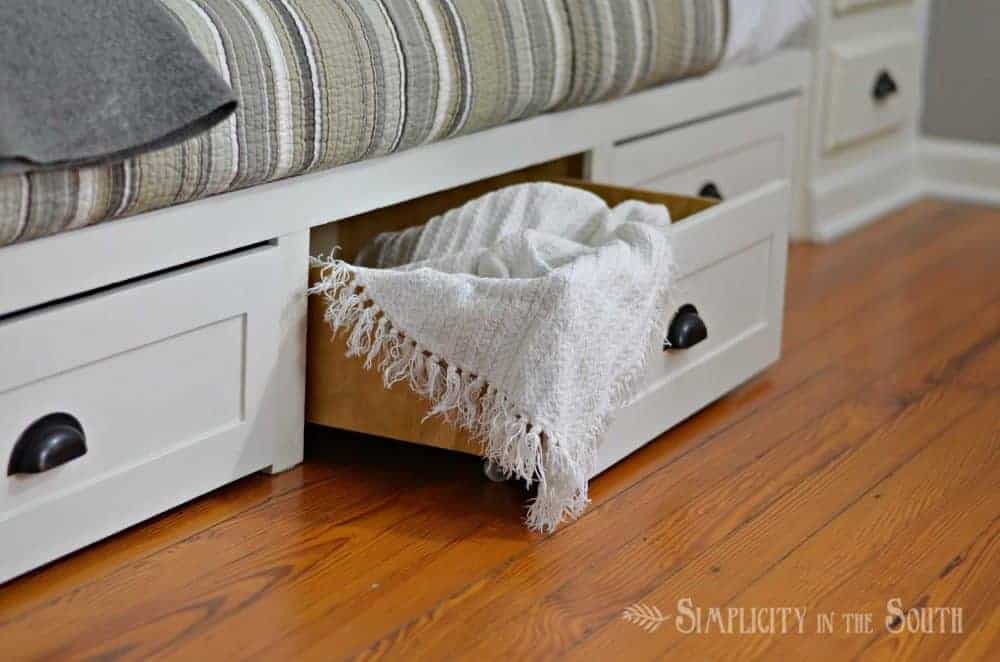
We used Ana White’s tutorial for her under bench trundle drawers for the storage under the bed.
We were able to construct all three drawers with left-over plywood for $4.00 per drawer. For a finishing touch, we faced the drawers with strips of left-over luan ripped down to 1-3/4″.
The Planked Back Wall:
The next part of the room remodel was to add extra coziness to the back wall.
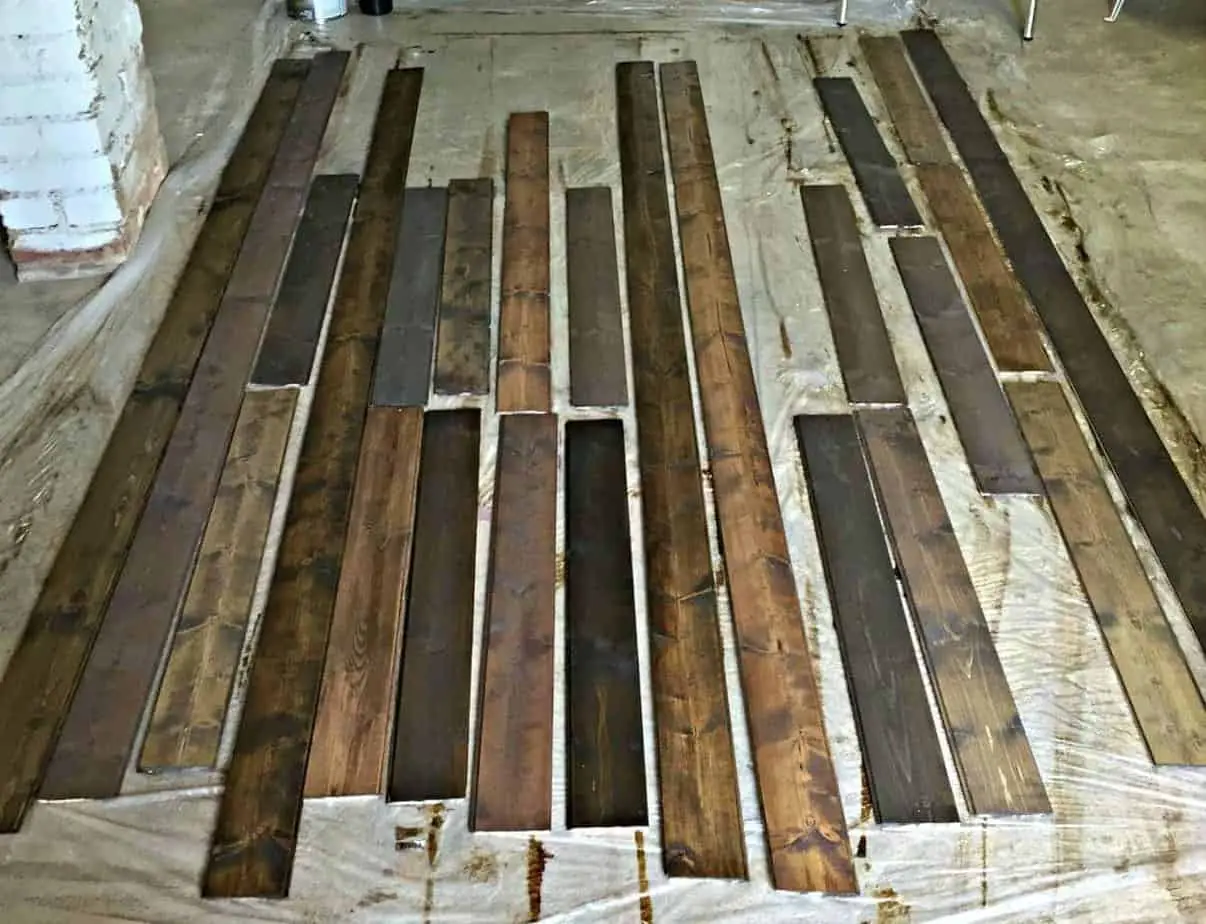
To add texture and the rustic look on the back wall, I used various stains on a few leftover packs of the same planks we used when we covered the popcorn ceiling.
If you want to go the easy route with planking the wall, you can buy these peel and stick reclaimed wooden planks or this cheaper option of reclaimed barn wood peel and stick wallpaper.
An in-depth tutorial can be found in my post about planking the wall in the office-in-a-closet. The only difference is, I didn’t use any paint over the planks.
Lighting:
Then we added these lights from Lowes that I found on clearance. They’re no longer available but these wall lamps are similar and are an even better deal for a set of 2.
These USB charger sockets were added in order to allow easy bedside phone and tablet charging. 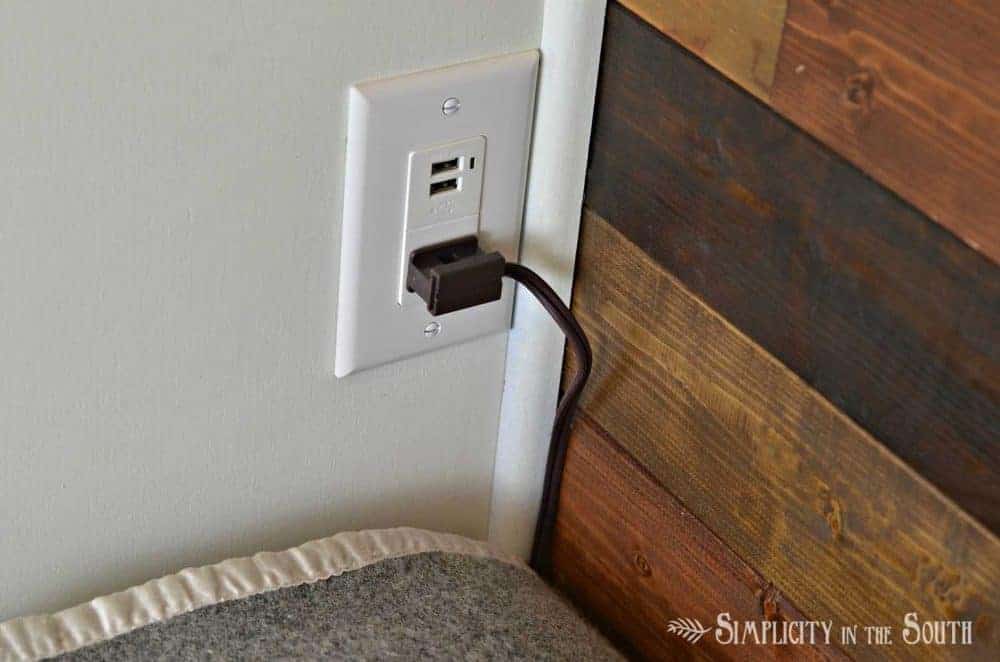 I’ll be sharing a complete reveal of the finished dormer bedroom pretty soon. It will have details of how we pulled all the furniture and decor together to create such a warm and cozy bedroom.
I’m so proud of how this room turned out and how it gave me the inspiration to do so much more myself!
Please follow along on Instagram and Facebook for sneak peeks!
And since every before and after deserves a good visual of how far it’s come…

See the completed room by clicking this link.

Pin this tutorial on how to make a built-in bed using kitchen cabinets for later!
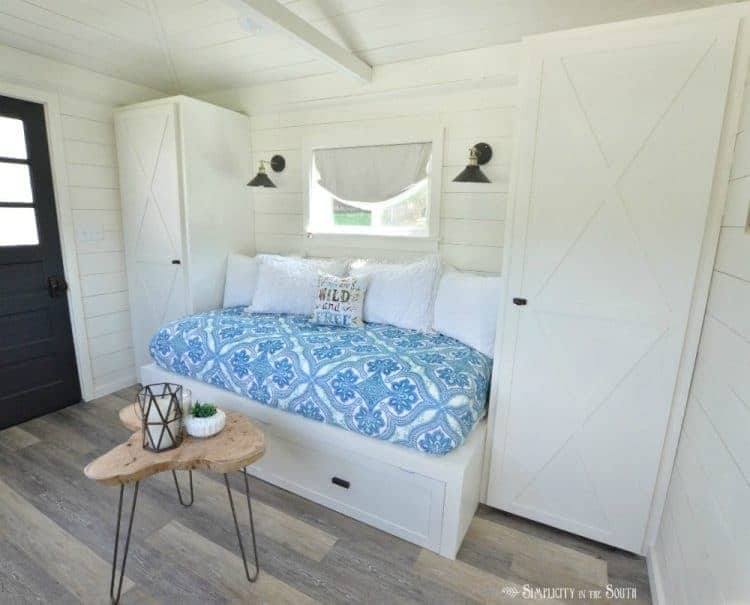
Want some more ideas for built-ins? We made a similar built-in bed for my step-daughter in our cottage guest shed but added a kitchenette and closet. See that post by clicking here or on the picture below.

This was featured on Thrifty Decor Chick & Remodelaholic!


Wow! It’s gorgeous. But you didn’t share how you closed the top of the drawer stacks. Looks like marble. That must have doubled your cost. ANy suggestions for nice looking economical tops?
Hi,
Thanks so much for asking. The tops of the drawer stacks were made by cutting down 1-in x 24-in x 4-ft common pine boards. Then they were primed and painted. I checked the link that I have in the post under the materials and they are $32 at Lowes so it’s a pretty affordable option, especially if you have the paint on hand. Let me know if you have any other questions and we’d be happy to help.
Tricia
I LOVE what you have created. Where did you order the cabinets from? Thanks in advance.
Thank you, Chris! We found them at a locally owned and operated home improvement store called Pop’s Discount Building Materials locates in Asheville, NC. We bought 2 cabinets that they had in the store but they can make custom-sized ones too.
Love this project! I am thinking I would like to try to put bunk beds in, my window is much higher. And, add beds to the sides also, for a total of four beds. Perfect for my grandkids “jammie parties”!!
Hi Jeannie, that would be so much fun for your grandkids! I would’ve loved having something like that growing up at my grandparents’ house.
I enjoy this DIY projects. I’m a newbee, somehow I can learn, and it will be fun to see a finish product. Thank you for posting your creative, practical ideas.
You’re welcome! When I first got started with do-it-yourself projects, it was a little intimidating. But I promise once you get started and see your results, you’ll feel so empowered to do more. I’m glad we inspired you!
Love,love,these,wish,I had a handy person around to do some of these wonderful projects
I’m glad you like it, Cecelia! I thought I was handy until I met my husband. 🙂
What size mattress did you use and where did you purchase it?
The mattress is an extra long twin that I purchased when we lived in our previous house. It measures 39″ x 80″. This is the link to the mattress I purchased from Walmart: http://bit.ly/2oW6nZ4 They shipped it to the store for free.
If they had it in the x-long twin size, I would’ve purchased the 8″ thick mattress instead.
Tricia, the bed looks amazing and stylish! I would never guess it made of used kitchen cabinets! great re-purposing project!
Thank you, thank you, so much for this post, because this s the solution to a space I have, but did not know what to do with it. This post just showed me what to do this summer.
You’re so welcome! I love knowing that I helped someone solve a problem they were having with their own house. It makes what I do all worth while!
May I ask where the window shade is from?
The shades are from Overstock.com. They’re called the Rustique Bamboo Shades. Here’s the link: https://www.overstock.com/Home-Garden/Rustique-Bamboo-74-inch-Long-Roman-Shade/2951638/product.html?recset=f06f1077-32f4-4ccc-b3d5-e7405f371163&refccid=RRVW6RYTMZ6YA4CFZL2LES7AZI&searchidx=0&recalg=63&recidx=0
I’ve used these in my old house also for over 6 years and they’ve always held up well.
Hello I am quite interested in surprising my daughter with the whole small dormer redo that’s you did please provide me the information on how to construct the bed
Thank you ever so much…
Jacqueline
I sure will! I’ll get my husband to draw out the plans along with the supply list for you asap.
I was just checking to make sure you got my email a couple weeks back with the plans. I worried they may have been sent to spam since I sent attachments.
You all did a beautiful job. So warm and cozy looking, too with excellent rustic features. Know this is a stupid question to ask but I still that just the lamp cord running straight down below the lamps or is the wire encompassed in something else? It’s just so perfectly straight, too! How did you do this? Blessings, Suzanne
Thank you, Suzanne! The lamp came with a cord cover / pipe that screws together and makes it all look nice and straight.
I absolutely adore this! I saw a similar bed at a well know store for $1200.00 and that was minus the mattress.
It looks wonderful! What a great use of the space. The kitchen cabinets work perfect there too. I do have one question: What did you use on top of the cabinets?
Hi Robin! Thank you so much for the sweet comment. We used a couple of these boards from Lowes to top the cabinets.
Hope that helps!
I would just stop there, grab a cuppa tea and a book – and be done with it – if I ever remodel I will have to do this type of space last – Looks fantastic!
Wow! This is so amazing and beautiful! Thank you for sharing your journey with this project. It’s inspiring!
How clever! Love it
Perfect, as usual! So happy to see you on your blog again! But, especially glad to see you so happy!!
Hey, Ginger! Thank you so much! It feels good to be back. I miss talking to you!