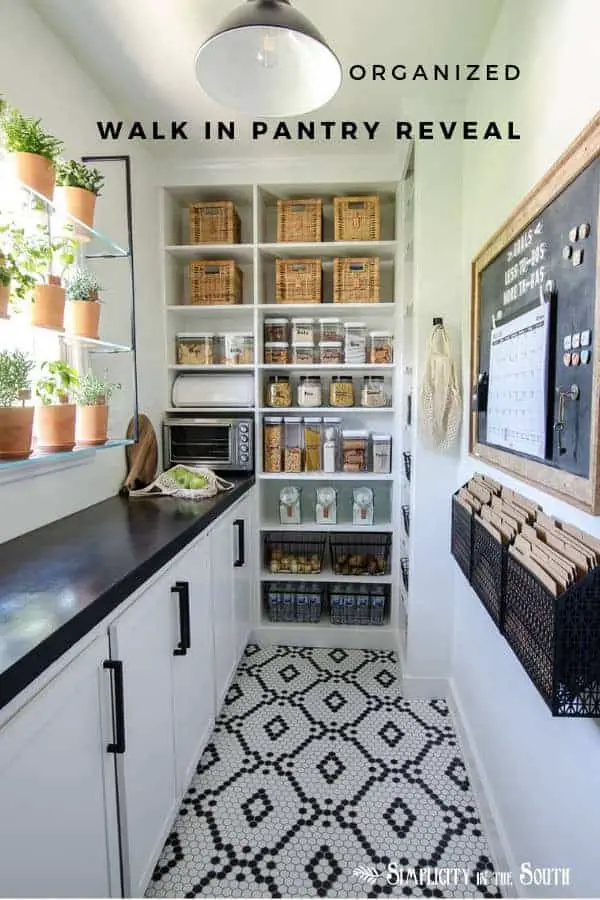
Walk-In Pantry Reveal
Remember that feeling you got when you walked across the stage at your high school graduation? Or that feeling the first time you had to take your little one to kindergarten, despite the tears and separation anxiety (yours…not the kiddo’s).
It’s that feeling of “Yaass! I did it! And made it out alive!!!”
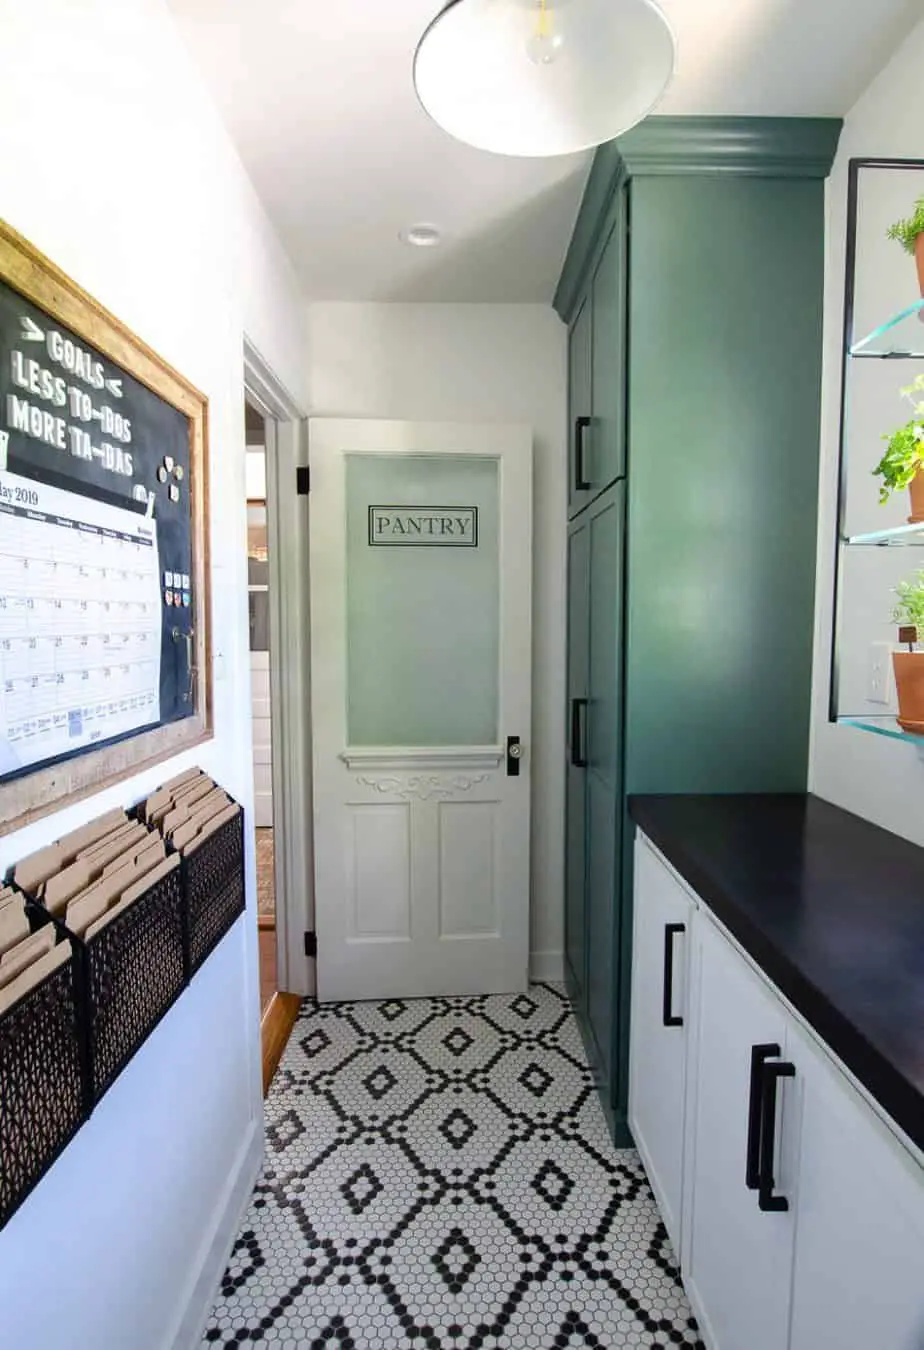
I’ll walk you through our walk in pantry reveal! What was once a bathroom has been transformed into a well-organized dream pantry.
That’s exactly how it feels to have our pantry remodel complete. It’s an accomplishment just to say, “Yay! It’s reveal day!”.
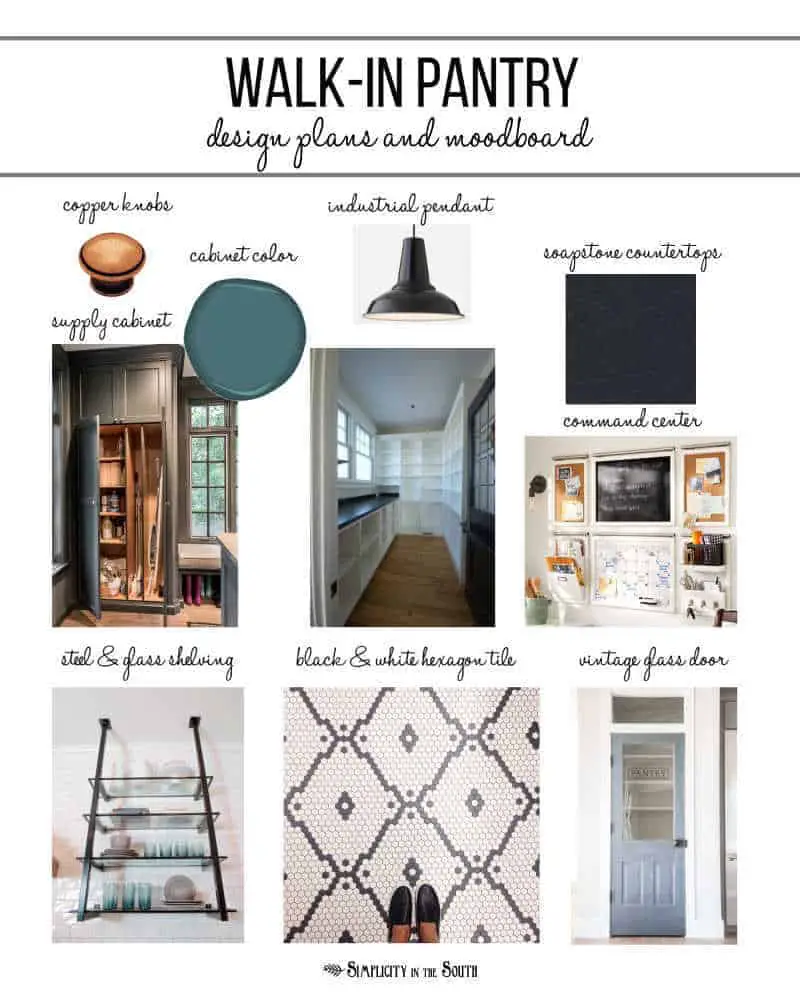
If this is your first time here, we’ve been busy as bees the past 5 weeks transforming an old bathroom into a walk-in pantry as participants in the One Room Challenge hosted by Linda of Calling It Home.

This is how the room looked just five short weeks ago.
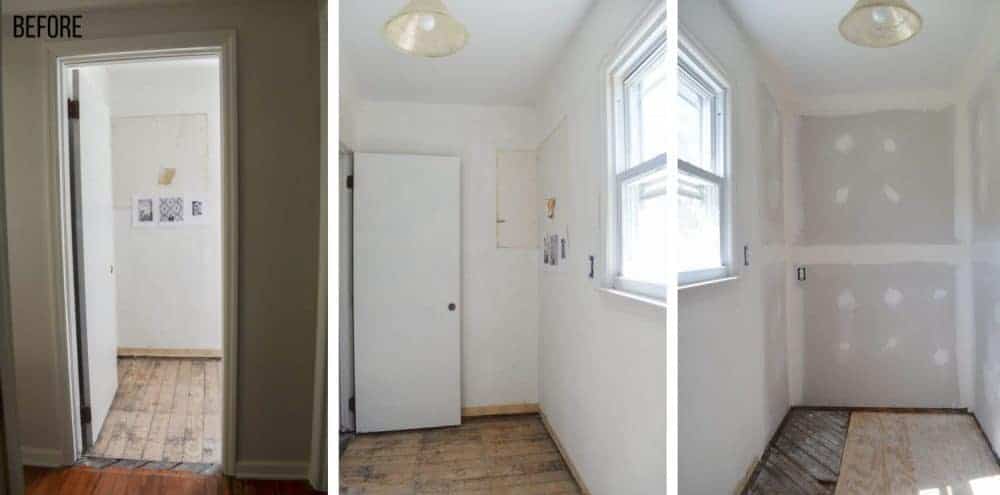
When we converted a downstairs bedroom into a master bathroom, walk-in closet, and powder room, we needed to find a function for the former downstairs bathroom since we didn’t need three full bathrooms. This is how the room looked on move-in day.
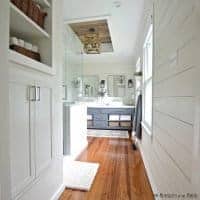
So without further ado, I present to you our organized walk-in pantry!
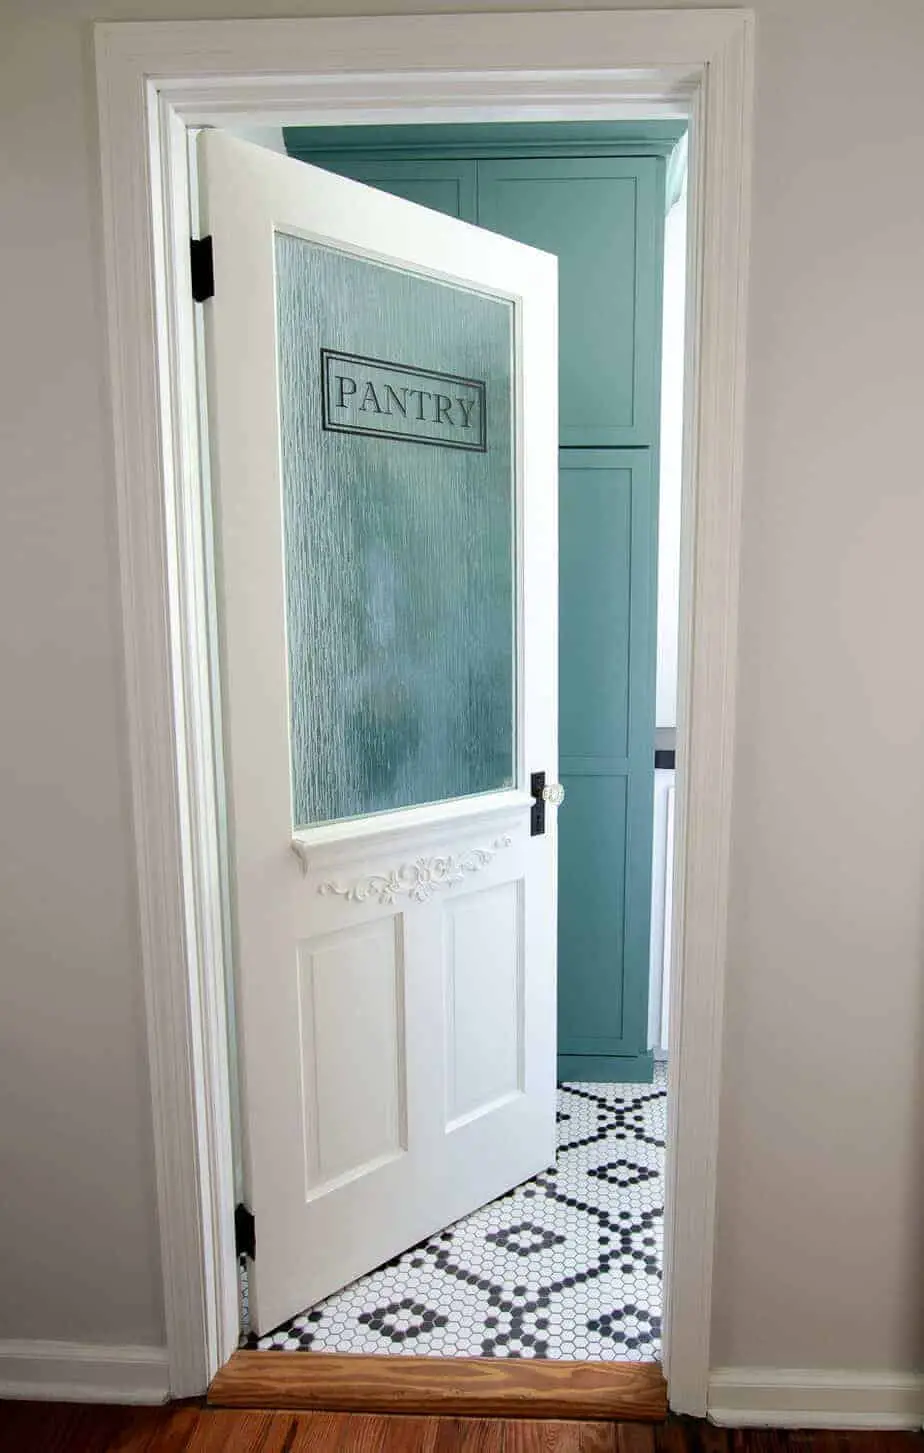
My husband and I are committed do-it-yourselfers, so if there’s a way we can make it ourselves or transform it in some way with our own two hands, we try our darndest to do it. Not only did my husband, Jason, build the cabinetry, but he even handcrafted the metal door handles. I adore him for his ability to make my design dreams a reality!
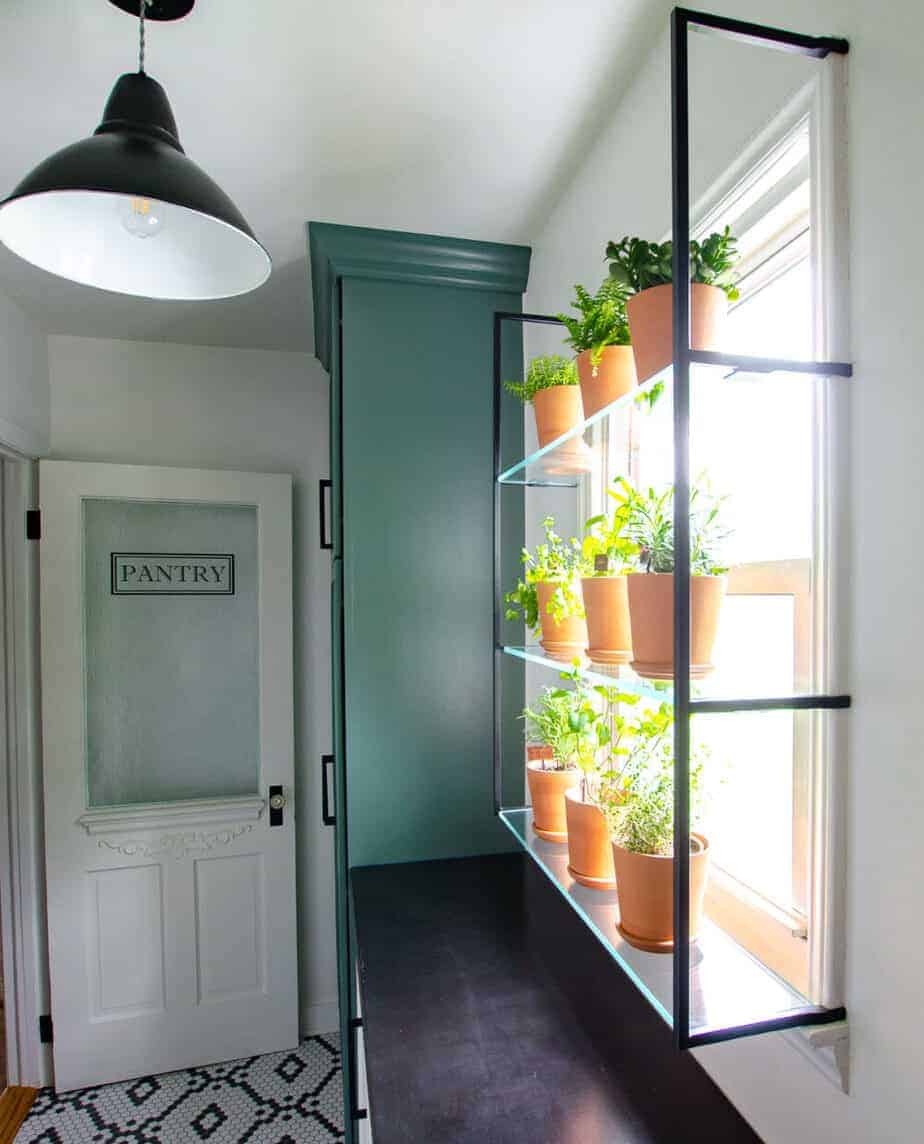
(I’ll follow up with a tutorial on how we changed a solid door that we found at the Habitat for Humanity into a glass-paneled door.)
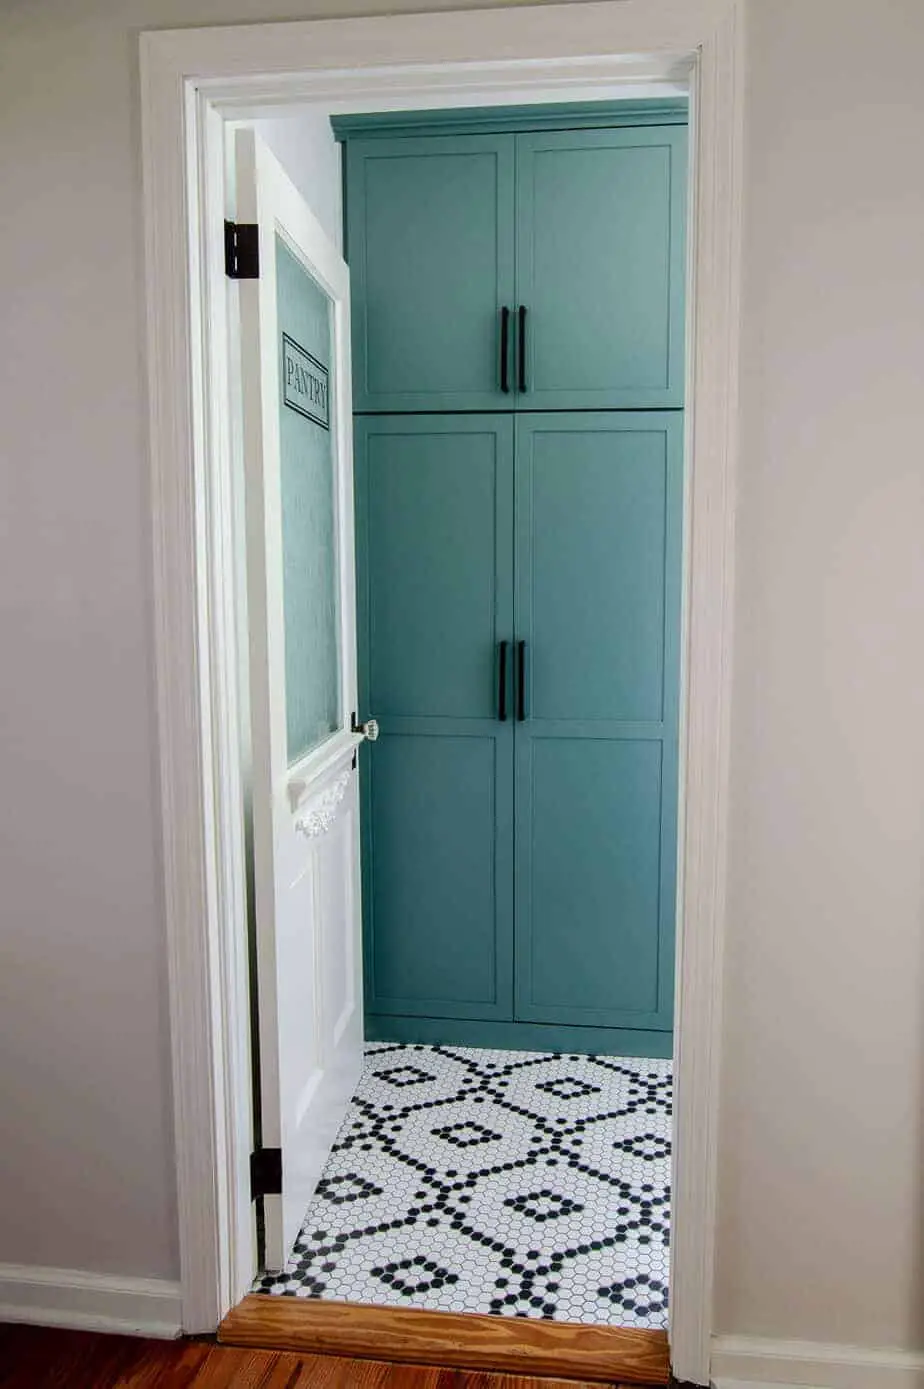
Cabinet color: Studio Blue Green by Sherwin Williams
*Affiliate links are included to help you find the products we used. See our full disclosure here.
Picking a favorite thing in this room is like picking a favorite child. It’s just not possible. I love it all, but the black and white hexagon tile floor seems to be the star of the show! Our guests that have seen it in person comment on the floor first.
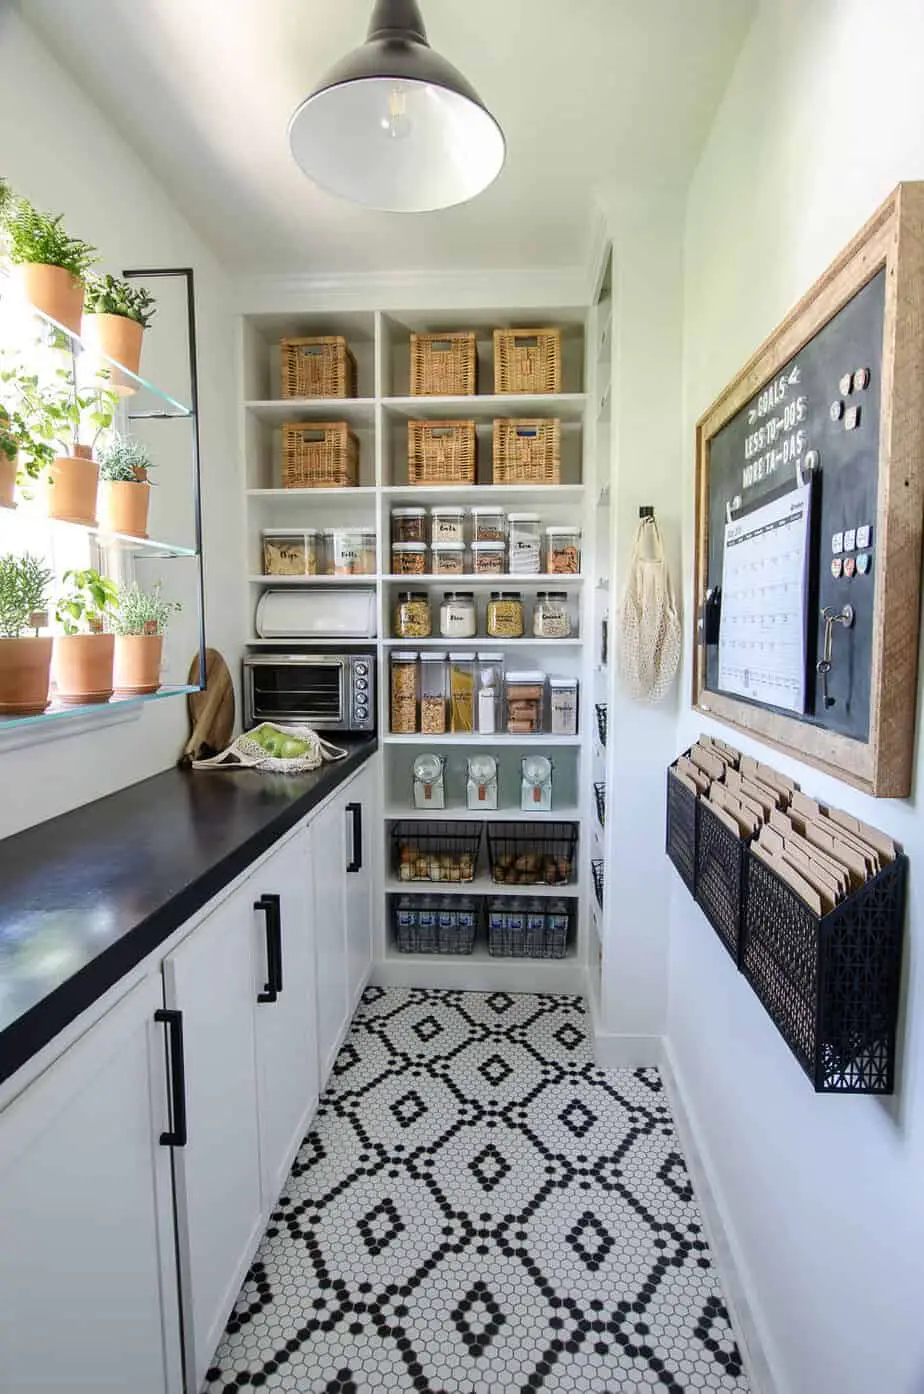
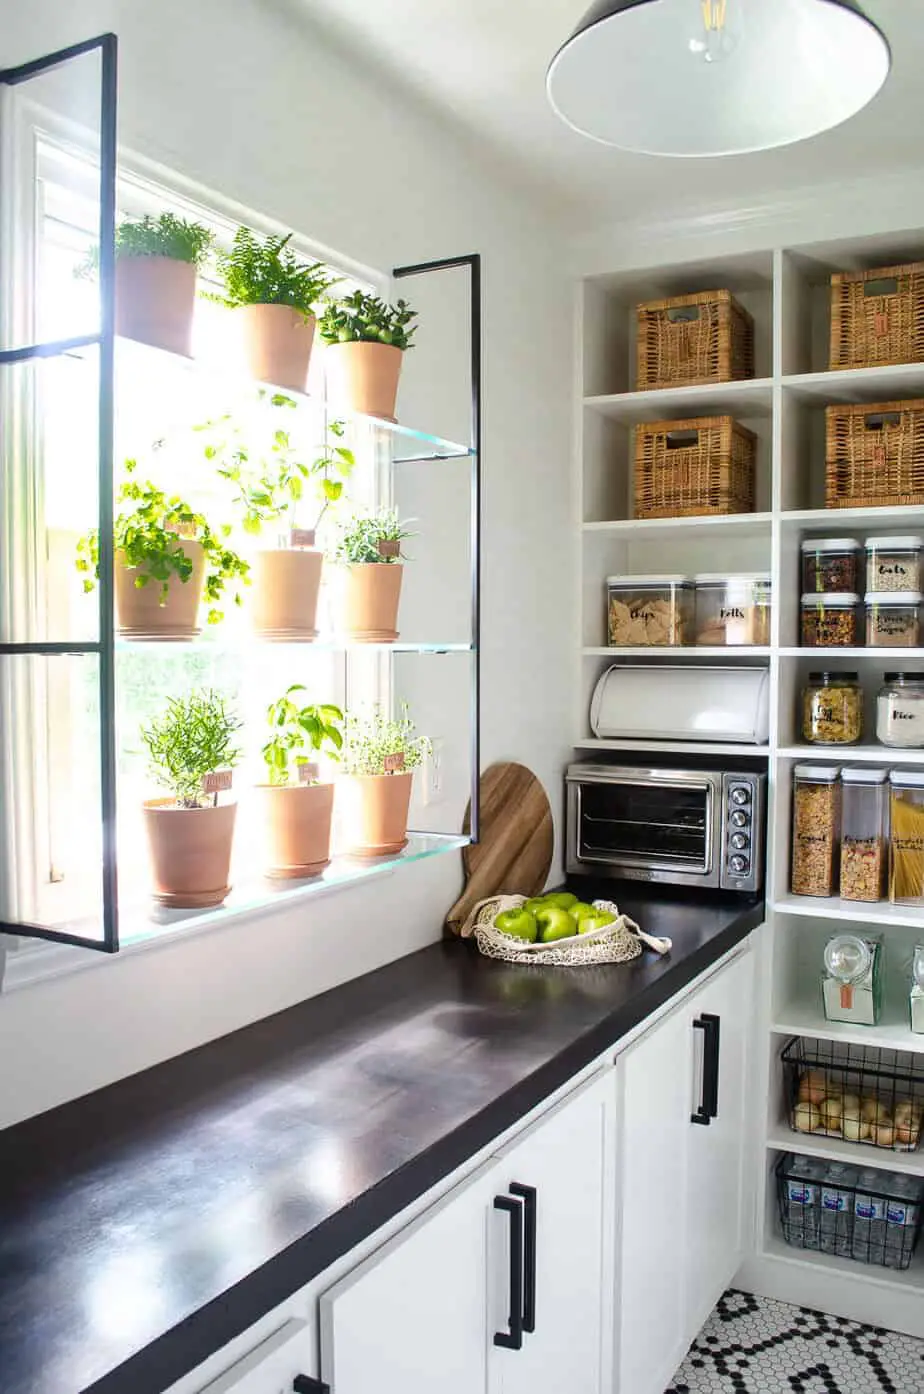
The concrete countertop should last for many years of bringing groceries in and for setting up the appliances stored in the lower cabinets.
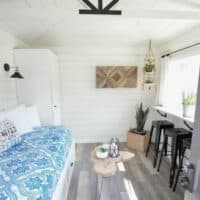
My husband, Jason, welded these 1/2″ steel window garden shelf brackets.
The pendant light is from Ikea. It’s the FOTO plug-in light that I painted matte black and rewired using vintage inspired black and white cloth wire and this modern canopy light kit. I bought the pendant 10 years ago for my boys room and had the wire left over from the wooden wall sconces we made for the guest room, so the light was pretty much a freebie. As much as I loved the industrial factory pendant light from Schoolhouse from my moodboard, it wasn’t in the budget.
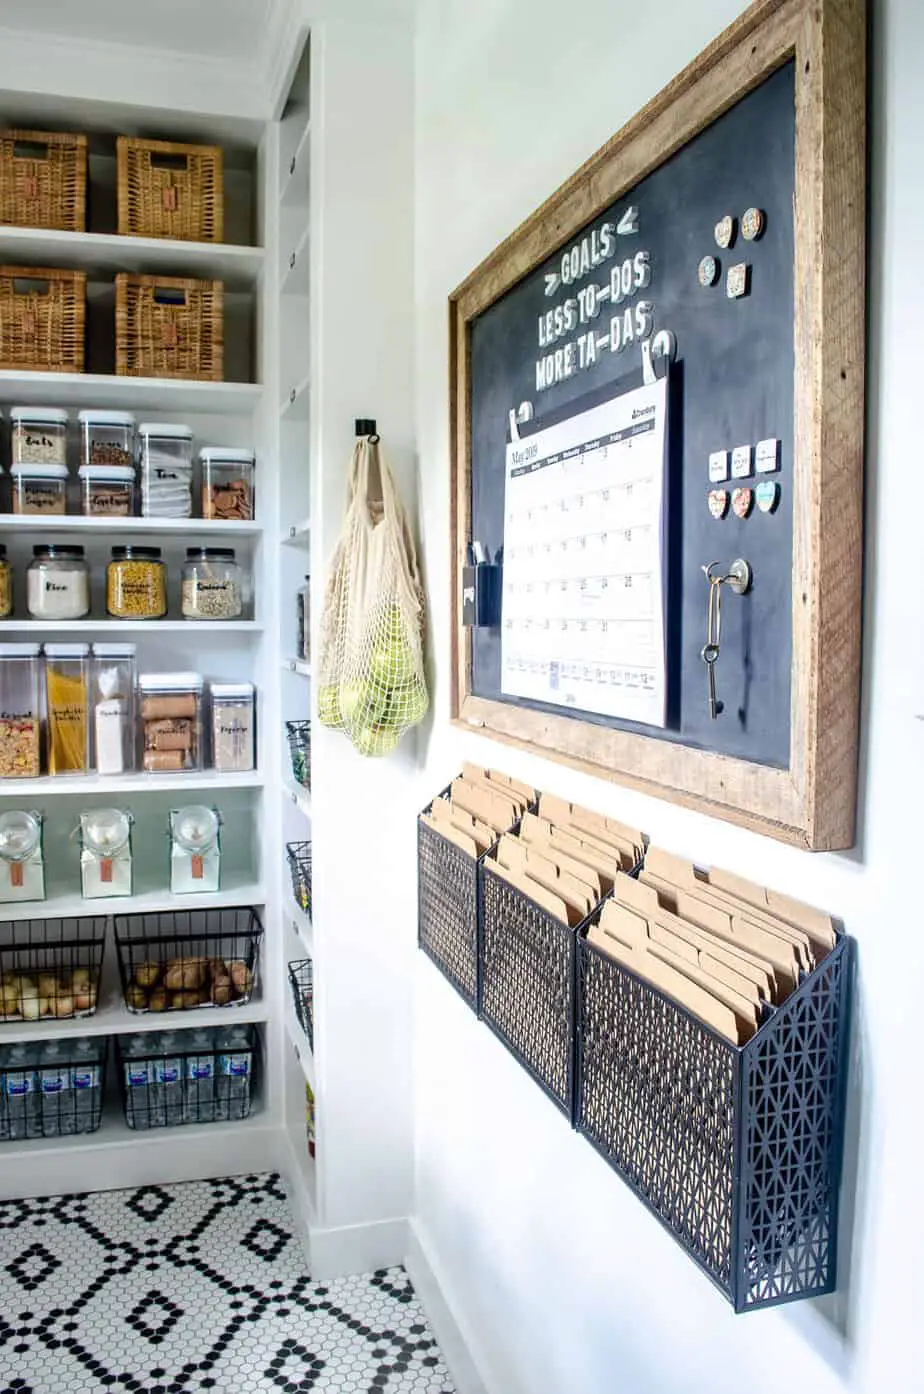
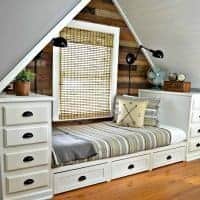
I honestly haven’t had time to organize our DIY command center yet. But now that all the to-dos are checked off, I can find a home for all of our paperwork.
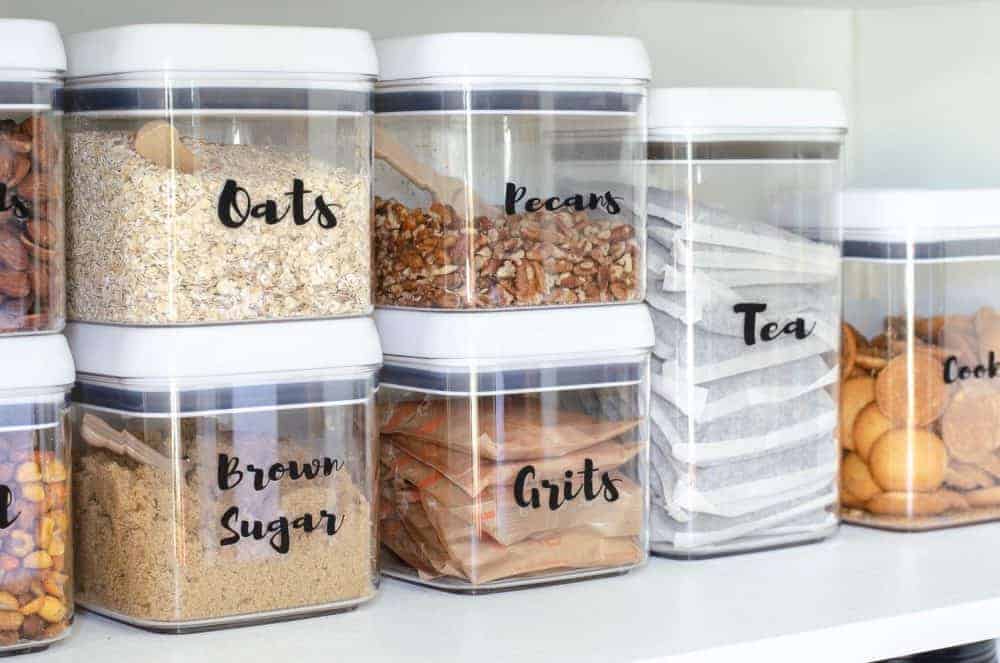
I’ve had so much fun getting our pantry organized over the past few days so I hope you are able to get a few ideas while you’re here!

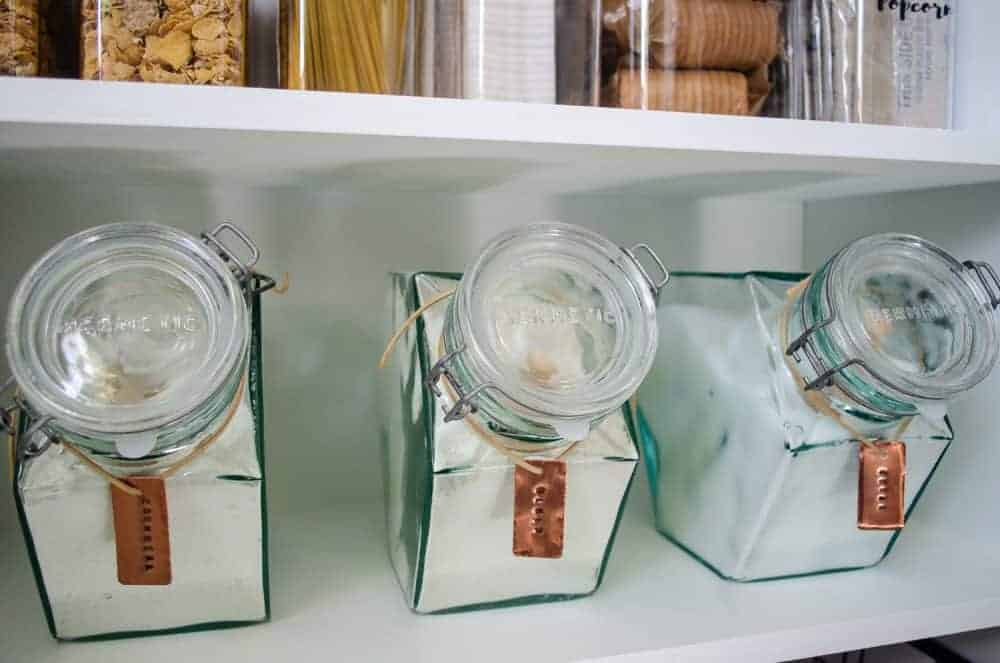
I labeled some of the jars and baskets with stamped copper labels using the same technique as the herb garden markers tutorial I shared last week.
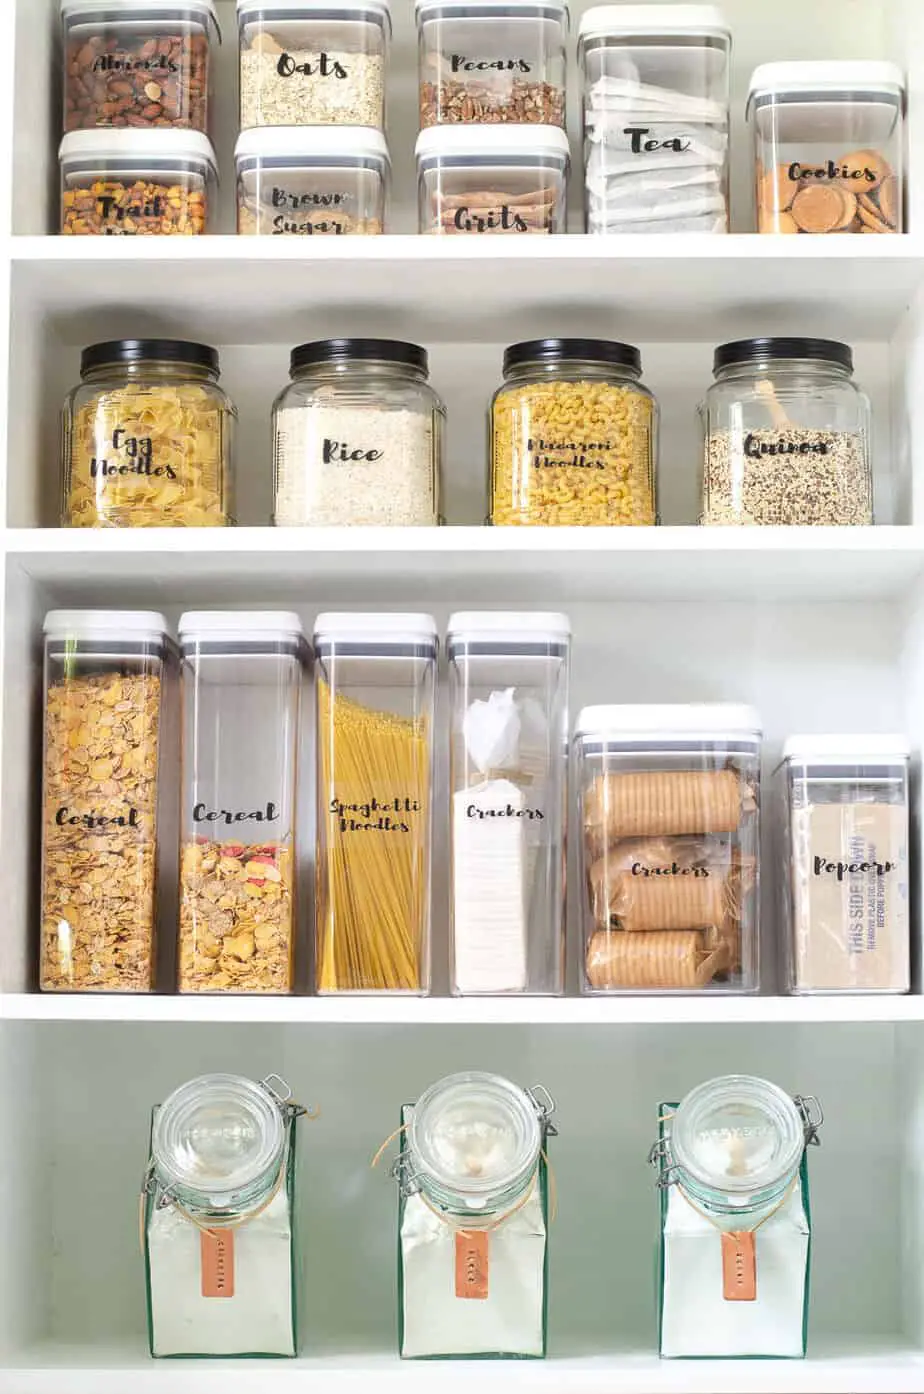
I’ll be giving a more detailed pantry organizing post in the future along with some freebie pantry labels you can print at home. Make sure you follow along by subscribing to the blog so you don’t miss out!

For a brief moment, I thought about cropping out the brown linoleum floor from the 80s in our unfinished kitchen in the background. Then, I remembered something my husband and I were talking about the other night.
Putting the love inside of a home takes time and having a good idea of what your home needs for your family. Even though we were trying to reach a goal under a set timeline, we were still able to enjoy the journey of designing and creating our dream pantry that our family will enjoy for years to come.
Be sure to check out the other participants of the One Room Challenge and I hope you continue to follow along as we renovate our 100-year old craftsman bungalow! You can find all the rooms we’ve finished so far by clicking this link.
PIN THIS IDEA FOR LATER:
CATCH UP ON ALL THE ONE ROOM CHALLENGE PANTRY ROOM POSTS HERE:
Week One: Design and Moodboard
Week Two: Hexagon Tile Flooring
Week Four: Magnetic Chalkboard + Command Station
Week Five: A Window Garden +DIY Herb Garden Markers

If organization is your thing, then you’d love how I organized our modern farmhouse master bathroom.
Check out our last One Room Challenge, the Modern Farmhouse Cottage Guest Shed.
We’re having a blast renovating every room in our 1915 Bungalow. Catch up on all the room makeovers and home tours we’ve shared so far:


I’m in love with that pantry door! Can you share where you found it?
I have a similar space in my kitchen that i am looking at walling off into a pantry. Would you mind sharing the dimensions of yours? I’d like to see what is doable and what needs to be nixed 🙂
Hi! Where did you get the file holders that are on the wall? Thanks! Love it all
Random question but where did you get your microwave from? Love all your ideas!
We have our microwave in the kitchen but the toaster oven that you see in the pantry is similar to this one from Amazon. The stainless steel model is no longer available. It takes longer to cook than the one we used to have but I like that it has 2 racks. I hope this helps!
Bonsoir,
Plein de bonnes idées, merci.
Je vais essayer de suivre vos transformations. Enfin si je trouve comment m’inscrire à la newletter du blog.
Bon week-end.
Good evening,
Lots of great ideas, thank you.
I will try to follow your transformations. Finally if I find how to subscribe to the blog’s newsletter.
Have a nice week end.
Gorgeous pantry, we have a similar situation, a small but usable space. What is the total distance between the wall and the cabinets (walking area).
That would help me tremendously.
Gena
Thank you, Gena! From the edge of the countertop to the wall is 36-1/2″. The large green cabinet is the same distance.
Where did you buy the jars with black lids? Live your Reno…very well done.
Hi Alesa,
The jars with the lids were picked up from Dollar General. I painted the lids since they were originally silver.
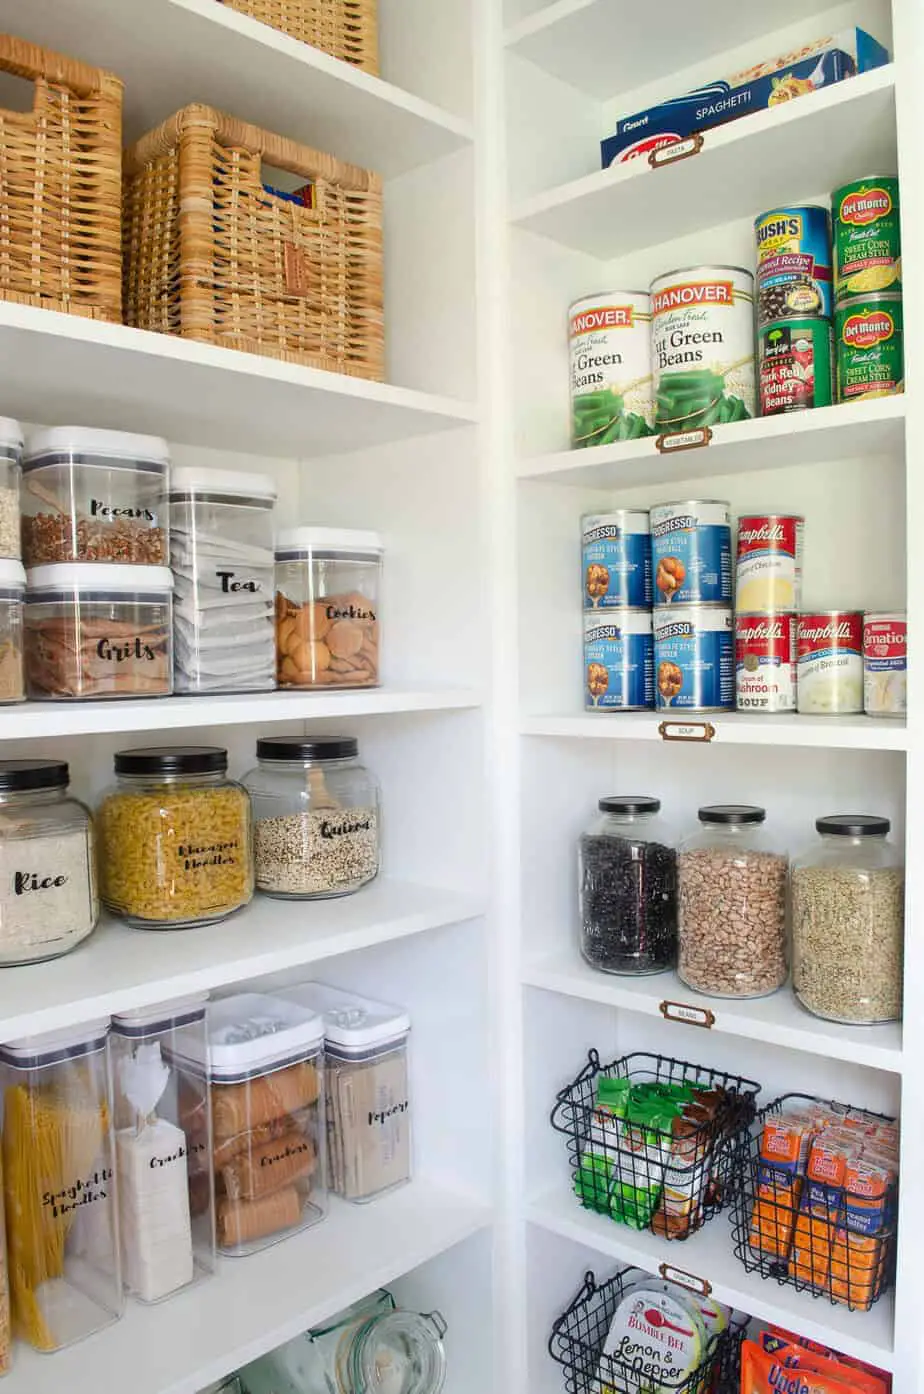
Hi! My husband and are planning out our similar sized pantry in our 1903 craftsman and are loving this inspiration! What depth are the shelves on your back wall and then the very shallow ones on the right next to your command center? Thanks!!!
Hi Sam,
Thank you so much! I’m happy you’re doing a similar remodel for your craftsman style home. The back wall shelves are 12″ deep and the depth on the right wall shelves are 7″ deep. I’ve been happy with the depth on the shelves but wish I had more width where the can goods are. Especially now, since I’ve been stocking up. Good luck with your project and let me know if you have any other questions.
Tricia
Where did you get the small labels that you put on the shelves with the canned goods?? This pantry is a dream!!!
Thank you so much, Emily! I bought a bunch of the label holders several years ago on Amazon and they don’t sell those exact ones but these are the same size and shape: https://amzn.to/2TxsAM8
I spray painted them with hammered copper paint so they’d match the labels I made for my jars. I hope that helps!
Could you tell me where your small and larger black wire baskets are from. Would like to use same type in my pantry. Thanks.
Rebekah Embree
Hi Rebekah,
The large baskets were from Walmart. I think they’re the medium sized ones here: http://www.walmart.com/ip/Better-Homes-Gardens-Medium-Wire-Basket-with-Chalkboard-2-Pack/441242683
The small baskets were hard to find in the right size and in black so I painted them then hot glued felt pads to the bottoms. They were from Amazon and the link is here: http://www.amazon.com/dp/B077NF1DJ6/?tag=siminthesou-20
I hope that helps!
Tricia
Wow! This is gorgeous! I so wish I had a pantry now……
Oh how I would love a dedicated pantry space! Beautiful job with this makeover. Love all the organization and pretty details!
Ah! I love this!! I wish I had a pantry as beautiful and functional as this one. This is insanely beautiful. I would love the window shelving for home-grown herbs as well. I don’t really have a great place to put it in our current house, but what a fantastic idea.
What a beautiful pantry!! Love the herbs in the window…nice to always have fresh herbs on hand! Did you know that nuts will last for ages in the freezer? I’ve had my walnuts go rancid anywhere else. I need to show my pantry some love…I’ll need to figure out how to make a concrete floor level and smooth first!! Thanks for the inspiration!!
Outstanding! I’m so impressed. I love the plant shelf!
This is SO special. Way to make a unique space in an old home amazing!! That tile is SO COOL!
That tile and that teal cabinetry is the best thing ever! It all looks so good, I hope you get to enjoy it and relax a little after all that work!
Incredible! Just an all-around stunning space. Love that cabinet color. And the floors. I’ve never seen a room like this in a home before and now I feel like I need it!
This is making my slightly OCD self happy dance! Function combined with beauty and I just love all the very cool details. Good job!
Wow, wow, wow! I love everything! I bought the stamper to make garden tags like yours and love how you used it in the pantry as well. Great job!!
Whoa! I’m seriously gobsmacked! This is an amazing transformation! That pop of teal is a jaw dropper and I’m loving all the organization. Congrats on a stunning reveal!
Gorgeous and organized pantry!
JAW ON THE FLOOR! Seriously, amazing! I just need to borrow hubby for a few projects!
The flooring is amazing. Plus the herb garden! Perfect!
Love your pantry!!! And the herb window! I’m working on designing my aunt and uncle’s new house (!) and and curious. If the pantry was 1 foot thinner (4 feet instead of 5 feet) would you feel too cramped? They will have a pocket door to enter, so I don’t have to worry about the inswing.
Thanks, Andi! I rounded up the width on the pantry, so it’s actually 4’8″ wide instead of 5′. I don’t think that losing 4″ width would make it feel cramped at all. We tried to follow some guideline/ rule-of-thumb that says that you need 36″ walking space but I think applies more to “working areas” like a kitchen or bathroom. Just for reference when you’re space planning, our countertop depth is 18″ and the cabinet depth is 16-3/4″. This ended up being more depth than we needed for the Instantpot and other appliances in the cabinets below but just enough room on the countertop for the toaster oven. Enjoy designing your aunt and uncle’s home!
I meant to type 16-3/4″ on the cabinet depth. Oops!
Thank you, thank you, thank you!!!
Tricia, this is the most gorgeous pantry I’ve seen in forever! You guys work so well together and it shows. You’ve also got an amazingly talented husband, you lucky devil. 😉 Can’t wait for the follow-up posts.
Aw! Your comment got me a little teary eyed (in a good way, of course). I do feel very lucky to have such a talented husband. I can show him a picture of an idea, and he has this amazing ability able to recreate it. The good thing is, he hates to paint and I don’t mind it at all. So I pick up where he left off.
You guys knocked this one out of the park! So beautiful and well done. Enjoy!
Thank you for your sweet comment! We’ve been enjoying the heck out of the pantry this past week. It makes bringing home the groceries a little more enjoyable.
This is absolutely beautiful. What an amazing job you did. Congradulations.
Thank you, Diane! I definitely have to give the credit to my husband for everything he did to make it possible. Thanks for stopping by the blog!
What a fabulous pantry…so organized! The black and white hex tile is my favorite floor ever!
I appreciate your kind words, Mary! The floor tile makes me smile every time I walk in the room. 🙂
Your pantry is gorgeous! Great job!
Thank you, Emy!
Wonderful job! Command center, green tall cabinet, window shelves, hex tile — love it!
I’m so glad you like it, Amy! Thanks so much!
Dream pantry. Excellent transformation
Thank you so much, Leslie! We’ve been really enjoying our new room…especially our boys!
this is one that I was SO EXCITED to see the after and it is even better than I expected! ABSOLUTELY GORGEOUS!!! LOVE the color of that pantry cabinet too my gosh
Thank you so much, Carmen, for following along and for your kind words!
This is an absolute dream! That floor and cabinet color are incredible, but my favorite part are the plant shelves in front of the mirror. I just love everything!
I’m so happy that you like it! I originally planned on putting 2 sets of shelves on either side of the window but I’m glad we went with the window garden instead. And the herbs are loving the sunlight so far!
Wow!! That floor is stunning, and I love how you organized everything. You did such an amazing job!
Thank you so much, Leslea! When we finally finished the floor, my husband shook his head and said we’re never doing this again. But I think the trauma is over and we’re both so happy we did it. Thanks for stopping by!
It’s perfect! Love the plants in the window and all the organization!
Thanks, Allison! It feels so good to have one more room in order in our home. It feels even better to have finished everything on time. Now we can relax for a bit.
How lovely! As one who does not have a pantry at all I just want to ask: can I move in? 🙂
Thank you, Angela! I’m so glad you like it. 🙂
This is life changing! What a great reveal!
Thank you, Megan! It’s definitely made us a stronger couple getting through this without a (major) 😉 argument. And we’re all gonna enjoy the heck out of our new pantry!