Knock-Off Ballard Designs Repurposed Shutters Bathroom Shelf
A funny thing happened while my husband, Jason, and I were sitting on the couch last week watching Fixer Upper.
During a commercial, Jason starts flipping through the latest Ballard Designs catalog. He sees their shutter shelf for $259.00, looks at me and says, “We could totally make that out of those shutters in the garage.”
He gets all the heart eyes when he comes up with spontaneous projects like that.
So, we paused the show, head to the garage and got started on what would become our version of Ballard Design’s shutter shelf for only $7.00!
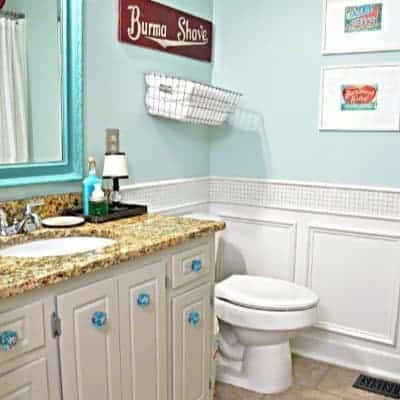
This solved two problems for us. We were able to repurpose shutters we already had and we were able to make a bathroom shelf for over the toilet to add more storage. Win, win!
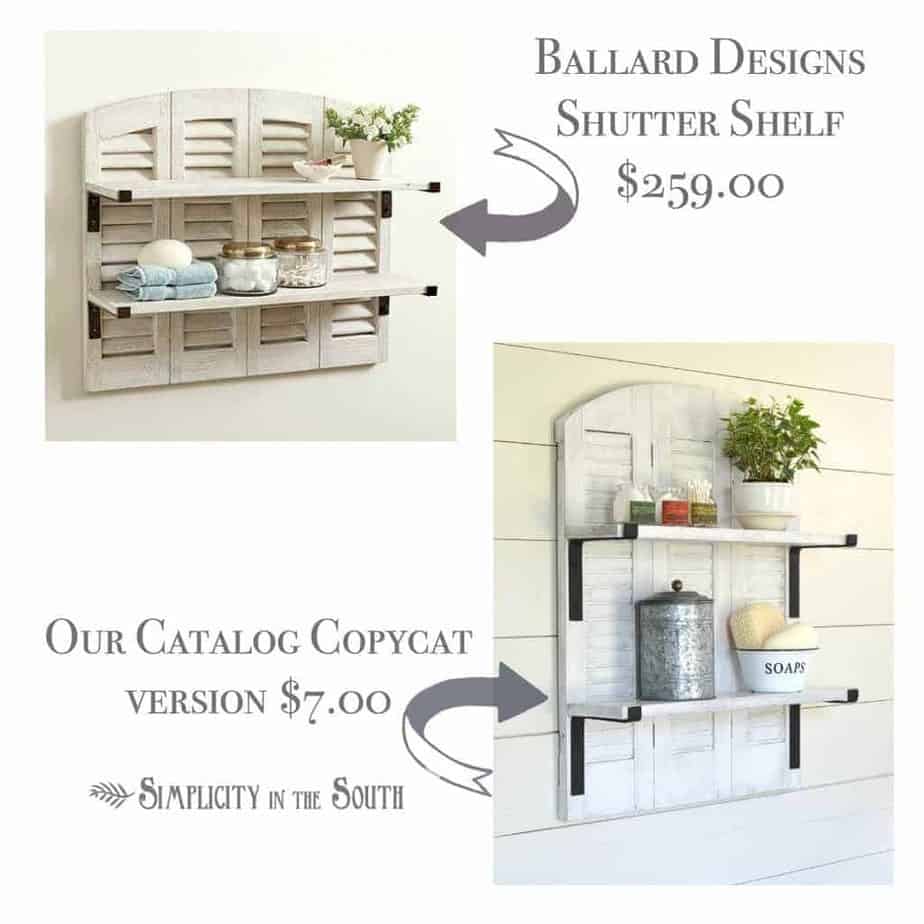
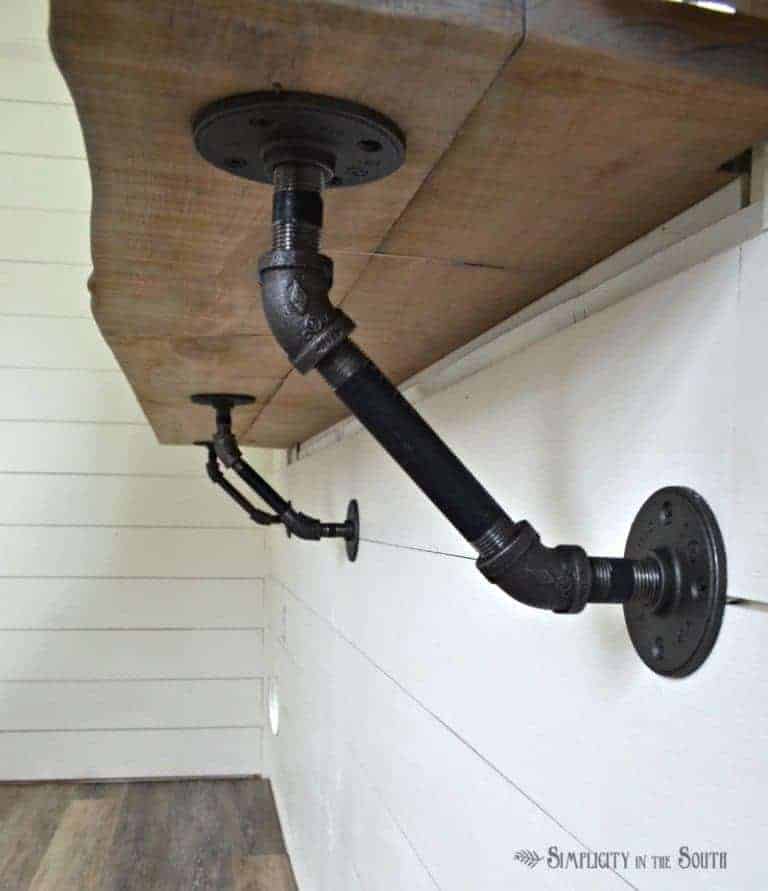
We had everything on hand except the industrial farmhouse style brackets to make the shelf. We couldn’t find anything like them in the store, so we made them ourselves for $1.00 per bracket. Check out the end of the post for the link to the DIY farmhouse metal brackets.

(Affiliate links included for your crafting convenience.)
Old shutters (Check out your local Habitat for Humanity, Ebay, Etsy, or Craigslist.) I found these 6 years ago at a local thrift store
1/4″ plywood ripped down to 2″ strips or use lattice strips
1″x 6″ board for the shelves
Wood Glue
Brad Nailer / Staple Gun and 1/2 ” staples
For the final paint finish, you’ll need:
White Primer, Annie Sloan Clear Wax, Mineral Spirits, Black Chalk Paint, Fine Grit Sandpaper, Buffing Cloth

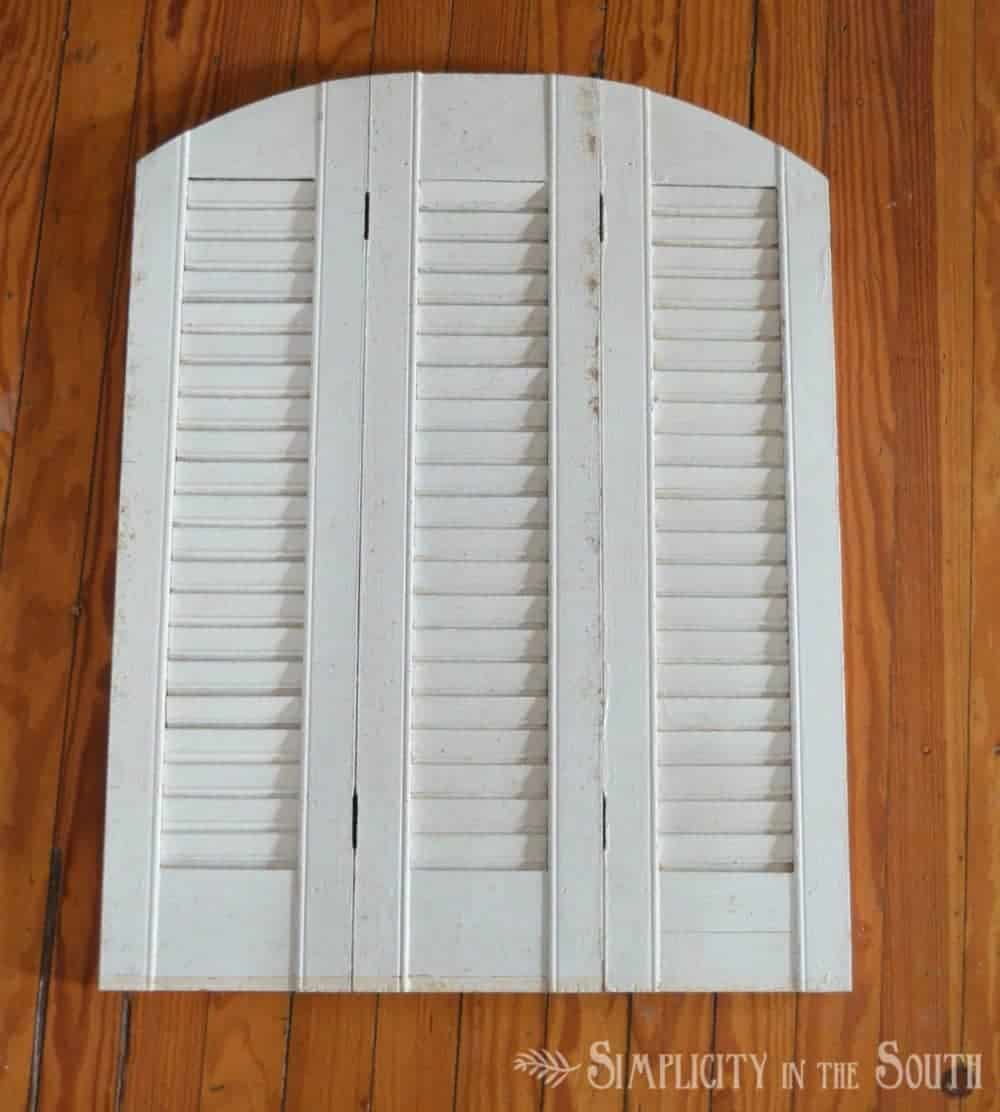
We decide to go with 3 shutters instead of 4 because the proportions were better for an over-the-toilet-shelf.
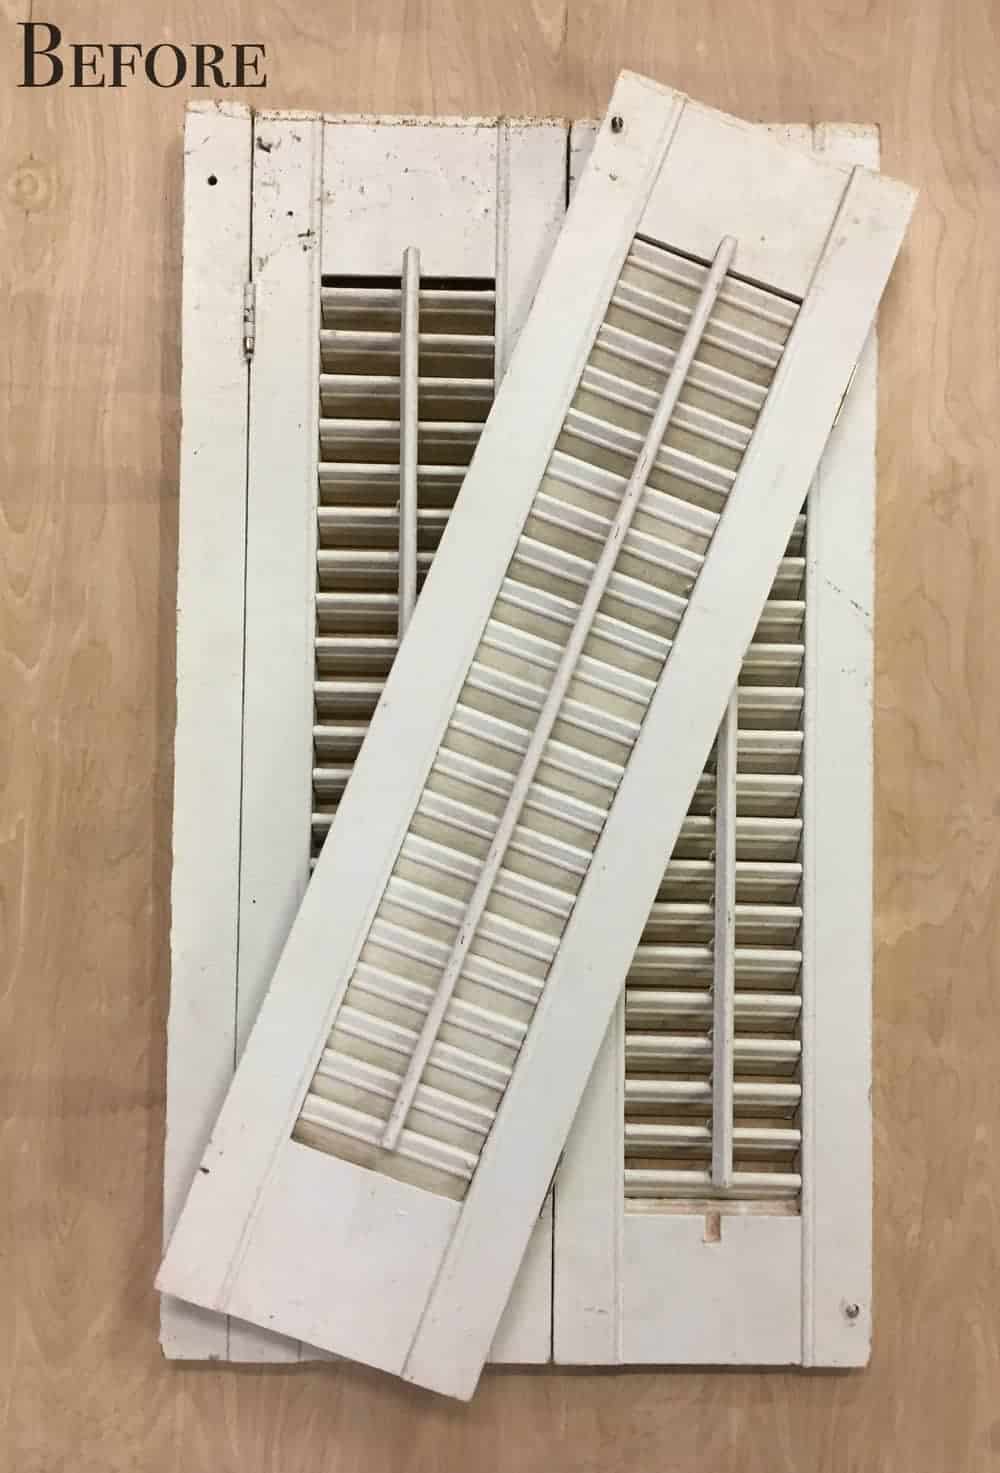
The first thing we did was remove the hinges.

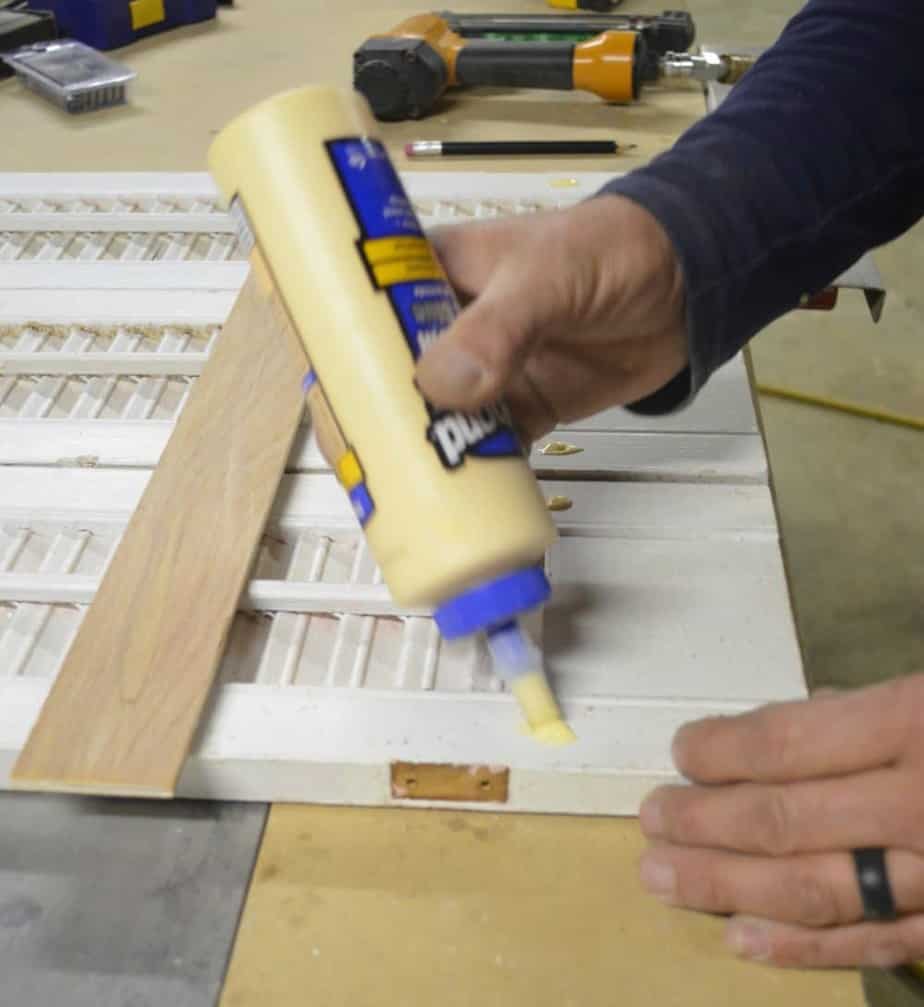
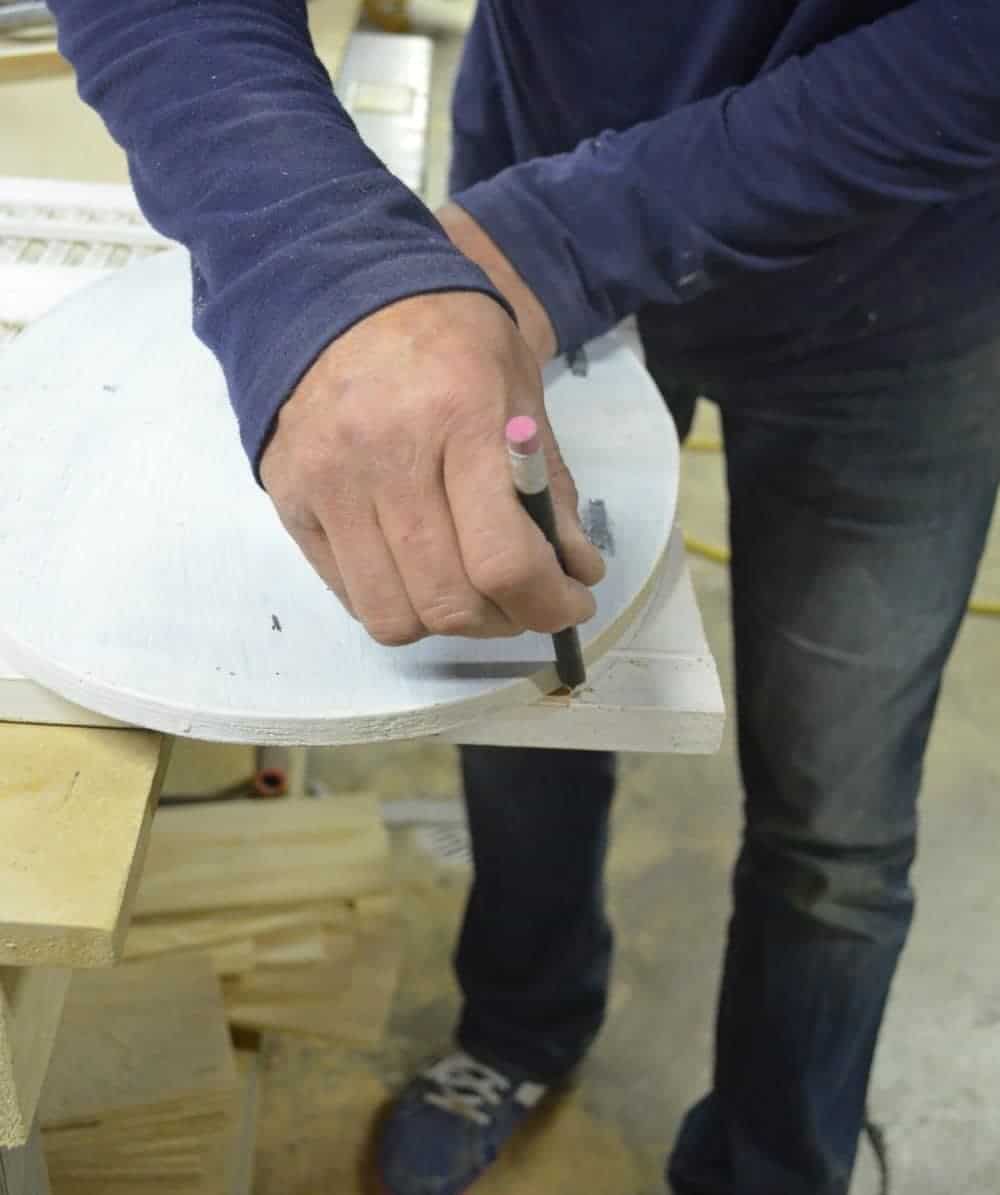
Next, we lined up the shutters and connected them together using wood glue, scrap 1/4″ plywood, a bar clamp, and staples using the pneumatic staple gun. On the top end of the shutters, we attached the plywood strip about 2″ from the edge. That’s the side that we’ll cut the arch.
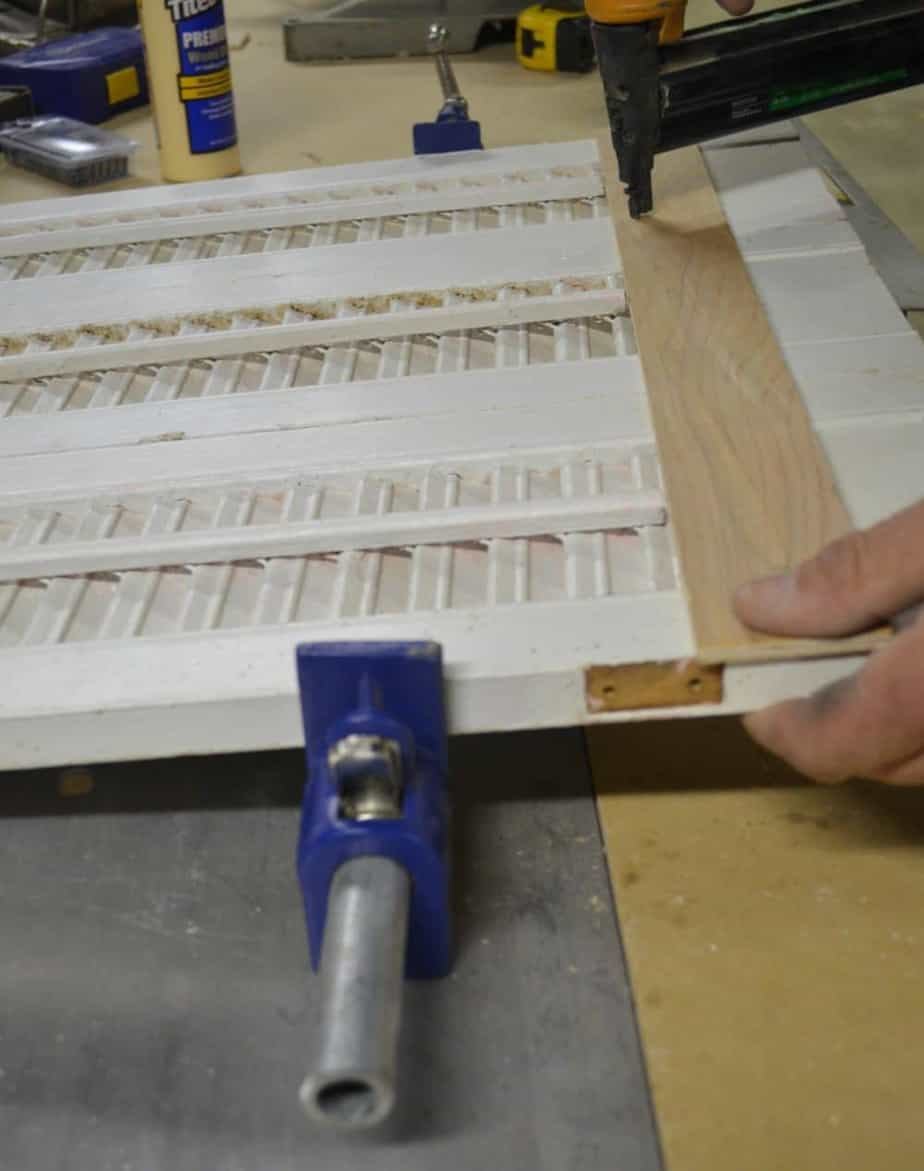
On the bottom side, we stapled the strip along the edge.

We traced a curve along the top of the shutters.
Then we cut the arch using a jig saw.
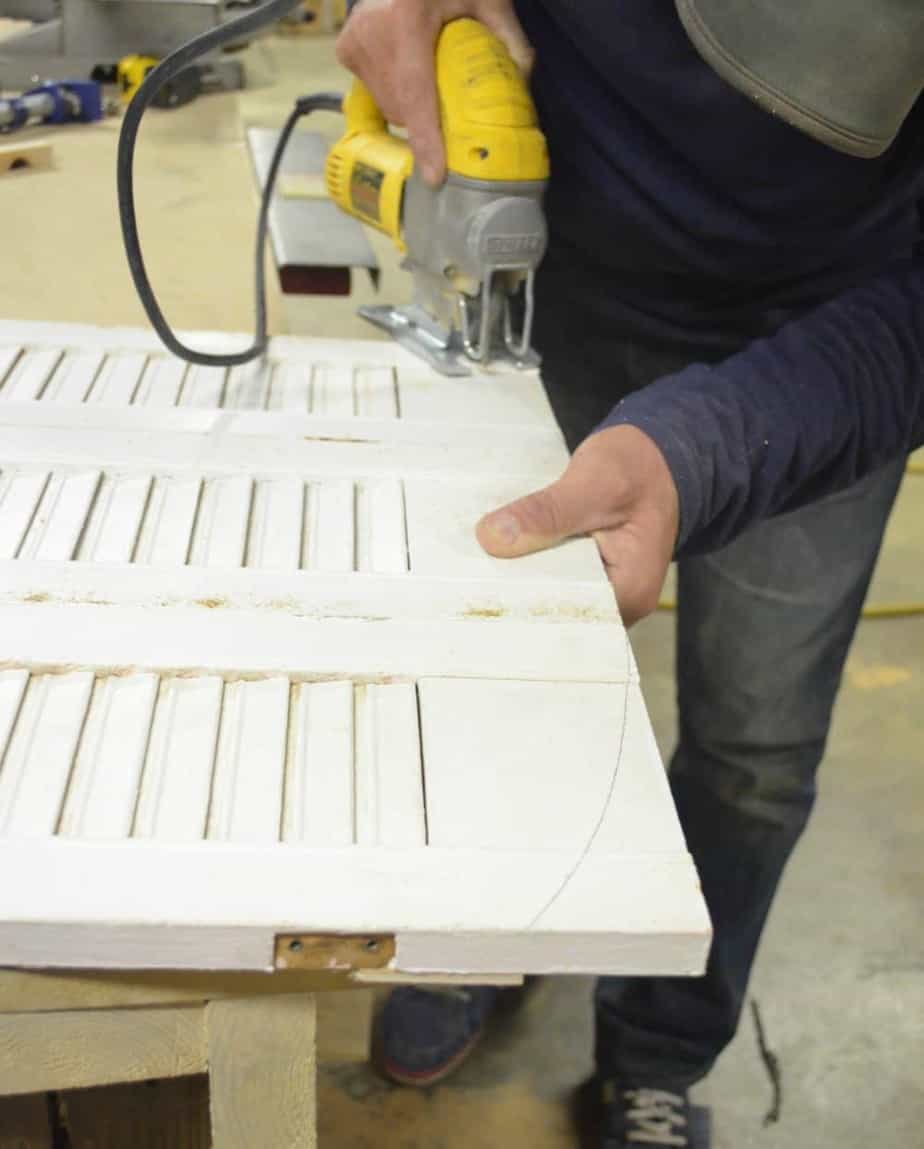
Now, it’s ready for some paint, shelves, and brackets!
For the next step, we cut a 1 x 6 to make the shelves. I let my 11-year-old son get rid of some energy by giving the shelves a distressing with the hammer and a nail set. Have at it, Mason! Then, the shelves and shutters were given a couple coats of white primer.
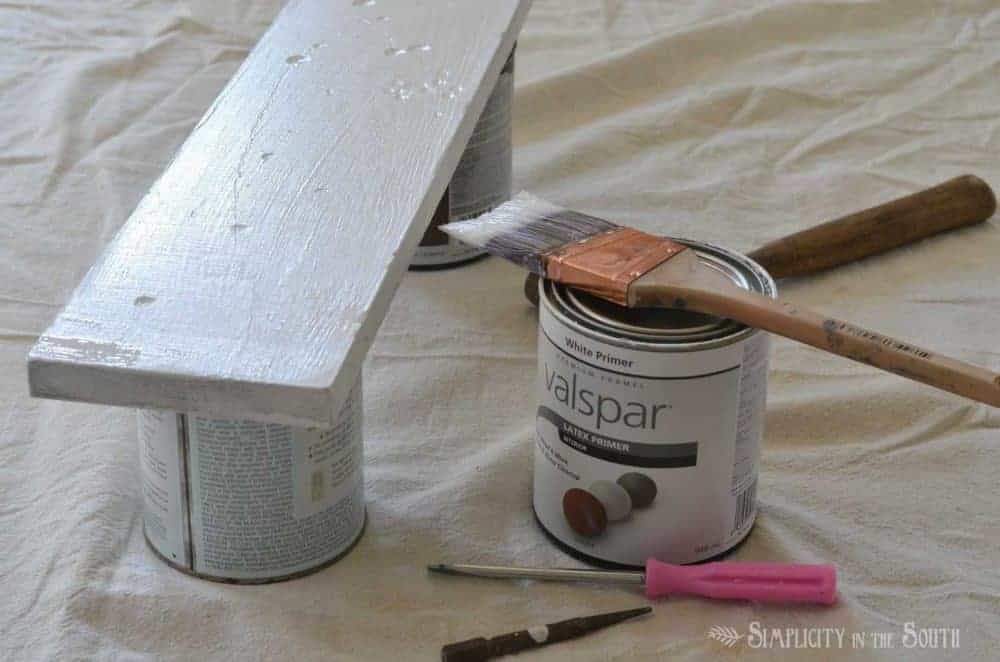
My experimental side wanted to try making my own antiquing wax, so I mixed up a batch and used it on the shelves and shutters right over the primer.
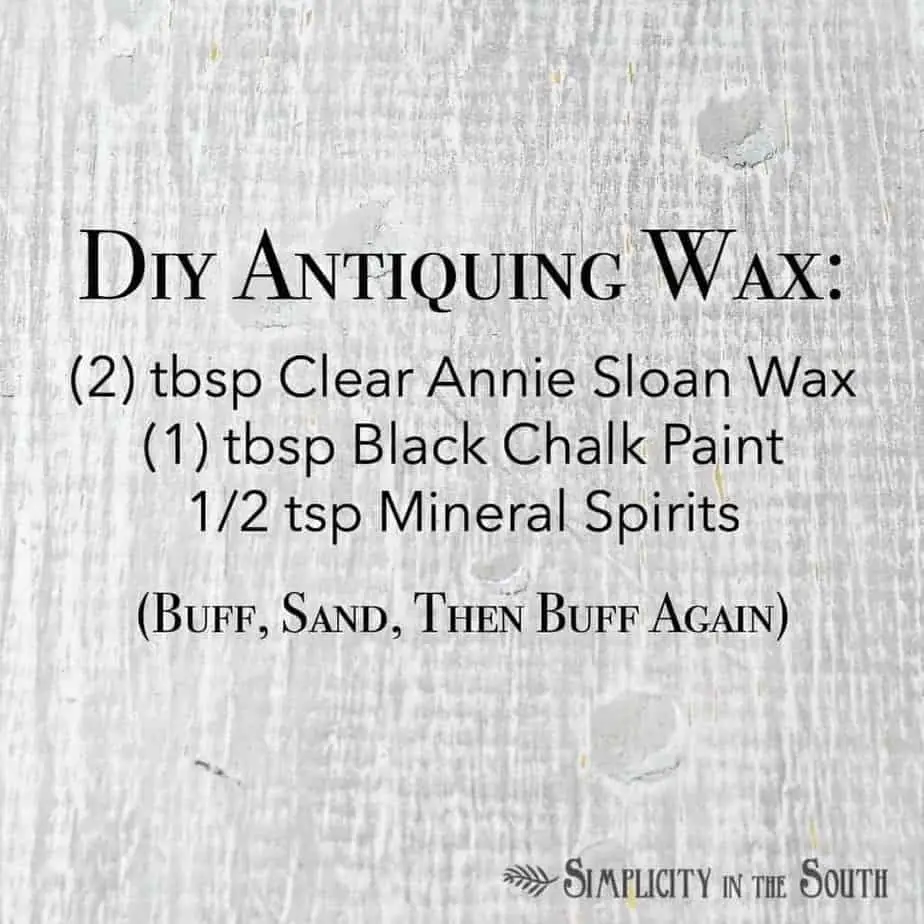
I normally use Miss Mustard Seed’s antiquing wax, but I’ve run out. I prefer hers because it doesn’t give the paint a brown tint like Annie Sloan’s Antiquing Wax. This DIY antiquing wax is the closest I could come up with on my own but I may have to modify it a little to get the right consistency.
Tip: If you get too much antiquing wax on your project, you can remove some of it with clear wax, mineral spirits or sandpaper.
I’m smitten over our catalog copycat version for a few reasons…this is authentically vintage and the proportions are just right for over the toilet. Oh, and we saved $252 building the repurposed shutters bathroom shelf ourselves!

galvanized tin (sold as a set of 3) // enamel soap dish

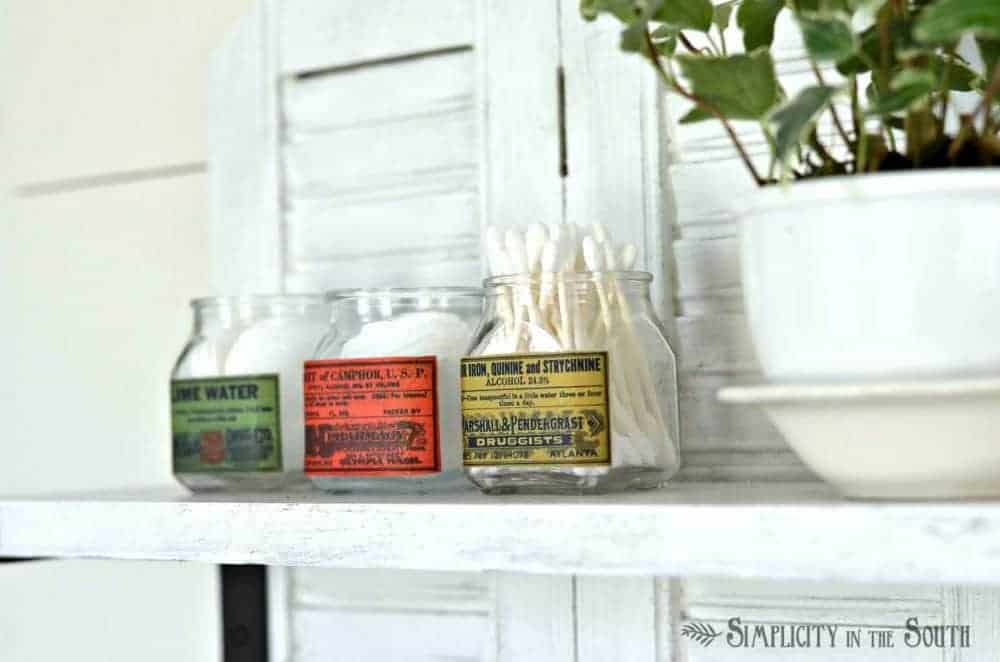
Click here to see how to make the decoupaged vintage apothecary jars.
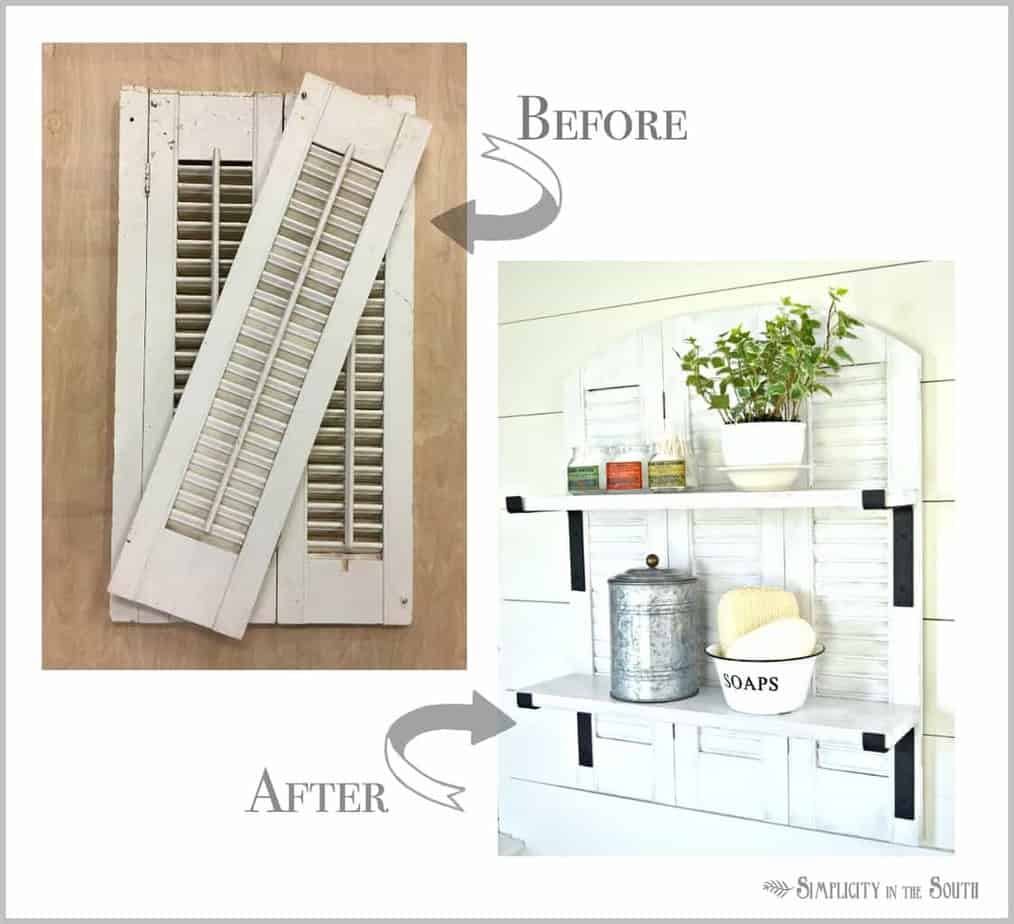
Lots of projects are going on behind the scenes over at our 100-year-old bungalow. This Ballard Designs inspired shutter shelf is going in our master bathroom and it looks awesome with the shiplap walls!
Head over to this link to see how you can make the DIY farmhouse-style metal brackets!

Do you love catalog copycat projects as much as we do?
Check out the rest of my catalog inspired knock off projects here!
I hope this inspired you to make your own bathroom shelf.


![[Room Reveal] Our Vintage Modern Powder Room Remodel](https://www.simplicityinthesouth.com/wp-content/uploads/2019/01/Vintage-Modern-Powder-Room-reveal-1-768x471.jpg)
Tricia, I have a ton of salvaged shutter doors from a huge built in at the back of our new old house that we had to demo out to make room for a new sliding glass door. This is the perfect idea to re-purpose them! I can’t wait to try it!
Hi Lori,
Perfect! I’m glad you’re able to find a way to repurpose them.
I absolutely love any project using old shutters. We have a pair of jalousie/rounded top shutters I bought somewhere ages ago, think this would be great idea for them. That or found 2 sets of shutters at habitat last Saturday, price not clear and nobody around to ask. Would have bought them for sure. I rarely pass up shutters. Just never know when project will come up. Would like to use them to make your awesome shutter shelf project for our guest bath, needs more storage. Wall room lacking in master bath.
Have to say I love catalog knock -offs so will be looking into more of yours. Your Mr. is pretty sharp fella along with his Mrs.. Sounds like he shares your visions, have no idea how lucky you are.
What you two did to make an incredible master bath is phenomenal, love it so much. Would your Mr. like to come to CO to make a concrete countertop for a buffet I think would make a snazzy vanity in our bathroom. And kitchen counters? If you saw our kitchen counters you’d know why we need anything but what is there, UGH! Have been trying to convince my Mr. could use some laminate flooring for kitchen counters, saw it at least couple years ago on blogland. My old head is so full of projects would love to do for our house. Flooring is out in shed just waiting.
We have single wide mfg. home, 16×80, 3 bdrm. 2 full baths. It needs some work done. Was all could do to get Mr.to help me paint 3 yrs. ago and had waited for 8 yrs. to get that done. Still needs more done. I have limitations of what I can do so need help with projects, very frustrating to me.
Have wonderful rest of week, stay cool.
Thank you so much! We sound so alike. I was just at my Habitat for Humanity store last week looking for more shutters too! I found some beautiful green ones but too many of the slats were broken. So heart broken. I do feel very lucky that my husband shares the same passions that I do. We push each other to keep doing what we love and he inspires me to be more creative. Sounds like you have some great ideas for your home! Thank you so much for stopping by and I hope you get to make your own shutter shelf soon!
I’d love to know how you made those brackets. Every link I click on to find the information leads to a 404 Error page. Would you mind sharing another link or perhaps the web address to the directions. Your shelf looks great! Thanks for sharing!
Tricia — I was able to do a search and find the tutorial on making the brackets! That’s a nice You Tube Video your husband made.
Thanks,
Kim
Thank you, Kim. And thanks for letting me know about the 404 Error Page. I got it fixed to today. I’m glad you were able to find the post. 🙂
I can’t even EXPLAIN how gorgeous this is! Great job and thank you so much for sharing the DIY version!!!
Oh my gosh, I love this! I don’t know if we have any shutters laying around anywhere, but I may have to go dig around now. 🙂 I can totally see this going outside, also, and filling the shelves with plants. Thanks for sharing!
Love it and so thrifty. Could you please tell me where the brackets come from. Thanks
Thank you, Starr! I’ll have the tutorial on how we made the brackets first thing in the morning. We made ours for about $1.00 per bracket. If you don’t want to make them, you can find them on Etsy under “farmhouse shelf brackets” for about $12.00 each.